Showing posts with label pizza. Show all posts

Wednesday, February 3, 2010

Hot Pepper 'Za


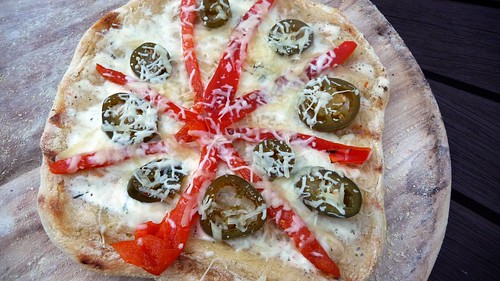
hot pepper 'za, originally uploaded by Kim De.

Pizza is one of my favorite foods. When I was a single gal, I ate it frequently. My friend, Autumn, shortened it to 'Za and the zippy term has stuck.

Speaking of zippy...


This "'za" was incredibly spicy! It was also amazing on flavor. Don't hesitate to try it, as you can very easily control the amount of heat.

Now the fun thing with this is I made it up so there is no formal recipe. I didn't measure the veggies, just added what I had prepared until it looked like enough.

Doesn't it look good?


It is! So without further ado, I present to you,

Hot Pepper 'Za

One recipe pizza dough (I used this recipe)
Poblano peppers, roasted and cut into strips
Jalapeno pepper, roasted and sliced (optional)
Red bell pepper, roasted and cut into strips
Red onion, sliced thin and pre-cooked (I sauteed with salt until soft)
Good quality white cheese, Monterey Jack, Sharp Provolone, etc, shredded


Roast the vegetables over a gas flame, or place on a baking sheet and broil, turning frequently, until all sides are charred. Place in a paper bag to steam for 5-15 minutes. Rub gently under cold water to "skin" most of the black pepper parts.

Preheat the oven to 550.

Press the pizza dough into the shape you wish to use. Slide it onto a cornmeal covered pizza peel or onto parchment paper. Let it rest about 5 minutes then press more until it is the desired size. (We make ours to a 8-9 inch round)

Sprinkle a small amount of cheese onto the dough. Begin to lay the poblano peppers in a pin-wheel shape around the dough. Lay the red bell peppers down next to them. Add as much or as little as looks good to you.

Sprinkle the red onion around the crust then lay the jalapeno slices over the top. Sprinkle with more cheese then place in the oven for 6-10 minutes (depending how hot your oven is). The cheese will be bubbly and the crust a light brown. Carefully remove and loet cool for 5-10 minutes before slicing.

Enjoy!

Sunday, November 22, 2009

Spinach, Caramelized Onion and Bacon Pizza


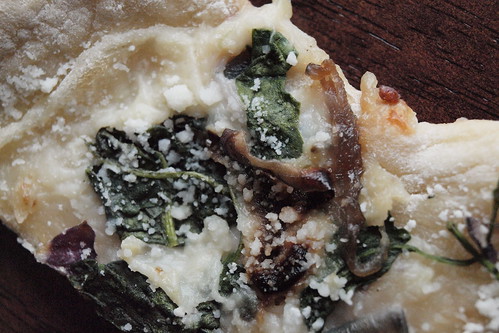
PB220816, originally uploaded by Kim De.

Don't laugh at the tiny slice of pizza in the photo. That is all that was left and I had to hide it to get my picture!

I chose this pizza for a few reasons. First, I rarely make pizza with meat, and I never cook bacon so this recipe seemed a good one to do both with. Lastly, it is adapted from Cooking Light so I knew it had to have a smidgen of good health inside it.

Unlike most recipe I make, I followed this almost exactly. We both really enjoyed it but honestly, we couldn't taste the bacon. With that declaration, we will try this again, substituting mushrooms for the bacon. I really do prefer pizza without meat!

Spinach, Caramelized Onion, and Bacon Pizza (From Cooking Light)

NOTE: for the crust, I used this recipe. If you decide to try it, is requires an overnight rise in the refrigerator.

Topping:
4 bacon slices, chopped
1 (10-ounce) package fresh spinach
2 cups (1/4-inch-thick) sliced onion
2 teaspoons sugar
1 tablespoon butter
2 garlic cloves, minced
3 tablespoons all-purpose flour
1/2 teaspoon freshly ground black pepper
1 cup 2% reduced-fat milk
1 tablespoon cornmeal
1 cup (4 ounces) grated fresh Parmesan cheese

NOTE: I made the dough following this technique. My other changes are in BOLD

To prepare topping, cook bacon in a large nonstick skillet over medium heat until crisp. Remove bacon from pan, reserving 2 teaspoons drippings. Set bacon aside. Add spinach to drippings in pan; sauté 2 minutes or until wilted. Place spinach in a colander, pressing until barely moist. Add onion and 2 teaspoons sugar to pan; cook on medium high for 2 minutes, stirring frequently. Slowly turn the heat down to medium low and let the onion caramelize for 30 minutes. Remove from heat; cool.

Melt butter in a medium saucepan over medium heat. Add garlic; cook 2 minutes, stirring frequently. Add 3 tablespoons flour and pepper, stirring with a whisk; cook 30 seconds. Gradually add milk, stirring constantly with a whisk. Cook 5 minutes or until thick and bubbly, stirring constantly with a whisk.

Preheat oven to 475º.

Roll dough into a 12-inch circle on a floured surface. Place dough on a (12-inch) pizza pan or baking sheet coated with cooking spray and sprinkled with cornmeal. Crimp edges of dough with fingers to form a rim. Spread milk mixture evenly over dough; top with spinach and onion.

Bake at 475° for 20 minutes. Sprinkle evenly with bacon and cheese; bake an additional 5 minutes or until golden brown. Cut pizza into 8 wedges.

Saturday, October 24, 2009

White Pizza


Hopefully better pictures are soon on the way...

Last night we did a simple pizza with a green salad. After much research I decided on a White Pizza. After looking at numerous recipes I decided using elements of different recipes and making my own.

I started out making an 8-inch pizza dough, rolling it out and letting it rest while pre-heating the oven to 550 (for about 40 minutes)

Next I crushed and sliced 4 cloves of garlic and slowly simmered it in 1-2 T olive oil (I didnt measure) and sea salt, being careful not to let it brown. This was poured into a small bowl to let cool.

Then I thinly sliced 1/2 of a yellow onion and did a quick par-cook in the pan that formerly held the garlic. While the onion softened, I did another thin slice, this time on a ripe tomato.

Now for the cheese: I finely diced a small chunk of part-skim mozzarella and a small chunk of provolone and tossed them together in a bowl. I placed them back into the fridge until needed.

I turned my attention back to the dough, using my fingers to push it out one last time before using my new pizza peel to slide it into the hot pizza stone for 2 minutes, pulling it out and turning it over to dress.

It was then time to construct the pie:

The olive oil and garlic were brushed onto the crust. The soft onions were sprinkled over next, then the tomatoes were placed around the edges. Finally the cheese came out and was sprinkled over the waiting ingredients. The final step, the hot oven. After it spent 7 minutes on the hot stone, it was pulled out, sliced and eagerly placed in our mouths!

It was great! The only changes I would make would be to use red onion for stronger flavor, a bit less oil and a bit less cheese - if you know me at all you are surprised by this statement, but it overpowered the onion and tomato - but overall it was a great pizza!

In case you are wondering, it goes wonderful with a green salad and a glass of chianti, followed by a chocolate biscotti!
Posted by Picasa

Friday, August 28, 2009

An experimental pizza


canadian bacon pineapple za, originally uploaded by Kim De.

An exciting thing happened Thursday night. Bo told me that he remembered that is was pizza night and got excited! - Remember, this is the boy who DOESNT LIKE PIZZA! He has, however, decided he likes mine, and likes them so much that he looks forward to a pizza dinner!

Thursday's offering was a variation on the pineapple/canadian bacon pizza. I am usually not a fan of pineapple on a pizza, but Bo likes it, so I wanted to make it for him. I was thinking that roasted poblanos might add a touch of heat as well as the smoky flavor to tie in with the canadian bacon - then it hit me. If I was going to roast the pepper and quickly grill the bacon, why not also grill the pineapple!

To construct, I decided to put a thin layer of marinara on the homemade crust before laying down the thin slices of poblano pepper, roasted and peeled. I wanted that to be the highlight, so only one chunk of char-grilled pineapple and one square of bacon was placed between the peppers. Then a few small slices of fresh mozzarella were placed on top before sliding the pizza into a 550 degree oven. 7 minutes later it was ready to come out and after a brief rest, it was ready for slicing.


Bo enjoyed his favorite flavors of pepper, canadian bacon and pineapple together and I was able to handle the pineapple because of the char flavor, and meat because I love my husband. :)

Tuesday, August 18, 2009

Pizza on an off night


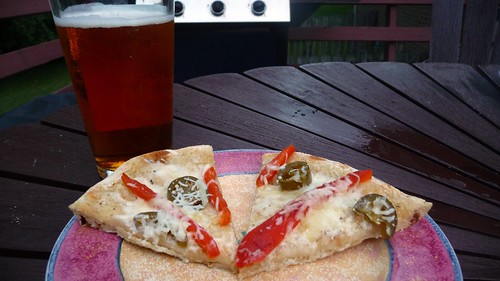
jal/ranch, originally uploaded by Kim De.

We are out of town part of this week, so we are switching things up a bit. I was craving pizza tonight and I knew the best way to break it to Bo - jalapenos!

I have been looking for a reason to make a pizza with my homemade ranch dressing and spicy jalapenos seemed the perfect contrast for the coolness of the ranch. Oh, one last thing - I grilled it

I started off by pulling our new favorite pizza dough out of the freezer. After it thawed, it was easy to poke and punch it into a slightly round shape. Now this pizza ended up being a collaboration. My plan was to round out the veggies with tomatoes but when Bo suggested red peppers, it made so much sense to roast them to finish things off. A light sprinkling of mozzarella and provolone cheeses held everything together while helping the ranch keep things cool.

We both loved the mix of flavors on this pie and will be using this one again!


Jalapeno Ranch Pizza

Pizza dough pushed or rolled into an 8-inch circle
1/2-1/3 cup of your favorite Ranch Dressing (or to taste)
1/2 large red pepper, roasted, peeled, seeded and julienned
8-10 pickled japapeno slices (or more to taste)
1/2-3/4 cup shredded italian cheeses ( any mix you choose: mozarella, provolone, parmesan)

Prepare or purchase the crust of your choice. Roll the dough into approximately 8 inches and put in the refrigerator on parchment paper or foil with cornmeal to firm up prior to grilling.

Roast the pepper then steam in a paper bag for 15-30 minutes. Rinse under water to remove the peel, then seed and julienne. Blot the pickled jalapeno slices in between paper towels.

Pre-heat the grill on high for at least 15 minutes. Spray with non-stick spray then slide the dough into the hot grates. (Tip: Use a peel coated with cornmeal, or on have on a cookie sheet then flip over on to the grate.) Grill 5-10 minutes or until the underside is light brown. Remove from the grill, flipping over so the grilled side is facing you.

Spoon the ranch dressing over the grilled side of the crust, spreading around. Sprinkle approximately 1/2 cup cheese over the dressing, then place the red peppers on top. Scatter the jalapenos between the pepper slices and finish off with the final 1/4 cup of cheese. Turn the grill down to low and place the pizza back on, long enough to finish the bottom and melt the cheese. Remove and let rest for 5 minutes prior to slicing.

Saturday, August 1, 2009

The Godfather weekend


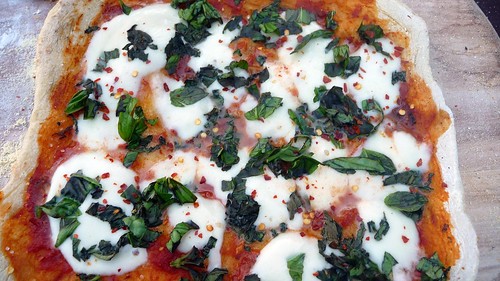
Reinhart finished, originally uploaded by Kim De.

For Christmas I purchased The Godfather trilogy on Blu-Ray for Bo. Last week, we set up our new BluRay player (ps it is august 1st). To celebrate, we have planned a Godfather weekend, complete with Italian food.

To kick it off, I made Pizza Napoletana Margherita from Peter Reinhart. I havent strayed from whole wheat pizza crust for many weeks, but was ready to try something different - and boy am I glad I did! This crust is easy to make, and has amazing flavor. I try so hard to only put whole grains in our bodies, but I may have to relax the rules for pizza nights!

This dough starts a day ahead of time mixing iced water with chilled flour, yeast and salt. After separating into balls, the dough is put into the refrigerator where is sits until ready to use. (Note: The rest of the balls have been put into the freezer for future use)

Last night I pulled the dough ball out of the fridge to let it come to room temperature. It had the perfect elasticity and was easy to work with, even cold.
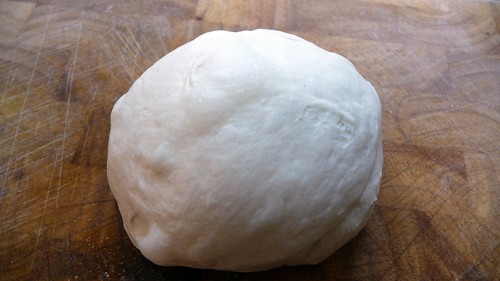


Two hours later I started the shaping process, first pressing it into a round disk, then letting it rest before working on it again. When I felt it was the correct size, I covered it and left it to rest on the cornmeal covered peel while preheating the oven.


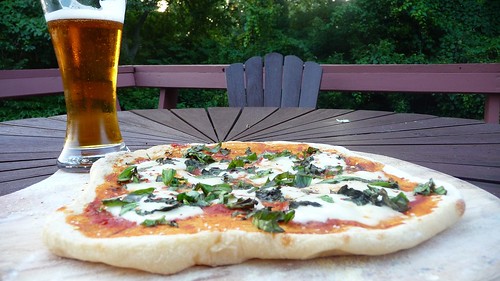
Just before baking I spread the crust with the evening's choice of ingredients. Wanting a simple pizza true to its Italian roots, we choose a simple tomato sauce from the freezer, a sprinkling of sea salt, a few slices of buffalo mozzarella and a handful of snipped basil. This was slid onto the hot baking stone and left to quickly bake. Five minutes later it was ready to be pulled back out for a very quick rest before being sliced and consumed.

We both loved this pizza, and both felt this crust may be our new favorite. Served with beer on our deck, it was a perfect Friday evening. Stay tuned for more Italian goodies...


Peter Reinhart's Napoletana Pizza Dough Recipe (Adapted from The Bread Baker's Apprentice)

4 1/2 cups (20.25 ounces) unbleached high-gluten,-- bread, or all-purpose flour, chilled
1 3/4 (.44 ounce) teaspoons salt
1 tsp (.11 ounce) instant yeast
1/4 cup (2 ounces) olive oil (optional) (I left this out)
1 3/4 cups (14 ounces) water, ice cold (40°F)
Semolina flour OR cornmeal for dusting

Stir together the flour, salt, and instant yeast in a 4-quart bowl (or in the bowl of an electric mixer). With a large metal spoon, stir in the oil and the cold water until the flour is all absorbed (or mix on low speed with the paddle attachment), If you are mixing by hand, repeatedly dip one of your hands or the metal spoon into cold water and use it, much like a dough hook, to work the dough vigorously into a smooth mass while rotating the bowl in a circular motion with the other hand. Reverse the circular motion a few times to develop the gluten further. Do this for 5 to 7 minutes, or until the dough is smooth and the ingredients are evenly distributed.

If you are using an electric mixer, switch to the dough hook and knead on medium speed for 5 to 7 minutes, or as long as it takes to create a smooth, sticky dough. The dough should clear the sides of the bowl but stick to the bottom of the bowl. If the dough is too wet and doesn't come off the sides of the bowl, sprinkle in some more flour just until it clears the sides. If it clears the bottom of the bowl, dribble in a tea- spoon or two of cold water. Let it rest 15 minutes, then knead another 1 minute. The finished dough will be springy, elastic, and sticky, not just tacky, and register 50 to 55F.

Sprinkle flour on the counter and transfer the dough to the counter. Prepare a sheet pan by lining it with baking parchment and misting the parchment with spray oil (or lightly oil the parchment). Using a metal dough scraper, cut the dough into 6 equal pieces (or larger if you are comfortable shaping large pizzas), You can dip the scraper into the water between cuts to keep the dough from sticking to it, Sprinkle flour over the dough. Make sure your hands are dry and then flour them. Lift each piece and gently round it into a ball. If the dough sticks to your hands, dip your hands into the flour again. Transfer the dough balls to the sheet pan, Mist the dough
generously with spray oil and slip the pan into a food-grade plastic bag.

Put the pan into the refrigerator overnight to rest the dough, or keep for up to 3 days. (Note: If you want to save some of the dough for future baking, you can store the dough balls in a zippered freezer bag. Dip each dough ball into a bowl that has a few tablespoons of oil in it, rolling the
dough in the oil, and then put each ball into a separate bag. You can place the bags into the freezer for up to 3 months. Transfer them to the refrigerator the day before you plan to make pizza.)

On the day you plan to make the pizza, remove the desired number of dough balls from the refrigerator 2 hours before making the pizza. Before letting the dough rest at room temperature for 2 hours, dust the counter with flour, and then mist the counter with spray oil. Place the dough balls on top of the floured counter and sprinkle them with flour; dust your hands with flour. Gently press the dough into flat disks about 1/2 inch thick and 5 inches in diameter. Sprinkle the dough with flour, mist it again with spray oil, and cover the dough loosely with plastic wrap or a food-grade plastic bag. Now let rest for 2 hours.

At least 45 minutes before making the pizza, place a baking stone either on the floor of the oven (for gas ovens), or on a rack in the lower third of the oven. Heat the oven as hot as possible, up to 800F (most home ovens will go only to 500 to 550F, but some will go higher). If you do not have a baking stone, you can use the back of a sheet pan, but do not preheat the pan.

Generously dust a peel or the back of a sheet pan with semolina flour or cornmeal. Make the pizzas one at a time. Dip your hands, including the backs of your hands and knuckles, in flour and lift 1 piece of dough by getting under it with a pastry scraper. Very gently lay the dough across your fists and carefully stretch it by bouncing the dough in a circular motion on your hands, carefully giving it a little stretch with each bounce. If it begins to stick to your hands, lay it down on the floured counter and reflour your hands, then continue shaping it. Once the dough has expanded outward, move to a full toss as shown on page 208. If you have trouble tossing the dough, or if the dough keeps springing back, let it rest for 5 to 20 minutes so the gluten can relax, and try again. You can also resort to using a rolling pin, though this isn't as effective as the toss method.

When the dough is stretched out to your satisfaction (about 9 to 12 inches in diameter for a 6-ounce piece of dough), lay it on the peel or pan, making sure there is enough semolina flour or cornmeal to allow it to slide. Lightly top it with sauce and then with your other top-pings, remembering that the best pizzas are topped with a less-is-more philosophy.

Slide the topped pizza onto the stone (or bake directly on the sheet pan) and close the door. Wait 2 minutes, then take a peek. If it needs to be rotated 180 degrees for even baking, do so. The pizza should take about 5 to 8 minutes to bake.

Remove the pizza from the oven and transfer to a cutting board. Wait 3 to 5 minutes before slicing and serving, to allow the cheese to set slightly.


Saturday, July 18, 2009

Another "tart" night


Tart, originally uploaded by Kim De.

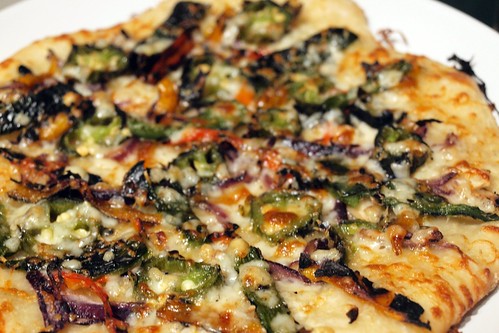
Notice that "tart" is in " " - the reason being this recipe really turns out like a pizza. I have been wanting to make Rustic Onion Tart with Market Cheese and Walnuts from Deborah Madison ever since I heard the name. A good recipe title can reach out and grab me, and this one did its job!

When I began to plan this meal, I was going to make the crust the recipe called for. However when I discovered I had half a recipe of whole wheat pizza dough in the freezer I decided to use that. After all, I was sure the strong flavors of onions, bleu cheese and walnuts could handle the nutty wheat crust!

When it was time, I shaped the crust with my hands, then rolled it to make sure it was very thin. You may have noticed that I dont make my pizza crust round - I like the look of the free form shapes. To the crust I added the mixture of red and yellow onions I had been caramelizing for the past hour.


The crust and onions were baked for about 7 minutes, then out of the oven it came so the rest of the ingredients could be added. I had sliced and crumbled a soft artisan bleu cheese and chopped a few walnuts. Those were sprinkled around the top of the onions to be baked again for about 6 minutes. The "pizza/tart" was slid back out of the oven and cooled for only a few minutes before I needed to slice and try. The recipe calls for arugula to be added at this time, but since I did not have any, I left it out.

I have always enjoyed the flavors of a strong cheese with walnuts and I wasnt disappointed this time. Add the sweetness of the onions and this was a winner. If you notice, I didnt bake as long as was called for - my crust was much smaller and very thin so I adjusted accordingly.


I felt a special yet simple salad was called for with this main dish. I tore up some greens, added a few slices of granny smith apple and a few red grapes, and to tie things in, a small sprinkle of bleu cheese and walnuts. Homemade ranch dressing was drizzled over top. With this dinner a nice hoppy IPA beer was served.


The verdict? Bo said, "We are never eating pizza out again!"

Rustic Onion Tart with Market Cheese and Walnuts (Adapted from Local Flavors)

Local Flavors Pizza Dough (recipe below)
3 Tbs olive oil
3 lbs onions -- thinly sliced
several thyme sprigs -- leaves plucked and chopped
sea salt and freshly ground black pepper
2 oz local blue cheese or Gorgonzola -- crumbled
4 whole walnuts -- shelled and chopped
1 large handful small arugula leaves

Make the pizza dough. While it's rising, heat the oil in a Dutch oven over medium heat. Add the onions and two thirds of the thyme; toss to coat the onions with the oil. Cover and cook until lightly colored, stirring occasionally so they cook evenly, 30-40 minutes. Season well with salt and pepper.

Twenty minutes before it's time to bake the tart, preheat the oven to 450 degrees. Roll the dough into a thin rectangle just large enough to fill a 12x16" sheet pan or into two 12" rounds. Cover the dough with the onions and bake for 12 minutes. Add the cheese and walnuts, and return the tart to the oven until the crust is crisp and the cheese is melted, about 10 minutes. Remove, add the remaining thyme, and cover with arugula. Cut into squares and serve.


Local Flavors Pizza Dough

1 1/4 cups warm water
1 Tbs active dry yeast
pinch sugar
3 cups all-purpose flour -- (more as needed)
1 tsp sea salt
1 Tbs olive oil

Put the warm water in a mixing bowl and stir in the yeast, sugar, and 1 cup of the flour. Set aside until foamy, 20-30 minutes. Lightly oil a clean bowl from the dough.

Stir in the salt and oil, then start stirring in the flour until the dough is fairly stiff. When too stiff to stir, turn it onto a lightly floured counter and knead until smooth and shiny, about 10 minutes. Add more flour as needed. Put the dough in the oiled bowl, turn once to coat, cover with plastic wrap, and set aside to rise until doubled in bulk, about 1 hour.

Roll out into desired shape, top, and bake.

Saturday, July 11, 2009

Friday Night Pizza

Good Saturday Morning!


Last night we had plans to go out in the world where people are - both being somewhat homebodies (me more than him) we dont always do that - so a quick, light dinner was called for. With this being "meat week" I had to do a non-veg pizza, so I settled on a Cheeseburger Pizza I saw on Culinary in the Desert. Bo isnt nearly as enamored with pizza as I am, so I try to make those that he will like (read: have meat).


I made a whole wheat crust. I usually make the 16 oz version, then use half, freezing the other half for next week. We like it thin and crisp, so I roll it out as thin as I can. I spread my favorite marinara on top (Thanks Alysha!) then sprinkled on the browned ground beef. A thin layer of shredded cheese followed (did I mention Bo isnt a huge cheese fan!!!!). I mixed a smoked mozarella with a sharp cheddar. The pizza was slid into a 500 degree oven onto our stone for a 9 minute bake.

I am having oven issues right now: the temp isnt calibrated correctly and I have to preheat down 5-10 degrees each time. I have three (yes, THREE) oven thermometers inside right now trying to discover the correct temp adjustment but at this time they are NEVER in sync with each other, so frustration runs rampant when I am baking. Why am I telling you all of this? Because I forgot to adjust the temp the obligatory 5-10 degrees and the pizza got a touch crispier then I would like, but it is probably nothing anyone else would notice. In fact tonight's comment was "we should never eat pizza out again!" Pretty good for a guy who "doesnt like pizza!"

A slice with a small salad and we were out the door to a Blues Club for the evening!

Just for fun, I added a pic of this morning's breakfast. Sometimes I get inspired by leftovers - they scream to me: "ADD ME TO EGGS!!!" This morning I obeyed. One half of a crab cake and a few stalks of asparagus from Thursday nights dinner were chopped up and tossed into a frying pan. A sprinkling of pancetta crumbs was added along with some Black and Red Spice mix from Penzeys. The eggs were beaten with a touch of crumbled feta, then added to the hot pan until just cooked and soft. I served breakfast with muffins from the freezer.


Cheeseburger Pizza (Adapted from Canadian Living and Culinary in the Desert)

***NOTE: Since I made a smaller pizza, I used only half the porportions of all ingredients!***

8 ounces ground sirloin
1/2 cup chopped onion
3 garlic cloves, minced
1/2 teaspoon dried oregano
1/4 teaspoon fresh ground black pepper
1/4 teaspoon salt
16 ounces prepared whole-wheat pizza dough
1/4 cup marinara sauce
3 ounces shredded mozzarella cheese
3 ounces shredded white Cheddar cheese

Preheat oven to 500 degrees with a pizza stone placed on the lowest rack.

In a medium skillet, add beef, onion, garlic, oregano, salt and pepper - cook over medium-high heat, stirring often to crumble the meat, until beef is no longer pink, about 5 to 6 minutes. Remove from the heat, drain off fat, if necessary, and set aside.

Stretch and roll out pizza dough to a rough 12" circle on a lightly floured surface. Sprinkle enough cornmeal to lightly cover a pizza peel and transfer the dough on top.

Spread sauce over dough - scatter the top evenly with the cooked beef mixture. Sprinkle the cheeses evenly over the top. Slide the pizza onto the stone and bake until the cheese has melted and the crust is golden, about 10 minutes. Remove and transfer pizza to a wire rack to cool slightly before serving.

Makes about 4 servings.


Monday, July 6, 2009

Back in the kitchen

We spent the weekend in IN with the family. Here are a few photos:

My little great-niece - notice the William-Sonoma catalog - she is a foodie in training!


Bo with my nephew Skyler


Our dog, Foxy, is not happy about the small creatures (children) walking around the house!


When we came home, I wanted something quick and easy for dinner. I had a small sourdough pizza dough in the freezer as well as some smoked pulled pork. I made a quick BBQ sauce, did a saute on the chopped green peppers and onions and shredded a smoked gouda.

I had trouble rolling out the dough - it was almost "watery" - it wanted to pull apart so I had to work very carefully with it. After baking it for 5 minutes, I turned it over, spread the bbq sauce on and sprinkled the pulled pork. I added the sauteed veggies and shredded cheese and baked it for 10 more minutes. Turned out pretty good, altho Im not sure I like sourdough with the toppings. I think the wheat crust I use would have been better.


This morning I started on dinner for tomorrow night. I will be out tonight, so no food review. However tomorrow we are having company so will be having a larger dinner than usual.

Sneak "peak" into tomorrow night: I am making a Chicken White Bean Chili, Ozark Cornbread and Broccoli Slaw. Dessert will be a simple Banana Chocolate Chip Muffin, seen below.


Reviews, pics and recipes to be posted Wednesday morning. Hope everyone had a great 4th!!!