
Dinner tonight was quick and easy. I try to make myself do that once a week.
This particular recipe calls for pork chops, but could easily be done with beef and especially chicken breasts. It can be served over rice or pasta, with a crusty bread to dip in the juices, or like we did with a green salad and a bold red wine!
Enjoy!
Pork Chops alla Pizzaiola (Adapted from Giada De Laurentiis)
2 tablespoons olive oil
2 (1-inch thick) bone-in pork loin center-cut chops (about 12 ounces each)
Salt and freshly ground black pepper
1 small onion, thinly sliced
1 (15-ounce) can diced tomatoes, in juice
1 tablespoon dried oregano, thyme or basil, or a combination of
1/4 teaspoon dried red pepper flakes, -- or more to taste
1 tablespoon chopped fresh Italian parsley leaves
Heat the oil in a heavy large skillet over medium heat. Sprinkle the pork chops with salt and pepper. Add the pork chops to the skillet and cook until they are brown and an instant-read meat thermometer inserted horizontally into the pork registers 160 degrees F, about 3 minutes per side. Transfer the pork chops to a plate and tent with foil to keep them warm.
Add the onion to the same skillet and saute over medium heat until crisp-tender, about 4 minutes. Add the tomatoes with their juices, deied herbs, and 1/4 teaspoon red pepper flakes. Cover and simmer until the flavors blend and the juices thicken slightly, stirring occasionally, about 15 minutes. Season the sauce, to taste, with salt and more red pepper flakes. Return the pork chops and any accumulated juices from the plate to the skillet and turn the pork chops to coat with the sauce.
Place 1 pork chop on each plate. Spoon the sauce over the pork chops. Sprinkle with the parsley and serve.
Wednesday, October 28, 2009
Pork Chops alla Pizzaiola
Monday, September 21, 2009
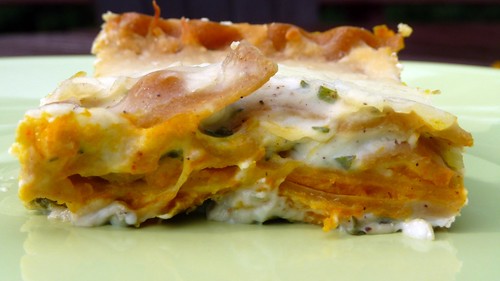
Butternut Squash Lasagna
I love to cook. I was thinking recently about how this happened and how it has evolved. Everybody has some sort of creativity in their soul. Me, I love to write. Not really good at it, but it is something I enjoy. I am realizing the joy of taking good pictures, but I am a major novice with lots to learn. Cooking is my true creative outlet. It feeds me emotionally (no pun intended). It soothes me. It relaxes me. It makes me zen.
And it is the way I show my love to my family and friends.
Why did I share all of this? Because I made this recipe for a birthday lunch for a dear friend.
Butternut Squash Lasagna.
One of the best things I have had in my mouth for a long time. Or as a friend recently said about a soup "too good to swallow"! It was simple to make, but the flavors were complex. It looked pretty on a plate, so it was perfect for company. Oh, and did I mention that the taste was phenomenal?

Sounds strange? Dont be afraid. Try it. It might cause you to wax poetic about your love for cooking. I did.
Butternut Squash Lasagna (Adapted from Giada De Laurentiis)
2 12oz boxes frozen winter squash
Salt and freshly ground black pepper
3 amaretti cookies, crumbled
1/4 cup butter
1/4 cup all-purpose flour
3 1/2 cups whole milk
Pinch nutmeg
3/4 cup (lightly packed) fresh basil leaves
12 whole wheat lasagna noodles, parcooked 5 minutes
2 1/2 cups shredded whole-milk mozzarella cheese
Thaw the squash in the refrigerator then transfer the squash to a food processor. Add the amaretti cookies and blend until smooth. Season the squash puree, to taste, with salt and pepper.
Melt the butter in a heavy medium-size saucepan over medium heat. Add the flour and whisk for 1 minute. Gradually whisk in the milk. Bring to a boil over medium-high heat. Reduce the heat to medium and simmer until the sauce thickens slightly, whisking often, about 5 minutes. Whisk in the nutmeg. Cool slightly. Transfer half of the sauce to a blender*. Add the basil and blend until smooth. Return the basil sauce to the sauce in the pan and stir to blend. Season the sauce with salt and pepper, to taste.
Position the rack in the center of the oven and preheat to 375 degrees F.
Lightly butter a 13 by 9 by 2-inch glass baking dish. Spread 3/4 cup of the sauce over the prepared baking dish. Arrange 3 lasagna noodles on the bottom of the pan. Spread 1/3 of the squash puree over the noodles. Sprinkle with 1/2 cup of mozzarella cheese. Drizzle 1/2 cup of sauce over the noodles. Repeat layering 3 more times.
Tightly cover the baking dish with foil and bake the lasagna for 40 minutes. Sprinkle the remaining mozzarella over the lasagna. Continue baking uncovered until the sauce bubbles and the top is golden, 15 minutes longer. Let the lasagna stand for 15 minutes before serving.
*When blending hot liquids: Remove liquid from the heat and allow to cool for at least 5 minutes. Transfer liquid to a blender or food processor and fill it no more than halfway. If using a blender, release one corner of the lid. This prevents the vacuum effect that creates heat explosions. Place a towel over the top of the machine, pulse a few times then process on high speed until smooth.
Monday, September 14, 2009
An Italian Night
I love breakfast for dinner. I love a good frittata. Amazing that these two things are symbiotic!
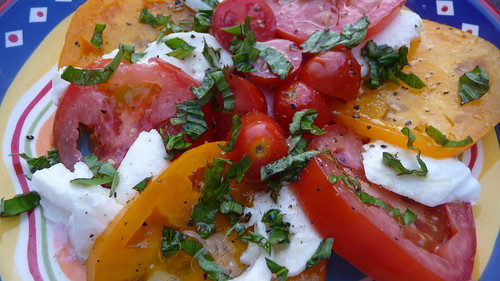
Tonight we went with Italian flavors. Prosciutto and Apple Frittata with a Caprese Salad.
I must admit, as pretty as the salad is, it is so simple to make. I sliced various tomatoes and arranged them on a plate with buffalo mozzarella. I drizzled them with a dressing of lemon juice, olive oil, salt and pepper. Basil from my deck finished off the combo. Almost a crime!
I have another confession to make - tonight's frittata was a combination of two recipes, plus my own ideas. I have a basic recipe, but as this dish is extremely forgiving, you could do many things to it. So I decided my frittata would have a touch of prosciutto, instead of milk or cream as a binder I would add mascarpone cheese, parmesan cheese would be needed as the other salt, and to add a contrast? Sliced roma apple. I think the plan worked. The meat was an amazing salty contrast to the sweet of the apple.
The picture? Well, the phone was ringing as the oven timer was buzzing - basically I didnt do it. Trust me. It was pretty. Picture the light yellow eggs, the diced pink meat, the ribbons of green basil and the red from the apple peel. A beautiful presentation.
Instead, I included a picture of my dog, Foxy, and the rough life she leads!

Prosciutto and Apple Frittata (Adapted from recipes by Giada and Everyday Food Magazine)
1 tablespoons olive oil
1 shallot , chopped
4 garlic cloves, minced
Salt and freshly ground black pepper
6 large eggs
1/4 cup marscapone cheese
1/4 cup grated Parmesan
2 ounces sliced prosciutto, coarsely chopped
1 gala apple, cored and thinly sliced
2 tablespoons chopped fresh basil leaves
Heat the oven to 350.
Heat the oil in a heavy 9 1/2-inch-diameter skillet over medium heat. Add the shallot and garlic. Season with salt and pepper, to taste. Saute over medium-low heat until the shallot is tender, about 2 minutes. Add the prosciutto and saute another 3 minutes or until crisp.
Whisk the eggs, cheese, 2 T Parmesan, and basil in a medium bowl to blend. Pour the egg mixture into the skillet. Lay the apples over the top of the egg, then sprinkle with the remaining cheese. Cook over medium-low heat until the egg mixture is almost set but the top is still loose, about 3 minutes. Place the skillet in the oven. Bake until the top is set and golden brown, about 10 minutes. Using a rubber spatula, loosen the frittata from skillet and slide the frittata onto a plate.
Sunday, August 2, 2009
Godfather Weekend Cont'd
Now in my mind, this movie called for baked ziti or lasagna, but Bo loves his seafood, so...
Starting in the afternoon, I though we might need a snack. I decided on biscotti, something I have never made before. I didnt want a sweet snack, I thought something more savory was in order. After an extensive search, I found a recipe on Culinary in the Desert that I thought might fit the bill. It is called Pepperoni Biscotti. I followed the recipe to a T - almost. Instead of pepperoni, I used prisciutto di parma since I had some for our lunchtime pannini.
These biscotti are good - a nice snack. Not something I would want with my coffee, but they were fun. The mixture was crumbly as noted in the recipe, but it wasnt difficult to form the logs. These arent the crunchy cookies you may be used to - they are a bit softer - but very good.

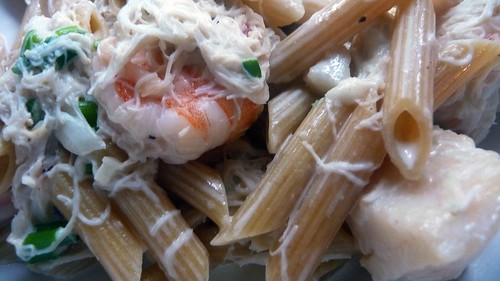
Now on to the main event. Seafood Fettuccine. Wow. That is all. Wow. Yes, this could have been thicker, but it is a recipe from Cooking Light so half -n -half was used in place of heavy cream. I can deal with thinner if I can have my beloved alfredo sauce one to two times a year.
While the pasta is boiling, green onions and garlic are sauteed in butter before shrimp and sea scallops are added. The cream is poured in along with the crab, salt and pepper. When the mixture has thickened a bit, parmesan cheese is stirred in before everything is mixed with the hot pasta (I used penne).
Like I mentioned, the sauce was a bit thin, but the flavor was amazing and I didnt feel the guilt associated with a traditional alfredo. What did Bo think? Major thumbs up!
It was so good, I needed to show you the picture again!
Pepperoni Biscotti (Adapted from BH&G and Culinary in the Desert)
6 tablespoons butter, softened
4 garlic cloves, minced
1 tablespoon sugar
1 teaspoon baking powder
1 teaspoon Italian seasoning
1 1/2 ounces fresh grated Parmesan cheese, divided
1 large egg
1 tablespoon milk
1 cup all-purpose flour
1/2 cup whole wheat pastry flour
1/2 cup chopped pepperoni
1/4 cup finely chopped red sweet pepper
2 tablespoons finely chopped onion
2 tablespoons chopped fresh parsley
Preheat oven to 350
In a large mixing bowl, add butter and beat on medium for 30 seconds. Add garlic, sugar, baking powder, Italian seasoning and 1 ounce (about 1/4 cup) Parmesan cheese. Mix until completely combined. Beat in egg and milk. Mix in as much flour as you can with the mixer, then use a wooden spoon to stir in remaining flour, pepperoni, red sweet pepper, onion, and parsley - it should be fairly dry.
Scoop the dough out onto a lightly floured surface and knead the dough a few times until it holds together. Divide the dough in half and shape each into a 9" x 1 1/2" roll. Scatter the counter with the remaining Parmesan cheese and roll each dough back and forth to coat them with the cheese. Place the dough on to a parchment lined baking sheet and flatten slightly.
Bake until the top feels firm to the touch, about 20 to 25 minutes. Remove and let cool on the baking sheet for about 35-45 minutes.
If you turned the oven off, reheat it to 325 degrees. Cut each roll diagonally into generous 1/2" slices. Place the slices back onto the cookie sheet and bake for 10 minutes - turn the biscotti over and continue to bake until they have started to crisp up, about another 10 to 12 minutes. Remove and place the biscotti on a wire rack to cool.
Seafood Fettuccine (Adapted from Cooking Light)
1 1/2 tablespoons butter
1 cup chopped green onions
4 garlic cloves, minced
1 pound medium shrimp, peeled
1 pound sea scallops
2 cups half-and-half
1/2 teaspoon salt
1/4 teaspoon black pepper
1/2 pound lump crabmeat, shell pieces removed
3/4 cup (3 ounces) grated fresh Parmesan cheese, divided
8 cups hot cooked fettuccine (about 1 pound uncooked pasta)
1/4 cup chopped fresh parsley
Melt butter in a 12-inch nonstick skillet over medium-high heat. Add onions and garlic; sauté 1 minute or until tender. Add shrimp and scallops; sauté 3 minutes or until done. Reduce heat to medium-low.
Add half-and-half, salt, pepper, and crabmeat; cook 3 minutes or until thoroughly heated, stirring constantly (do not boil). Gradually sprinkle 1/2 cup cheese over seafood mixture, stirring constantly; cook 1 minute, stirring constantly. Remove from heat. Combine pasta and seafood mixture in a large bowl. Top each serving with 1 1/2 teaspoons cheese and 1 1/2 teaspoons parsley.
Saturday, August 1, 2009
The Godfather weekend

For Christmas I purchased The Godfather trilogy on Blu-Ray for Bo. Last week, we set up our new BluRay player (ps it is august 1st). To celebrate, we have planned a Godfather weekend, complete with Italian food.
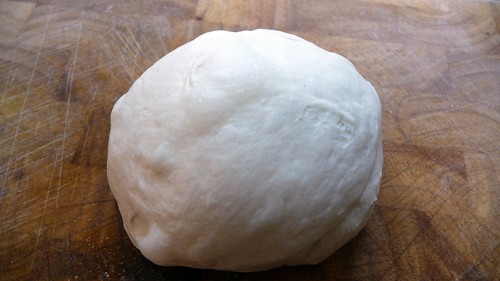
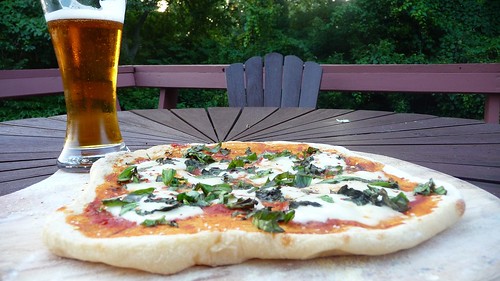
To kick it off, I made Pizza Napoletana Margherita from Peter Reinhart. I havent strayed from whole wheat pizza crust for many weeks, but was ready to try something different - and boy am I glad I did! This crust is easy to make, and has amazing flavor. I try so hard to only put whole grains in our bodies, but I may have to relax the rules for pizza nights!
This dough starts a day ahead of time mixing iced water with chilled flour, yeast and salt. After separating into balls, the dough is put into the refrigerator where is sits until ready to use. (Note: The rest of the balls have been put into the freezer for future use)
Last night I pulled the dough ball out of the fridge to let it come to room temperature. It had the perfect elasticity and was easy to work with, even cold.
Two hours later I started the shaping process, first pressing it into a round disk, then letting it rest before working on it again. When I felt it was the correct size, I covered it and left it to rest on the cornmeal covered peel while preheating the oven.

Just before baking I spread the crust with the evening's choice of ingredients. Wanting a simple pizza true to its Italian roots, we choose a simple tomato sauce from the freezer, a sprinkling of sea salt, a few slices of buffalo mozzarella and a handful of snipped basil. This was slid onto the hot baking stone and left to quickly bake. Five minutes later it was ready to be pulled back out for a very quick rest before being sliced and consumed.
We both loved this pizza, and both felt this crust may be our new favorite. Served with beer on our deck, it was a perfect Friday evening. Stay tuned for more Italian goodies...
Peter Reinhart's Napoletana Pizza Dough Recipe (Adapted from The Bread Baker's Apprentice)
4 1/2 cups (20.25 ounces) unbleached high-gluten,-- bread, or all-purpose flour, chilled
1 3/4 (.44 ounce) teaspoons salt
1 tsp (.11 ounce) instant yeast
1/4 cup (2 ounces) olive oil (optional) (I left this out)
1 3/4 cups (14 ounces) water, ice cold (40°F)
Semolina flour OR cornmeal for dusting
Stir together the flour, salt, and instant yeast in a 4-quart bowl (or in the bowl of an electric mixer). With a large metal spoon, stir in the oil and the cold water until the flour is all absorbed (or mix on low speed with the paddle attachment), If you are mixing by hand, repeatedly dip one of your hands or the metal spoon into cold water and use it, much like a dough hook, to work the dough vigorously into a smooth mass while rotating the bowl in a circular motion with the other hand. Reverse the circular motion a few times to develop the gluten further. Do this for 5 to 7 minutes, or until the dough is smooth and the ingredients are evenly distributed.
If you are using an electric mixer, switch to the dough hook and knead on medium speed for 5 to 7 minutes, or as long as it takes to create a smooth, sticky dough. The dough should clear the sides of the bowl but stick to the bottom of the bowl. If the dough is too wet and doesn't come off the sides of the bowl, sprinkle in some more flour just until it clears the sides. If it clears the bottom of the bowl, dribble in a tea- spoon or two of cold water. Let it rest 15 minutes, then knead another 1 minute. The finished dough will be springy, elastic, and sticky, not just tacky, and register 50 to 55F.
Sprinkle flour on the counter and transfer the dough to the counter. Prepare a sheet pan by lining it with baking parchment and misting the parchment with spray oil (or lightly oil the parchment). Using a metal dough scraper, cut the dough into 6 equal pieces (or larger if you are comfortable shaping large pizzas), You can dip the scraper into the water between cuts to keep the dough from sticking to it, Sprinkle flour over the dough. Make sure your hands are dry and then flour them. Lift each piece and gently round it into a ball. If the dough sticks to your hands, dip your hands into the flour again. Transfer the dough balls to the sheet pan, Mist the dough
generously with spray oil and slip the pan into a food-grade plastic bag.
Put the pan into the refrigerator overnight to rest the dough, or keep for up to 3 days. (Note: If you want to save some of the dough for future baking, you can store the dough balls in a zippered freezer bag. Dip each dough ball into a bowl that has a few tablespoons of oil in it, rolling the
dough in the oil, and then put each ball into a separate bag. You can place the bags into the freezer for up to 3 months. Transfer them to the refrigerator the day before you plan to make pizza.)
On the day you plan to make the pizza, remove the desired number of dough balls from the refrigerator 2 hours before making the pizza. Before letting the dough rest at room temperature for 2 hours, dust the counter with flour, and then mist the counter with spray oil. Place the dough balls on top of the floured counter and sprinkle them with flour; dust your hands with flour. Gently press the dough into flat disks about 1/2 inch thick and 5 inches in diameter. Sprinkle the dough with flour, mist it again with spray oil, and cover the dough loosely with plastic wrap or a food-grade plastic bag. Now let rest for 2 hours.
At least 45 minutes before making the pizza, place a baking stone either on the floor of the oven (for gas ovens), or on a rack in the lower third of the oven. Heat the oven as hot as possible, up to 800F (most home ovens will go only to 500 to 550F, but some will go higher). If you do not have a baking stone, you can use the back of a sheet pan, but do not preheat the pan.
Generously dust a peel or the back of a sheet pan with semolina flour or cornmeal. Make the pizzas one at a time. Dip your hands, including the backs of your hands and knuckles, in flour and lift 1 piece of dough by getting under it with a pastry scraper. Very gently lay the dough across your fists and carefully stretch it by bouncing the dough in a circular motion on your hands, carefully giving it a little stretch with each bounce. If it begins to stick to your hands, lay it down on the floured counter and reflour your hands, then continue shaping it. Once the dough has expanded outward, move to a full toss as shown on page 208. If you have trouble tossing the dough, or if the dough keeps springing back, let it rest for 5 to 20 minutes so the gluten can relax, and try again. You can also resort to using a rolling pin, though this isn't as effective as the toss method.
When the dough is stretched out to your satisfaction (about 9 to 12 inches in diameter for a 6-ounce piece of dough), lay it on the peel or pan, making sure there is enough semolina flour or cornmeal to allow it to slide. Lightly top it with sauce and then with your other top-pings, remembering that the best pizzas are topped with a less-is-more philosophy.
Slide the topped pizza onto the stone (or bake directly on the sheet pan) and close the door. Wait 2 minutes, then take a peek. If it needs to be rotated 180 degrees for even baking, do so. The pizza should take about 5 to 8 minutes to bake.
Remove the pizza from the oven and transfer to a cutting board. Wait 3 to 5 minutes before slicing and serving, to allow the cheese to set slightly.