Wednesday, March 24, 2010

Off to India!!!


Tomorrow is the big day, the day I take the longest plane ride of my life to meet my husband's family in India!

And yes, while there, I will be visiting the Taj Mahal!!!

While travel will only be for 2 weeks, I imagine it will take a few days longer to get back into the swing of cooking. I hope, however, to post a few pictures from some great restaurants!

I hope everyone has a great couple of weeks!

Photo from http://www.bdginternational.com/images/Taj20Mahal.jpg

Monday, March 22, 2010

Shrimp and Squid Cocktail


Things are heating up at our house - and food prep is winding down. In two days I will be on a plane for my first trip to India. Not wanting lots of leftovers, I haven't cooked as much this week, instead I am blogging recipes that have fallen through the cracks.

You are going to think it is crazy that a recipe this amazing wasn't blogged about the second it was consumed!

This is one I recommend for a dinner party. It is a make-ahead dish, it looks elegant, has a "wow" factor in the presentation, and oh yes, it TASTES GREAT!


If you have an aversion to squid, feel free to use scallops, or just shrimp. Make it as spicy as you want by controlling the shakes of the Tabasco bottle. Use more cilantro and less onion. Chop a habanero into the marinade if you wish.

It is easy to make it your own!


Shrimp and Squid Cocktail (Food and Wine)

1/2 cup fresh lime juice
1/4 cup fresh orange juice
1/4 cup tomato juice
1 tablespoon tomato paste
Salt and freshly ground pepper
Hot sauce
2 pounds shelled and deveined large shrimp
1/2 pound cleaned squid, cut into 1/2-inch rings, tentacles halved
2 pounds tomatoes—halved, seeded and finely diced
2 Hass avocados, cut into 1/2-inch dice
4 scallions, white and tender green parts only, thinly sliced
1 small red onion, finely diced
2 tablespoons chopped cilantro
Plantain chips, for serving

Bring a large pot of salted water to a boil and fill a large bowl with ice water. In another large bowl, whisk the lime, orange and tomato juices with the tomato paste. Season with salt, pepper and hot sauce.

Cook the shrimp in the boiling water just until curled and pink, about 1 minute. Using a slotted spoon, transfer the shrimp to the ice water. Return the pot of water to a boil and add the squid. Cook for 30 seconds, until firm but tender. Drain immediately and add to the ice water.

When cool, drain the shrimp and squid and pat dry. Add to the bowl with the juices and toss to coat. Transfer the mixture to a large resealable plastic bag. Close the bag, pressing out the air. Refrigerate overnight, turning the bag occasionally.

Transfer the seafood salad to a bowl and stir in the tomatoes, avocados, scallions, onion and cilantro; season with salt, pepper and hot sauce. Refrigerate for at least 30 minutes or up to 2 hours. Using a slotted spoon, scoop into martini glasses and serve with the plantain chips.

Cuban Black Beans

I know. Yet ANOTHER way to make beans!!! But like the other ones I have tried recently, this one brings something new and special to the table.

These beans follow the "formula" I like, lots of flavor, a bit "saucy", but unlike most others I make that rely on a savory, these have a hint of sweet.

Welcome to Cuban Black Beans. Savory from green pepper, onion and garlic is balanced with sweet and tart from sugar, red wine vinegar and a splash of white wine.

I enjoyed them. Bo, not so much, but I wasn't surprised. He really doesn't care for sweet seeping into his main dishes. These will not become my "go-to" recipe for the lovely turtle beans since I always prefer bold over candied, but I can see them being made again in the "someday" of recipe-land.

Frijoles Negros - Cuban Black Beans (Adapted from Food and Wine)

1 pound dried black beans, picked over and rinsed
About 11 cups water
1/4 cup extra-virgin olive oil
1/4-1/2 cup sofrito (I used this recipe from my freezer)
1/4 teaspoon dried oregano
1 bay leaf
2 tablespoons sugar
Freshly ground black pepper
2 tablespoons red wine vinegar
2 tablespoons dry white wine

In a large saucepan, combine the beans with 10 cups of water and the quartered green pepper and bring to a boil. Cover and remove from the heat. Let stand until the beans are softened, about 1 hour.

Return the beans to a boil and cook over very low heat until tender, 1 1/2 to 2 hours. Discard the green pepper.

In a skillet, heat the oil. Add the sofrito and cook until most of the liquid is gone.Using a slotted spoon, add 1 cup of the beans to the skillet and mash to a paste.

Scrape the paste into the beans in the saucepan. Add the oregano, bay leaf, sugar, 2 teaspoons of salt and 1/2 teaspoon of pepper. Add the remaining 1 cup of water, or enough to just cover the beans, and cook for 1 hour, stirring occasionally. Add the vinegar and wine and cook, stirring frequently, until the beans are thick, about 15 minutes longer. Discard the bay leaf and serve.


Saturday, March 20, 2010

Mango Salsa

Have you ever tried fruit salsa? If not, you don't know what you are missing! A mixture of sweet and spice, fruit salsas are great with grilled meat and fish, wonderful with chips, and fabulous on a bed of rice for a light lunch.

This particular salsa is made with a base of mango and jalapeno, but the sky is the limit! Any sweet tropical fruit will shine here - pineapple, papaya, kiwi, or a mixture of all the above. And for contrast, make sure you include a hot pepper. Jalapeno is typical, but habanero or scotch bonnet would add to the flavor as well as the color palate. Finish off with an acid such as lime juice and some chopped cilantro, and you have your self a beautiful side dish or garnish easy enough for every day but special enough for company.

Mango Salsa (Allrecipes.com)

1 mango, peeled, pitted and diced
1 red onion, diced
3 tablespoons chopped fresh basil
3 tablespoons chopped fresh cilantro
1 lime, juiced
Minced jalapeno, to taste
Salt and pepper, to taste

Meanwhile, in a small bowl combine the diced mango, onion, basil, cilantro, lime juice, jalapeno and salt and pepper. Refrigerate until ready to use. Serve with plantain chips or over grilled meat.

Thursday, March 18, 2010

Fantasy Island Fudge Rum Cake

YUMMMM!!!! Rum cake! I remember clearly a slice devoured while in the Bahamas. Moist, sweet yet sharp from the rum, it was once of the best slices of cake I have ever had.

Until now.

Can you imagine the best cake you ever had, mixed with dark chocolate, coconut and chocolate chips? You don't need to imagine anymore!

Sorry for the lack of a glazed slice pic. Every time a knife cut through and a piece was placed on a plate, it was gone before a camera was ever thought of.

You understand, don't you?

Fantasy Island Rum Fudge Cake (Adapted from Tortuga Rum Fever & Caribbean Party Cookbook)

1 cup unsalted butter
1 cup sugar
1 cup light brown sugar, packed firm
3 large eggs
1 tsp vanilla extract
1 cup dark rum
1 1/2 cups vanilla or coconut yogurt
2 1/2 cups flour
1 cup cocoa
1 tsp salt
2 tsp baking soda
1 cup sweetened shredded coconut
1 cup dark chocolate morsels

Chocolate Rum Glaze

1 1/2 Tbs cocoa
1/2 cup sugar
1/4 cup butter
2 T water
1/4 cup dark rum

Preheat oven to 350 degrees. Spray a 10-inch tube pan or 12 cup bundt pan with oil. Cream together butter and sugars until light. Add eggs, one at a time, beating on low speed after each. Add vanilla extract and rum. In a separate bowl, mix together flour, cocoa, salt, and baking soda
with a wire whisk until blended. Add flour mixture alternately to batter with yogurt, blending after each addition. Stir in coconut and chocolate morsels until blended. Pour into prepared pan and bake for an hour or until top of cake springs back. It may crack in center and appear moist
when done. Prepare glaze (see recipe below). Allow cake to cool for 10 minutes then remove from pan and cool 10 minutes longer. Poke holes in cake with a fork all over and then spoon glaze over.

TIP: Glaze the cake while on the cooling rack with a platter under to catch leftover glaze. Put a different platter under the cake and rack while pouring the leftover glaze from platter number 1 over the cake. Continue switching plates and pouring glaze until it is almost gone.

Refrigerate cake at least an hour before serving. Cake should be stored in refrigerator to maintain fudgy texture and moistness.

Chocolate Rum Glaze

Combine the sugar and cocoa in a small bowl and stir until completely blended. In a medium saucepan melt the butter and stir in the water and sugar-cocoa mixture. Bring to a boil over medium heat, stirring constantly. Reduce heat and keep at a low boil for five minutes, until mixture has thickened to syrup. Stir in the rum and remove from heat – mixture will bubble up immediately, so keep stirring. Cool for 10 minutes, then drizzle over cake or other dessert.

Beer Marinated Flank Steak

If you ever watch Foodtv, you should try to catch Marcela Valladolid. She is adorable to watch and cooks Mexican food in a way you may not be used to seeing - without the addition of pounds of cheese!

Oh, and her recipes are good too!

Can I tell you how EASY this steak was? Take 10 minutes to make a marinade, plop your meat in, put it in the fridge, then come back when it is time to grill.


Simple! AMAZING flavor - I'm not even sure I can find the words to properly describe how this tastes. And the versatility - fajitas, tacos, over rice, in a salad.... use your imagination!

And a last note, the leftovers make a FABULOUS fried rice!!

Beer Marinated Steak (Adapted from Marcela Valladolid)

1 orange, thinly sliced with peel
1/2 onion, thinly sliced
4 garlic cloves, halved and smashed
2 1/4 pounds skirt steak
Kosher salt and fresh ground black pepper
1 cup light-colored beer (preferably lager style)
1/2 cup soy sauce

In a wide, shallow glass baking dish, scatter half of the orange slices, half of the onion slices and half of the garlic pieces on the bottom of the dish. Sprinkle the steak all over with salt and pepper and put in the dish on top of the orange and onion slices. Scatter the remaining orange, onion and garlic over the steak and pour in the beer and soy sauce. Cover with plastic wrap and marinate for 1 hour at room temperature or up to overnight in the refrigerator.

Prepare a barbeque on medium-high heat or preheat a broiler. Remove the meat from the marinade and discard the marinade. Grill the steak to desired doneness, about 4 minutes per side for medium-rare.

Tuesday, March 16, 2010

Triggerfish - New to You?

I don't have an amazing, earth-shattering recipe to share today. In fact, last night I did something I rarely do - I used a pre-packaged spice mix (Jamaican Jerk). Rather, I wanted to share with you this fish.

I discovered it by accident. I stopped by Whole Foods to purchase grouper only to discover it was $18.99 a lb. Seriously??? For that money I will be purchasing lobster, thank you very much! Instead, the fishmonger recommended Triggerfish. And just my luck, they were sampling it. And I loved it.

'Cause Im very picky about fish!


It can't be too thin or dry and definitely not too fishy! Pretty much I have stopped with Tuna, Salmon (I'm working on this one) and Mahi because in the past I have been able to eat them with a smile on my face. Triggerfish reminded me of the Mahi - it was a thick and meaty fillet, tender and moist and easy to cook without overcooking. And it doesn't taste fishy. Of this I am positive because the sample I tried had been cooked with just salt and pepper and a touch of oil.

SOLD!

I wanted to share this amazing find with you. I also cooked it simple - with the jerk seasoning, in a cast iron pan with a light covering of canola oil. I sprinkled the spice on both sides of the fish, then preheated the pan to very hot, adding the oil right before I added the fish (adding it away from me in case of spatters). Immediately I turned down the heat to medium and cooked the fish for 4-5 minutes until I saw the edges turning white.

Turning the heat back up to medium-high (for another wonderful sear), I gently flipped the fish and covered it. After 1 minute the heat was turned back down again for another 4 minutes. A tiny slit in the middle of the fillet showed a bit of pink so I covered it for another minute before taking it off the flame and letting it sit for 10 minutes to finish cooking.

It was moist and tender in the middle while having a nice crust on the outside. Yum!

If you haven't tried this fish, I highly recommend it!

Monday, March 15, 2010

Caribbean Cornbread

Southerners Take Note: This is not what YOU would call cornbread! It is moist and somewhat sweet, not dry. I promise, I am not trying to re-invent true cornbread, just offer another alternative!

Now that the disclaimer is out of the way, you MUST try this bread. I will repeat - YOU MUST TRY THIS BREAD! It is sweet from the pineapple and moist from the butter.

Lets talk about the butter. Im not a prude. I eat healthy with a combo or portion control and low cal foods. But this bread - 2 sticks of butter?- overkill. Besides the 'arghhh' factor with the calories, it was a bit greasy to the touch. I don't usually repeat recipes on this blog but in this case, I will be making this again, experimenting with the butter content, and I will blog with the results.

In the meantime, make it for your family. Make it as-is, or attempt to lighten it. If you do, let me know the results!

Caribbean Corn Bread (Adapted from Epicurious)

1 cup all-purpose flour
1 cup cornmeal
2 tablespoons baking powder
1 teaspoon salt
1/2 (2 sticks) unsalted butter, at room temperature
3/4 cup sugar
4 large eggs
1 1/2 cups canned cream corn
1/2 cup canned crushed pineapple, drained

Preheat your oven to 325

Butter and flour a 9-inch square glass cake pan.

In a mixer, cream the butter and the sugar. While the mixer is running, add the eggs one at a time, beating well after each addition. On a low speed, add the dry ingredients, and mix until blended well. Add the corn and pineapple and mix until just combined.

Pour the batter into the prepared pan and bake until a tester stuck in the center comes out clean, about one hour to an hour and fifteen minutes. Do not undercook the cornbread. It should be golden brown on top when done.

Stuffed Jalapenos


With just two of us in the house, I don't make "snack" foods very often, since they hang around the house begging to be eaten. But when I saw these on Good Morning America, I knew we had to find a way to try them.

Lets see - jalapenos are a vegetable, right? Voila! Now it's a side dish!!

Keep in mind if you make these for loved ones, peppers, even of the same variety, have varying levels of heat. Scraping a bit of the rib out will help control the unexpected.

Can you feel the excitement as they wait to be cooked?

We LOVE hot peppers, so the ribs stayed in!!! In our case, any heat we didn't expect was countered by the cool cream cheese and sweet barbecue sauce.

Appetizer, side dish, after school snack - heck a light dinner - TRY THESE!


Stuffed Jalapenos (Adapted from The Pioneer Woman)

18 fresh jalapeños
One 8-ounce package cream cheese
1 green onion, sliced
Diced pineapple (optional addition- I didnt use this time, but will the next)
Bottled barbecue sauce
Toothpick
Rubber gloves (or plastic bags) for working with jalapeños

Preheat the oven to 275ºF.

Begin by cutting jalapeños in half lengthwise. Try to keep the stems intact.

With a spoon, scrape out the seeds and light-colored membranes to match your heat-tolerance level.

In a bowl, combine the cream cheese, chopped green onion and pineapple (if using). Mix the ingredients together gently. Stuff each hollowed jalapeño half with the cheese mixture.

Brush the cream cheese with your favorite barbecue sauce. Bake for 30-45 minutes or until pepper is getting soft, but is not "mushy".

These are good hot, room temp and cold!

Friday, March 12, 2010

Charred Pear Tomato Salsa


Charred Pear Tomato Salsa, originally uploaded by Kim De.

It seemed time to write about a vegetable again. We do eat them!

I am reaching back a couple of weeks for this recipe. It is from Fiesta on the Grill, a wonderful cookbook that I highly recommend! Not made during grilling season, I cooked the veggies over the gas flame on my stove. Despite this change in technique, the tomatoes and other veggies had an amazing charred flavor.

Less salsa, more salad, this side dish can be great with strong thick tortilla chips, or eaten alongside your favorite main dish with a fork.

Oh, and if I didn't mention it before, it is very easy to make!

Charred Pear Tomato Salsa (Adapted from Douglas Rodriguez)

Salt
1 medium white or red onion, peeled and sliced into 1/2-inch rounds
3 cups (about 1 1/4 lbs) cherry or pear tomatoes
1 t + 1 T olive oil
2 cloves roasted garlic, peeled and thinly sliced
2 t to 2 T chopped chipolte chiles in adobo sauce (the amount depends on your heat tolerance)
1 T fresh cilantro, chopped
1 1/2 T lime juice
Salt and Pepper to taste
Sugar as needed

Preheat oven to 450 and line a baking sheet with foil, or prepare a small steamer basket with oil for your gas stove-top.

Salt the onion slices and cook until browned and a little charred around the edges, at least 15 minutes in the oven, or 5 minutes over the gas flame. Remove, cool and chop into 1/2 inch pieces.

Toss the tomatoes in 1 t oil and cook the same way as the onions, until they have some black spots, are beginning to give off juice, but are still firm. Remove from heat and place in a bowl ti capture the liquid.

Combine the onion, tomatoes, garlic, chiles, cilantro, lime juice and remaining oil and let sit for 10-15 minutes for the flavors to develop.

Taste and season with salt and pepper and if needed, sugar to balance.

Thursday, March 11, 2010

Arroz con Pollo


Arroz con Pollo, originally uploaded by Kim De.

Sounds so much prettier than Chicken with Rice!

I have always wanted to try this Cuban dish. Disclaimer - I have not yet tried this at a restaurant so I don't know exactly HOW authentic this recipe is, but I can tell you this much - It was GOOD!!!

I didn't find annatto seeds until after I was finished, I instead used achiote paste to make the oil. It seemed to work although I will be anxious to try again with the seeds. Also, a few of the ingredients were not readily available to me: ajices dulces and culantro. I simply left them out.

The other change I would make is to use more sofrito. It tastes sooooo good that a bit more can only be better, right?

I think it is necessary to say again - this one WILL be repeated!!!

Chicken with Rice (Arroz con Pollo adapted from Daisy Martinez)

1/4 cup Achiote Oil, recipe follows
1 (3 to 4-pound) chicken, cut into 10 pieces
Fine sea or kosher salt and freshly ground black pepper
1/2 cup Sofrito, recipe follows
1/4 cup alcaparrado or coarsely chopped pimiento-stuffed olives
1 teaspoon ground cumin
Pinch ground cloves
4 cups long-grain rice
5 cups homemade or store-bought -- reduced-sodium chicken broth
2 large bottled roasted red peppers, cut into 1/4-inch strips (about 1 1/2 cups)

Achiote Oil
1 cup olive oil
2 tablespoons achiote (annatto) seeds, (see Daisy's Notes*)

Sofrito
2 medium Spanish onions (about 12 ounces), cut into large chunks
3 to 4 Italian frying peppers or Cubanelle peppers, cored, seeded and cut into large chunks
16 to 20 cloves garlic, peeled
1 large bunch cilantro, washed
7 to 10 ajices dulces (see Daisy's Notes*), optional
4 leaves culantro (see Daisy's Notes*), optional
3 to 4 ripe plum tomatoes (about 1 pound), cored and cut into chunks
1 large red bell pepper, cored, -- seeded and cut into large chunks

In a paella pan or wide, shallow pan with a tight-fitting lid, heat the Achiote Oil over medium-high heat until the oil is rippling. Season the chicken with salt and pepper and add as many pieces skin side down to the pan as fit without touching. Cook, turning as necessary, until well browned on all sides, about 10 minutes. Remove the pieces as they are done and set aside. Adjust the heat under the pan, especially after you start removing chicken, so the chicken browns without the oil darkening.

When all the chicken is removed from the pan, add the Sofrito and alcaparrado. Season, to taste, with salt and pepper. Raise the heat to high and boil until most of the water is evaporated from the Sofrito. Add the cumin and cloves.

Stir in the rice until coated with oil. Return the chicken to the pan, pour in enough broth to cover the rice by the width of 2 fingers (about 1-inch), and bring to a boil. Cook over high heat until the level of liquid reaches the rice. Stir gently and reduce the heat to low. Cover the pan and cook until the liquid is absorbed, the chicken is cooked through, and the rice is tender but firm, about 20 minutes. Fluff the rice with a fork. The arroz con pollo can be brought to the table right in the pan or transferred to a large serving platter. Either way, garnish with the red pepper before serving.

Achiote Oil
Heat the oil and annatto seeds in a small skillet over medium heat just until the seeds give off a lively, steady sizzle. Don't overheat the mixture or the seeds will turn black and the oil will turn a nasty green. Once they're sizzling, remove the pan from the heat and let stand until the sizzling stops. Strain and reserve in a jar with a tight-fitting lid at room temperature for up to 4 days.

Sofrito
Chop the onion and Cubanelle or Italian peppers in the work bowl of a food processor until coarsely chopped. With the motor running, add theremaining ingredients 1 at a time and process until smooth. The sofrito will keep in the refrigerator for up to 3 days. It also freezes beautifully.

*Daisy's Notes:
Achiote seeds are a deep orange seed with a nutty flavor. They are available in many supermarkets and almost all Latin markets.

Ajices dulces are little sweet peppers that look similar to the fiery hot Scotch bonnet or habanero peppers, only smaller. They have a wonderful fresh herbal flavor, almost like cilantro, but only a tiny bit of heat.

Culantro is an herb with broad, round-tipped leaves. Its flavor is similar to cilantro, but much more intense. Both ajices dulces and culantro are available in Latin markets. If you cannot find them, simply increase the amount of cilantro to 1 1/2 bunches.

Tuesday, March 9, 2010

New Style "Refried" Beans


So I keep thinking "how many more ways can there be to make beans"?

Apparently at least one more.

Now take a close look at the picture. Think to yourself "Are these re-fried?" No, they are not. I put the word in " " because I chose to use this recipe for its components, but chose not to re-fry them.

Now that the details are out of the way... these are my favorite beans to date! The sauce they make is thick and the flavor is out of this world!
Confession time - I have never made beans that included a "meat ingredient". A smoked turkey wing provided a depth that has been missing from past bean recipes - yes, a turkey wing. I wasnt ready to use a ham hock and it's higher fat count. But after using the turkey, I'm not sure the hock is necessary.

The other "magic" is cooking the beans with a pot full of cilantro. It permeated its aroma into the simmering beans where it remained while they were being consumed!

Served with brown rice and the syrupy sauce or drained over a great salad, these beans are the current winner in our house.
At least until I make the recipe on deck for next week!

New Style Refried Beans
(Frijoles Refritos Estilo Nuevo by Daisy Martinez)
NOTE: I reprinted this recipe as written, not as I made it.

1 tablespoon olive oil
1 small Spanish onion, cut into medium dice
2 cloves garlic, whacked with -- the side of a knife and peeled
1 pound dried black beans
1 smoked ham hock or smoked turkey wing
1 bunch cilantro, washed
2 bay leaves
Salt and freshly ground black pepper
Good quality tortilla chips, for serving
Thinly sliced red radishes, for serving, optional

Heat the olive oil over medium-high heat in a medium saucepan. Add the onion and garlic and cook, stirring occasionally, until soft but not browned, about 4 minutes. Add the beans, ham hock, and cilantro. Pour in enough water to cover the ingredients by 2 inches. Toss in the bay leaves and bring the water to a boil, then adjust the heat so it is boiling gently. Cook the beans until tender, about 2 hours. Keep an eye on the beans; they should always be covered by liquid. When the liquid meets the level of the beans, top it off with cold water. Toward the end of cooking, ease up on the liquid you add; the goal is to have the beans barely covered with liquid by the time they're tender.

Drain the beans, reserving the liquid. Discard the turkey wing or ham hock and the bay leaves. (Leave the cilantro in with the beans.) Put the bean mixture in a food processor and process, gradually adding enough of the reserved liquid, until the beans are the consistency of mashed potatoes. Season, to taste, with salt and pepper. Mound the beans on a platter and garnish with tortilla chips and radish slices, if using. (The beans can be prepared up to 30 minutes in advance. Return the beans to the saucepan and keep warm over very low heat.)


- - - - - - - - - - - - - - - - - -


Monday, March 8, 2010

Grilled Chicken


Can it be? Did it really happen? Did I seriously use the grill last night?

YES! For the first time and even better, on our newly built deck!
I love the first time I turn on the grill each year. The first time meat hits the grate. The way it smells, the way it sounds....

I chose to make chicken for the inaugural first grill. I suppose it's no surprise, as I LOVE chicken! I decided to do bone-in pieces; breast, thigh and leg. I loosely followed the advice of Steven Raichlen in his How to Grill mixed with a recipe from Daisy Martinez in her new book Daisy Morning, Noon and Night. Below is the recipe adapted from these superstars!

Enjoy! We did!!!!

Grilled Chicken
10 chicken pieces, skinless, bone in

Marinade
2 T kosher salt
1 T fresh ground pepper
2 T mexican oregano
2 cup cider vinegar
1/2 cup orange juice

Mop
1 cup cider vinegar
2 T canola oil
2 T barbecue sauce (homemade or commercial)
1/4 cup pickled jalapeno slices and juice

1/4-1/2 cup more barbecue sauce to finish

Mix the salt, pepper and oregano and rub on the chicken. Place the pieces in a large bowl and add the vinegar and orange juice. Marinate on the counter for 1 hour, or in the refrigerator for 4-12 hours.

Start a grill and heat to medium. If the chicken was in the refrigerator, take it out 30-60 minutes prior to grilling.

Prepare the mop by mixing the vinegar through the pickled jalapenos. Place the chicken, meat side down, on the grill, mopping the bone side. Cook for 10-12 minutes, mopping every 5. Turn over the pieces and mop again. Cook for 8 more minutes or until the thigh registers 160.

Brush the bone side with remaining barbecue sauce, turn, and cook for two minutes. Do the same with the meat side, turning once again for 2 more minutes, or until the thigh registers 165. Remove the thigh and leg and place the thermometer in the breast until it reaches 165. Depending on how large it is, you may want to turn off the burner directly under the meat, finishing it on indirect-high heat.

Serve with sauce, slaw and some grilled garlic bread. Enjoy!

Honey, Lime and Rum Glazed Shrimp


rum honey shrimp, originally uploaded by Kim De.

Read the title. Isn't is pretty? Say it out loud. Sounds even better, doesn't it!

You should TASTE it!!!

Lime, rum and honey are all wonderful bold flavors on their own. Together they blend like a lovely three-part harmony. Rum provides the deep bass note with it's richness. Lime is the harmony that sits in the middle, keeping its own integrity, yet also providing the acid needed to help the rum and honey do their jobs. Then there is the honey. The melody. The sweet foundation. Without it, the other two would sound (taste) thin and out of place.

Now that I have channeled enough of my music background...

This recipe is easy and fun to make. It was made on the cast iron skillet and even though it cooked just fine, the grill would have helped caramelize the honey, making for a more crusty finish.

Guess I will have to make this again come grilling season!

Honey, Lime and Rum Glazed Shrimp (Adapted from Latin Flavors on the Grill)

1/2 cup freshly squeezed lime juice
1/2 cup dark rum
2 tbsp cornstarch, dissolved in 2 tbsp lime juice
3/4 cup honey (I used a dark amber)
Kosher salt and freshly ground black pepper
zest of 2 limes
1/4 cup finely chopped cilantro
20 large shrimp, peeled and deveined
2 tbsp oil
salt and pepper to taste

Combine lime juice and rum in medium-size saucepan and bring to a boil over high heat. Whisk in cornstarch and lime juice mixture and honey. Add salt and pepper to taste. Cook until thickened, about 1 to 2 minutes. Remove from heat and let cool completely. When glaze is cooled, stir in the lime zest and the cilantro. Transfer to a container, cover and keep cool.

Preheat grill to medium-hot. Toss shrimp with the oil, 6 tbsp of the glaze and salt and pepper to taste. Grill shrimp for 1 to 2 minutes each side, brushing frequently with more glaze. Cook until shrimp are bright pink on the outside and white on the inside.

Saturday, March 6, 2010

Chicken in Garlic Sauce - Pollo al Ajillo


Garlic chicken, originally uploaded by Kim De.

Although I am in the fortunate position to not have a job outside the home at this time, I did for all my adult life until very recently. When I wasnt getting home from work until six or after, It was very important to me to have meals that could be cooked very quickly. Along with that, however, it was important to me that these meals taste great, and also be healthy.

This dish would fit all those criteria! Recently I started cooking recipes from Daisy Martinez. She uses bold ingredients that dont require a lot of fat to taste good.
This recipe caught my eye, because it has garlic in the title. If there is garlic in the title, I'm pretty sure I will love it! Steam some rice while the chicken cooks, saute a bit of spinach and you have a great tasting meal! The aroma of the garlic cooking will make you hungry if you werent all ready!!


Chicken in Garlic Sauce - Pollo al Ajillo (Adapted from Daisy Martinez)

12 large chicken thighs (about 4 pounds; see Note)
Fine sea or kosher salt
1/4 cup canola oil
10 cloves garlic, sliced
2 teaspoons chopped fresh thyme leaves
1/2 cup dry sherry
1/2 cup chicken broth, homemade or canned

Wash the chicken thighs and pat them dry with paper towels. Season the chicken generously with salt and pepper. Heat the oil in a large heavy skillet over medium-high heat. Add as many of the chicken thighs, skin side down, as will fit without touching.

Cook until the skin is golden brown, about 10 minutes. Flip the chicken pieces and cook until the other side is golden brown, about 5 minutes more.

Remove the pan from the heat and spoon off all but about 2 tablespoons of the fat, leaving all the lovely brown bits behind. Return the pan to low heat, stir in the garlic and thyme and cook until the garlic starts to turn golden, about 1 to 2 minutes. Pour in the sherry, increase the heat to medium and bring to a boil. Let it boil a minute or 2, then return the chicken to the pan skin side up. Reduce the heat to low, pour in the chicken stock and bring to a simmer. Cover the pan tightly and cook 20 minutes. Flip the chicken pieces (or rotate them top to bottom if using a smaller pan) and cook until the chicken is very tender, about 20 minutes. Serve hot.

Thursday, March 4, 2010

Pupusas de Queso


puposa, originally uploaded by Kim De.

I was introduced to puposa several years ago when I moved to Nashville. Simply, it is a filled corn pocket. Kind of like a tortilla, yet different. They are very popular in many South and Central American countries. In fact, in El Salvador, November 13 is National Puposa day!

There is a restaurant in town that makes them and they are a favorite of mine. Fillings range from cheese, beans and cheese, pork and cheese... and they are served with a wonderfully tangy vinegar based slaw.

Like any other "bread" recipe that is mixed and manipulated, it was fun to watch the dough take shape. The aroma as the masa and water combine is incredible and I always find the kneading dough to be a pleasurable experience.

After a short rest, I rolled the dough into small balls, pushed a small indentation with my thumb, then added my choice of filling - shredded queso (cheese) and diced hot red pepper. The fillings were covered over and the dough was presses into a flat circle. A hot iron skillet made beautiful brown spots on the dough while making the cheese melty inside.

The corn flavor was similar to what I was used to. The filling wasn't as prominent as at the restaurant and I dry cooked mine instead of using oil, but all in all, a successful first experience.

If you have a place in town that makes puposa, give it a taste! Then come home and make your own!

Pupusas

2 cups Masa harina
1 cup Warm water
1 cup Filling (I used cheese and diced pepper)

In a large bowl, mix together the masa harina and water and knead well. Knead in more water, one tablespoonful at a time if needed, to make a moist, yet firm dough. (It should not crack at the edges when you press down on it.) Cover and set aside to rest for 5 to 10 minutes.

Roll the dough into a log and cut it into 8 equal portions. Roll each portion into a ball.

Press an indentation in each ball with your thumb. Put about 1 tablespoon of desired filling into each indentation and fold the dough over to completely enclose it. Press the ball out with your palms to form a disc, taking care that that the filling doesn't spill out.

Line a tortilla press with plastic and press out each ball to about 5-6 inches wide and about 1/4-inch thick. If you don't have a tortilla press, place the dough between two pieces of plastic wrap or wax paper and roll it out with a rolling pin.

Heat an ungreased skillet over medium-high flame. Cook each pupusa for about 1-2 minutes on each side, until lightly browned and blistered. Remove to a plate and hold warm until all pupusas are done.

Pupusas de Queso: With a cheese filling. Use grated quesillo, queso fresco, farmer's cheese, mozzarella, Swiss cheese or a combination. Add some minced green chile if you like.

Tuesday, March 2, 2010

Seared Salmon with Spinach and Creamy Roasted Peppers

Goal: Eat more salmon. Issue: I don't really care for salmon. Solution: Try to hide it?

Bo has high cholesterol. In trying very hard to bring it down, I have pledged to make salmon once a week. There. I put it in writing. Now it is real.

Salmon is full of Omega3 Fatty Acids, which is very good to lower bad cholesterol. It is important for it to be in our diet. I don't really like the strong flavor or the way it is usually cooked - grilled with a bit of salt and pepper. If I am to be able to eat AND enjoy it, it needs to have other strong flavors involved to satisfy my tongue!

Seared Salmon with Spinach and Creamy Roasted Peppers is from Mexican Everyday by Rick Bayless. Since I love both spinach and peppers (especially when I get to roast them!), and the word "creamy" is always pleasing to my ears, it seemed a perfect starting place.

The "cream" sauce was fun to make and smelled terrific. Gently sauteing the spinach in the bubbling mixture made for a lovely pale green. And the best part was plating the sauce with the seared salmon, which was cooked with liberal amounts of salt and pepper and in the lovely garlicky oil.


Serving with white rice would make an elegant meal for guests. Or for a special night at home. We ate ours with corn tortillas from the freezer, also a good choice as they complemented the masa in the sauce nicely.


Rounded out with a crisp white wine - well the salmon was tolerable! Almost enjoyable!

Of course, anything is enjoyable if served with wine!

Seared Salmon with Spinach and Creamy Roasted Peppers
(Rick Bayless)
2 fresh poblano chiles
10 ounces cleaned spinach
3 tb. olive oil
3 garlic cloves, peeled and halved
1-2 tb. masa harina (mexican corn "flour" used for making tortillas)
1 1/2 cups milk, plus a little more if needed
Four 4 to 5 ( 1 1/4 pounds total) skinless samon fillets
Sea salt and freshly ground pepper


Turn the oven on its lowest setting.

Heat the oil in a very large skillet, preferably non-stick, over medium heat. Add the garlic and cook, stirring regularly, until soft and lightly browned, about 4 minutes. Using a slotted spoon, scoop the garlic into a blender. Set the skillet aside.

Rub the blackened skin off the chiles and pull out the stems and seed pods. Rinse the chiles to remove bits of skin and seeds. Roughly chop and add to the blender, along with the masa harina and milk. Blend until smooth.

Return the skillet to medium-high heat. Sprinkle both sides of fish liberally with salt and pepper. Lay the fillets in the hot oil and cook until richly browned, about 2-3 minutes.

Use a spatula to flip the fillets, and cook until the fish barely flakes when pressed firmly with a finger or back of a spoon (you want it slightly underdone), ususally a couple of minutes longer for fish that is about 1 inch thick. Using the spatula, transfer the fish to an ovenproof plate and set in the oven.

With the skillet still over medium- high, pour in the poblano mixture and whisk until it comes to a boil and thickens, about 1 minute.

Reduce the heat to medium-low and simmer, stirring frequently, for 5 minutes to blend the flavors. If the sauce has thickened past the consistently of a cream soup, whisk in a little more milk. Taste and season with salt, add the spinach to the sauce and stir until it is warm and well coated with sauce.

Divide the creamy spinach among plates, top each with portion of the salmon. Or you can spoon the sauce over the fish.

Monday, March 1, 2010

Calamari and Mussles


Before February got too far in the past, I wanted to complete recipe reviews from our Valentine's dinner. (blogged here)

Our evening of Spanish treats and tapas included gazpacho, mushrooms, calamari and mussels. My recipe research must have paid off because most dishes were superb.
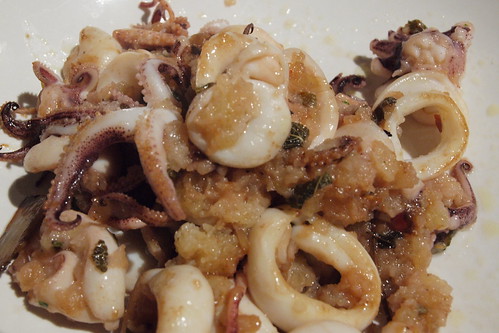
First the calamari. Calamares a la Plancha translates simply to grilled calamari, or calamari cooked on a hot iron (or cast iron skillet). The saute liquid was top notch, but honestly I dont feel the breadcrumbs were necessary. I will make this again!

Now for the mussels. Perfect mussels continue to allude me. I had them a few years ago at Rioja in Houston and was instantly enamored. Each time I try to replicate them, though, there is something missing. At Rioja the fish tasted of the sea without being "fishy" and the sauce was rich and earthy, perfect for dipping crusty bread. Each time I make them something is missing. This time the sauce was "thin" and there wasn't enough of it.

At least they make a pretty picture!

Calamares A La Plancha (Chef4all.com)

5 calamari tubes (size 6-8 per lb.)
2 Tbsp. panko breadcrumbs
2 Tbsp. vegetable oil
1 tsp. minced garlic
1/2 tsp. salt
1 pinch dry chili flakes
1/4 lemon, juiced
1 pinch white pepper
little sage and oregano.

In a small mixing bowl mix all the ingredients except the calamari; Wash the calamari tubes, check them thoroughly for any remaining pieces of the spine bone inside of them, and with a sharp knife make small slits throughout the tubes. Mix the calamari tubes with the prepared seasoning (or if you want to call it marinade) and let it sit for 5 minutes.

In the meantime, heat a 10-inch cast iron pan to high temperature, grease it with oil and place the calamari neatly in it. Cook each side for only about 25-30 seconds, until the breadcrumbs are golden brown, and then turn the calamari on the other side. Serve the calamari over chopped lettuce with a wedge of lemon.

Spicy Mussels with White Wine (Adapted from Bobby Flay)

3 tablespoons olive oil
1/2 Spanish onion, thinly sliced
4 large garlic cloves, chopped
2 teaspoons fennel seeds
1 teaspoon dried crushed red pepper
1/2 teaspoon salt, plus more for seasoning
1 cup dry white wine
2 (1/4-inch-thick) lemon slices
1/2 cup chopped fresh parsley leaves
1/2 pounds fresh mussels, scrubbed, debearded
1/2 cup chopped seeded tomatoes
8 slices crusty Italian bread,
Olive oil

Heat oil in heavy large pot. Add the onion and cook until soft. Add the garlic, fennel seeds, crushed red pepper and salt and cook for 1 minute.

Add wine, lemon slices, and 1/4 cup parsley; bring to boil. Add mussels. Cover pot and cook until mussel shells open, stirring once, about 6 minutes; discard any mussels that do not open. Using slotted spoon, transfer mussels to large shallow bowl. Boil broth in pot until reduced to 1 cup, about 3 minutes; season, to taste, with pepper. Pour broth over mussels. Sprinkle with tomatoes and remaining parsley.

Brush bread on both sides with oil and season with salt. Grill until golden brown on both sides. Serve mussels with bread for dipping.

Chocolate Almond Torte


choc alm torte, originally uploaded by Kim De.

I have alluded to this amazing torte in the past. Now it is time for you to try it!

If you like dark and chocolaty, if you like moist, if you like a hint of citrus in your chocolate, this is for you. Though easy to make, it is an impressive dessert to serve to guests.

My only caution is this: if you don't like orange with chocolate, or don't like it to be strong, leave it out of only use the zest of half of the fruit. It did have a strong orange flavor.

Otherwise, perfection!


Chocolate-Almond Torte (Adapted from Food Network Magazine)

1 1/4 cups blanched, sliced almonds
12 tablespoons unsalted butter, diced, plus more for greasing
8 ounces bittersweet chocolate, chopped
2 tablespoons breadcrumbs
3/4 cup granulated sugar
3 large eggs plus 3 egg yolks
Grated zest of 1 orange
1 tablespoon dark rum
1/2 teaspoon salt
Confectioners' sugar, for garnish
Whipped cream, for garnish (optional)


Preheat the oven to 350 degrees. Toast the almonds on a baking sheet until lightly golden, 6 to 7 minutes. Cool slightly, then pulse in a food processor until finely ground, but not pasty.

Melt 12 tablespoons butter and the chocolate in a heatproof bowl set over a saucepan of simmering water (do not let the bowl touch the water). Stir until the chocolate is smooth, then remove from the heat and cool slightly. Grease the bottom and sides of a 9-inch springform pan with butter and coat with the breadcrumbs, tapping out the excess.

Combine the eggs and yolks and the sugar in a stand mixer and beat with the paddle attachment on medium-high until thick and pale, about 3 minutes. Add the orange zest, rum and salt, then beat in the melted chocolate until smooth. Mix in the ground almonds until just combined.

Spread the batter in the prepared pan and bake until the top is firm and cracked (a toothpick inserted into the cake will be fudgy), 35 to 40 minutes. Cool on a rack 10 minutes, then run a knife around the edge of the pan and remove the ring. Serve warm or at room temperature. Garnish with confectioners' sugar and whipped cream, if desired.