Thursday, July 29, 2010

Picnic Ready Potato Salad


I couldn't believe when I looked that I had never blogged about my "famous" healthy potato salad!  So in embarrassment and shame for this oversight, here is a link to said recipe.  Enjoy!

Wednesday, July 28, 2010

Wild Wednesday - Heirloom Tomato Salad with Pesto


I found the most gorgeous heirloom tomatoes at the farmers market!  Gathered in a basket were all sizes, shapes and colors and I couldn't wait to get them home to find out what they were!

A quick internet search told me I had purchased the green zebra, the lemon boy yellow and brandywine red varieties.  And speaking of doing that search, I had no idea so many tomato varieties existed!  It was mind-boggling!


Wanting their flavors to tingle on our tongues I certainly did not want to cover them up with lots of salad dressing or even blanket them with bread in a sandwich.  Instead I decided to spotlight them with a light chop, a sprinkle of salt and pepper, and a dash of fresh pesto.

Heaven on a plate!

The #8 Reason to buy local

Local food helps to keep your taxes in check. Farms contribute more in taxes than they require in services, whereas suburban development costs more than it generates in taxes, according to several studies.

Monday, July 26, 2010

Berry Crisp


It is time again to highlight a dessert, something I don't get to do very often.

A basket of blackberries called to me the other day "Kim, Kim...we need to be cooked" so I decided to do the stand up thing and answer the call.


A quick search on the Cooking Light Bulletin Boards led me to a recipe that I outlined, then promptly changed - enough that I am happy, but not so much that you can't recognize the original if you had previously tasted it.  What this melding produced was a juicy, berry-y, sweet, crumbly treat that if you concentrate real hard, can be counted as a fruit serving.

Go ahead.  You have my permission!


Berry Crisp

8 cups mixed fresh berries: blueberries, raspberries, blackberries, strawberries
1 tablespoon cornstarch
1 tablespoon sugar
3/4 cups all-purpose flour
3/4 c oatmeal
1/3 cup dark brown sugar
1/3 cup granulated sugar
1 teaspoon ground cinnamon
1/8 teaspoon salt
1/2 cup melted butter 


Preheat oven to 350 degrees. To prepare filling, toss berries with cornstarch and sugar.  Set aside.

In a large bowl, whisk together flour, oats, sugars, cinnamon and salt. Stir in butter until coarse crumbs form.

Pour filling into a 9-inch square or round pan (do not grease first). Using your fingers, form topping mixture into 1/4-inch to 1/2-inch crumbs and spread over berries. Bake until filling bubbles and topping is light golden, about 55 minutes. Let cool slightly.

Sunday, July 25, 2010

Garbanzo Bean Salad


So today it is time for you to be bored/titillated/frustrated/excited by one of my non-recipe recipes.

Sorry.


I have been making a version of this for so many years now I can do it in my sleep. It was my go-to lunch when I was teaching and I hadn't planned well for lunch.  Easy to toss with ingredients on hand - all  you need is a base of garbanzo beans.


Garbanzo Bean Salad

Any combination of the following:
Garbanzo beans, rinsed and drained (really, canned works just fine here)
Spinach, chopped
Cucumbers, diced
Pear tomatoes, cut in half if large
Feta cheese, crumbled (if possible, spend the extra to buy a really good one.  It will make the salad!)
Basil

Toss whatever combination of ingredients you design.  Add salt and pepper to taste.

And if you desire a dressing, mix two parts balsamic vinegar to one part olive oil and one part dijon mustard.  Will change your life as you know it!

Friday, July 23, 2010

"Power Bar"


When I first heard whisperings of this recipe, my ears perked up.  You see I have been looking for a post workout snack as I am tiring of the beautiful banana, and I have yet to find a bar at the store that I like.  Plus who has the money? So I thought Id give this a try.


My version below is similar to the original but I did make a few changes to suit my pantry's offerings.  At first glance they were a bit crumbly but after carefully cutting them then freezing, the one I tried (thawed of course) was perfect!


And sooooo much better than the kind in a wrapper!

Power"ful" Bars


1/2 cup nuts, coarsley chopped (I used walnuts, almonds and pecans)
1 1/2 cup unsweetened brown rice cereal
3/4 cups rolled oats
2 1/2 oz. dark chocolate chips
1 cup unsweetented dried dates, pitted and choped in fod processor until smooth
1/2 cup unsalted almond or peanut butter.
2 T raw honey


In a mixing bowl combine chopped nuts, rice cereal, and rolled oats. 
Melt the chocolate in a double boiler or slowly in the microwave
Add dates, nut butter, and honey to chocolate and mix until fully combined.
Using a wooden spoon, fold the chocolate mixture into the cereal mixture. 
Press into an 8x8 pan.  Press the mixture down firmly
Cover with plastic wrap and refrigerate at least 30 minutes or until the mixture is set.
Cut into 24 squares. Squares can be stored in refrigerator 3-5 days.

Thursday, July 22, 2010

Easy Summer Sides

Easy Summer Sides

An article of refreshing salad recipes.  Enjoy!

Wednesday, July 21, 2010

Wild Wednesday - And the Chard Continues


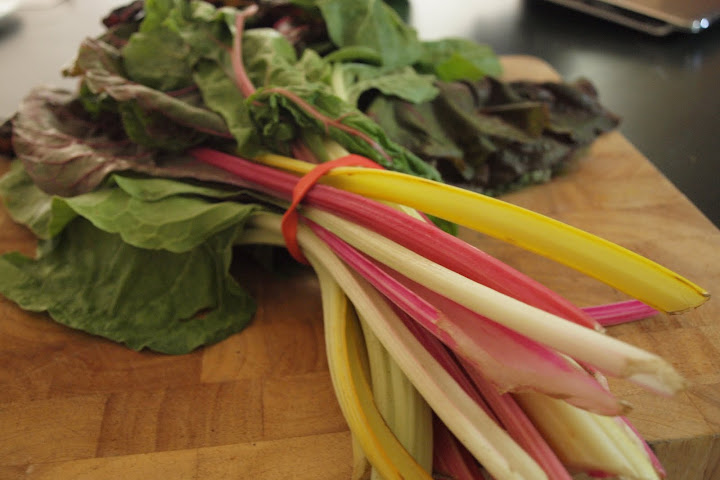
If you are sick of chard recipes, I really do appoligize.  But I love it so much and I can't resist it's shamrock leafiness.

In our house, vegetarian night is always met with great suspicion.  "What is she going to feed me"?  "Will I like it"?  "Will I feel full"?  "Will the meat police come while I sleep and haul me away for skipping a night"?  Yet we always have a happy ending.

This night was no different.  Suspicion.  Doubt.  Dread.  Tiny bite.  Slight smile. Bigger bite.  Bigger smile. Then the words "This is good"!  

Yes, I knew it would be.

There is a bit of prep work involved with this, so you may want to save it for when you have the time to relax, pour yourself a glass of wine, crank up some Motown and enjoy yourself.


And just know that after step one, your hands will carry the lovely scent of garlic with them for the rest of the evening.  It is aromatic heaven!

Reason #7 to buy local:

Local food preserves open space. The open landscape will survive only as long as farms are financially viable. When you buy locally grown food, you are doing something proactive about preserving the agricultural landscape.
            
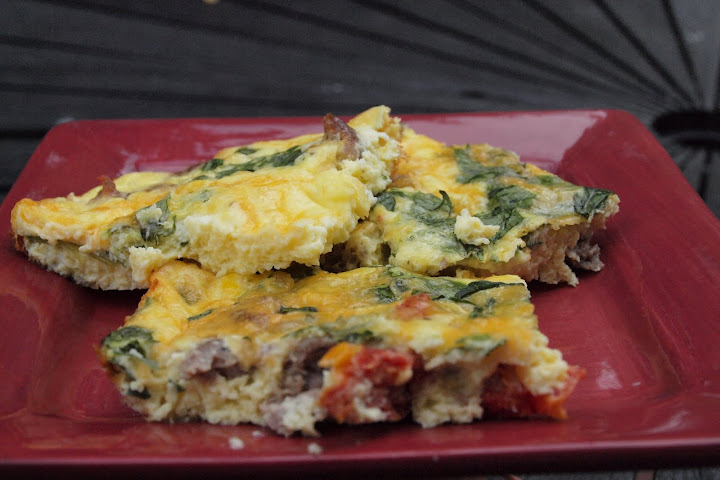
 Strata With Mushrooms and Chard (Adapted from Martha Rose Shulman)

1/2  lb            stale bread, sliced about 3/4 to 1 inch thick
3/4  oz           dried mushrooms
8      oz          Swiss chard, stemmed and cleaned
2                    garlic cloves, 1 cut in half, the other minced
1 1/2  cups     low-fat milk
2      oz          Gruyère cheese, grated (1/2 cup, tightly packed)
1      oz          Parmesan cheese, grated (1/4 cup, tightly packed)
2      Tbs        extra virgin olive oil
1      tsp         chopped fresh rosemary
                     Salt and freshly ground pepper
 4                   large eggs
  
If you plan ahead, buy a baguette, slice and leave it exposed over night.  This will help it become stale and make it easier to work with.  If it is soft, toast the slices then rub each, front and back, with the cut clove of garlic.  If the bread is soft, toast it lightly and rub each slice front and back with the cut clove of garlic. Cut in 1-inch dice.  Place in a very large bowl, and toss with 2/3 cup of the milk. Set aside.

Place the dried mushrooms in a bowl or a Pyrex measuring cup, and cover with 1 1/2 cups boiling water. Allow to sit for 30 minutes. Set a strainer over a bowl, line with cheesecloth, a coffee filter or paper towels, and drain the mushrooms. Squeeze the mushrooms over the strainer to extract all of the broth. Rinse, away from the strainer, in several changes of water to wash off sand. Squeeze out excess water. Chop coarsely. Measure out 1 cup of the mushroom broth, and combine with the remaining milk.

Preheat the oven to 350 degrees. Oil or butter a 2-quart baking dish or gratin. Heat a large skillet over medium-high heat, and add the chard. Stir until the leaves begin to wilt in the liquid left on them after washing.

Cover the pan, and let the chard steam until it has completely collapsed, about two minutes. Uncover and stir. When all of the chard has wilted, remove from the pan and rinse briefly with cold water. Press or squeeze out
excess liquid. Chop coarsely and set aside.

Add 1 tablespoon of the olive oil to the pan, turn the heat down to medium and add the minced garlic. Cook, stirring, until fragrant, about 30 seconds, and stir in the reconstituted mushrooms, the rosemary and the chard. Stir together for a couple of minutes, and season to taste with salt and pepper. Remove from the heat, and transfer to the bowl with the bread cubes. Add the cheeses, and toss together. Arrange in the baking dish.

Beat together the eggs in a medium bowl. Add salt to taste, the remaining milk and the mushroom broth. Add a few twists of the peppermill and pour over the bread. Press the bread down into the custard mixture. Sprinkle a little Parmesan over the top.  Place in the oven, and bake 40 to 50 minutes, until puffed and browned. Remove from the oven, and serve hot or warm.

NOTE:  This can be assembled through step 4 hours or even a couple of days before you beat together the eggs and milk and complete the casserole


Monday, July 19, 2010

Grilled Chicken with Cumin and Garlic - And Testing....

Grilled Chicken with Cumin and Garlic

I am beginning to write content for a website and much of it will be about *gasp* food and cooking.  I will share links with you as they happen.  They will be recognizable as they look very different from my other posts.

Feel free to visit the recipe if you desire.

Swiss Chard with Pasta


As my love affair with chard continues,  I am on a mission.  I want you to love it too.


I want you to see the beautiful stems of the rainbow chard.  I want you to experience the green scent that rises up in the air when your knife slices through.  And I really want you to know the delight of the garlic-infused-olive-oil wilt of a perfectly cooked batch.

So please, help to make me a very happy person and try some chard today!


Swiss Chard with Pasta (Adapted from FoodTV)

8 ounces pasta of choice, cooked and drained
1 tablespoons olive oil
1/2 onion, chopped
1 clove garlic, finely chopped or thinly sliced
1 pound Swiss chard, washed, stems removed and coarsely chopped
1/2 cup red wine
1 cup fresh cherry tomatoes, chopped
1 teaspoon red pepper flakes
Salt and pepper
  
In a large skillet heat the oil and stir in the onion. Cook for 2 minutes and stir in the garlic. Add the chopped Swiss chard and toss to coat. Pour in the wine or stock and stir to coat. When the chard begins to wilt, stir in the tomatoes and red pepper flakes. Do not over cook the chard. It is ready to serve just after it has wilted.

Immediately add the cooked pasta and toss to coat. 


    Friday, July 16, 2010

    Egg Bake


    Another classic in my book.  A child's Christmas memory of presents being opened while eggs, cheese and sausage bubbled away in the oven.  The magic of the timer announcing perfection as the last gift was freed from its colorful wrapping.


    I still love to eat Egg Bake.  In more recent offerings I have cut back on the meat, played up the veggies and tried to make it a healthier option.  But still it is Christmas Morning baked with in an egg.


    Egg Casserole

    1/2  pound Italian spicy sausage, casings removed (The sausage can be left out for a vegetarian dish)
    3 garlic cloves, minced
    1/2 cup chopped sun-dried tomatoes soaked in 1 cup boiling water
    2-3 cups fresh spinach, torn
    6 large eggs
    4 large egg whites
    1 cup milk
    1 cup plain yogurt
    2 cups grated mozzarella cheese
    1/2 teaspoon kosher salt

    Preheat oven to 375. Grease13 by 9 by 2-inch glass baking dish.

    Saute sausage in medium nonstick skillet over medium heat until brown and cooked through, breaking up with back of fork into small pieces, about 10 minutes. Add garlic and saute 3 minutes. Add sun-dried tomatoes, stir 1 minute. Spread sausage mixture into the prepared dish. (Can be made 1 day ahead, covered and refrigerated.)

    Layer spinach on top of sausage.  Whisk eggs, egg whites, milk, yogurt, 1 1/2 cups cheese, and salt in large bowl and blend well. Pour egg mixture over sausage mixture in the baking dish. Sprinkle with remaining 1/2-cup cheese.  Bake until top of the casserole is golden brown and knife inserted into center comes out clean, about 30 minutes. Let stand 5 minutes before serving.

    Wednesday, July 14, 2010

    Wild Wednesday - Fresh Corn Salad


    This week I took a turn through the Woodbine Farmers Market.  It is serving south Nashville (and those of us will travel anywhere for a good farmers market) and is filling a much needed niche.  It was busy and full of happy people and I look forward to visiting them again!

    When I got home my bag of goodies included corn and zucchini.  I wanted to play with the corn a bit, do something different from the usual boiled or grilled ear with butter and salt.  So I decided raw, and do it in salad.

    I grew up in corn country.  Indiana.  Corn as far as the eye can see.  But I don't remember every having it raw until several years ago when foodie friends introduced it to me.  When eaten raw, the corn retains all of its sweetness and as it is sliced off the cob, the beautiful corn-milk comes along for the ride, helping to make the basis for a wonderful sauce.

    And with your leftover corn, because you know you will over-buy, I recommend you try Moisturizing Corn Milk and Lavender Facial Toner from my friend at Crunchy Betty.  Your skin will thank you for it!

    And before you get the recipe:

    Reason #6 to buy local

    Local food builds a stronger community. When you buy direct from a farmer, you are re-establishing a time-honored connection between the eater and the grower. Knowing the farmers gives you insight into the seasons, the weather, and the miracle of raising food.

    Fresh Corn Salad

    2 ears corn, shucked and washed
    1/2 red pepper, chopped ** (use any combo of vegetables you desire.  I had a red pepper so I threw it in)
    1/2 zucchini, sliced into rounds then in half
    6 pear tomatoes, sliced in half
    1/4 cup chopped cilantro
    salt and pepper

    Carefully slice the corn kernels onto a plate or bowl.  Toss with the rest of the vegetables and the cilantro.  Salt and pepper to taste.

    This is the part where you get to be creative.  This is great with no additional sauce.  Or a touch of grainy mustard alone.  Maybe a hint of ranch dressing.  A newly mixed balsamic vinegar and oil blend.  Use your imagination and have fun!

    Monday, July 12, 2010

    Banana Bread


    About once a year I will dig bananas out of the freezer to make some bread.  I love my banana bread to be grainy, wheat-y and full of hearty goodness.  Or as Bo would say "hippie bread".  Fine.  I like hippie bread.

    This particular "hippie bread" came from Laurel's Kitchen.  I am positive I remember a copy of this in my moms kitchen in the 70's.  Now you have to get the picture.  My mom is a straight laced "Eisenhower Era" kind of gal.  She was never part of the summer-of-love; protest-everything gang.  But she has some hippie in her soul.  She was feeding us healthy food before it was vogue.


    We never had white bread in the house, or Kraft singles.  As soon as it was available our peanut butter was the natural only-peanuts-and-salt kind, and there were rarely potato chips or cookies purchased.  Yup.  She was a granola-foodie, but living in the heart of the Midwest, she just didn't know it.

    This walk down memory lane was to set up my need to reach for this cookbook to look for a banana bread recipe - then to make a few changes to meet today's "health food hippie bread"

    Laurel's Kitchen Banana Bread

    Juice of 1 lemon
    3 very ripe bananas
    1/4 cup brown sugar
    1/4 cup agave nectar
    1/4 cup butter, softened
    1/4 cup plain yogurt
    1 1/2 cups whole wheat flour
    1/2 cup wheat germ
    1/2 t salt
    1/2 t baking powder
    1/2 t baking soda

    Preheat oven to 375.  Mash bananas and mix them with lemon juice until they are smooth.

    Cream the butter, yogurt, brown sugar and agave nectar together.  Add the bananas and mix well.

    In a separate bowl stir together the dry ingredients.  Add to the banana mix stirring until just mixed.  It will be very stiff.  Spoon it onto a greased loaf pan and bake for 25-35 minutes.

    NOTE:  I checked after 25, then at 30 I covered with foil for the last 5 minutes.

    Saturday, July 10, 2010

    Creamy Polenta with Gorgonzola


    I have a dear friend who can wax poetic on the subject.  She can sing a song to polenta like no one else I know.  What ever I write will pale in comparison to her beautiful prose, but I will certainly give it a try.

    If you have never had a bowl of creamy polenta, you are in for a treat.  If you are southern, prepare a picture in your mind of grits.  Now move way eastward toward Italy.   There you are.  Add a more "corny" taste and a slight different texture.  But for simplicity sake within this post, picture grits. 


    Preparing this smooth offering is an zen experience in itself.   Bringing the water to a boil is a lesson in patience.  Slowly adding the golden grain while stirring is hypnotizing.  Watching the minuscule bubbles, controlling the heat, and bringing it to its creamy perfection brings about a meditative state. 

    It is perfect.  You love the texture and it has reached the exact thickness for your palate.  Now the fun begins!  What would you like to add to it?  If it is thick enough, you can grill it.  Eat it with a touch of salt.  Possibly some pure maple syrup.  Or make it a savory side dish by sprinkling it with sharp gorgonzola with just a dot of that pasta sauce hiding in your freezer.

    Whatever you do, Just Do It (with apologizes to Nike)

    Ok my friend, I hope I did justice to your true love, polenta!

    Creamy Polenta with Gorgonzola (Adapted from Giada De Laurentiis)

    6 cups water
    1 3/4 teaspoons salt
    1 1/2 cups yellow cornmeal
    1/4 cup (1/2 stick) unsalted butter
    3 ounces mild Gorgonzola, cut into 1/2-inch cubes
    Additional salt and freshly ground black pepper, optional

    Bring 6 cups of water to a boil in a heavy large saucepan. Add 1 3/4 teaspoons of salt. Gradually whisk in the cornmeal. Reduce the heat and simmer until the mixture thickens and the cornmeal is tender, stirring often, about 20 minutes. After 10 minutes, you can switch to a wooden spoon for easier stirring.

    Turn off the heat. Add the butter and Gorgonzola and stir until the cheese melts. Season with additional salt and pepper, to taste. Transfer the polenta to a bowl and serve.

    Friday, July 9, 2010

    Chicken with Balsamic BBQ Sauce

    Sweet, succulent, juicy, tender - all words that will be used in your home when you serve this chicken.

    To be honest, the chicken really isn't the star here - it's the sauce.  Sweet up front, back tongue bite and a bit spicy if you choose to use it as a dip.  

    It was terribly easy to make, utilizing a few top notch ingredients that just sing out for each other and take you away from the traditional sticky red barbecue sauce.


    The strong flavor make this a great sauce for more than just chicken.  It would also be fabulous on pork or steak and possibly even a meaty fish.

    Lucky for you it makes enough to try them all!

    Chicken with Balsamic BBQ Sauce (Giada  De Laurentiis)

    1 cup balsamic vinegar
    3/4 cup ketchup
    1/3 cup brown sugar
    1 garlic clove, minced
    1 tablespoon Worcestershire sauce
    1 tablespoon Dijon mustard
    1/2 teaspoon salt
    1/2 teaspoon freshly ground black pepper
    4 pieces chicken (any combination of breast or leg-and-thigh pieces)
    Salt and freshly ground pepper

    Combine all the sauce ingredients in a small saucepan and stir until all the they are incorporated and the mixture is smooth. Simmer over medium heat until reduced by 1/3, about 15 to 20 minutes.


    Place a grill pan over medium heat or preheat a gas or charcoal grill. Season the meat with salt and pepper. Lightly coat the chicken with olive oil, salt and pepper.  Place the meat on the grill.


    Cook the chicken about 8 minutes per side. Brush sauce over the chicken during the last 2-3 minutes of cooking time.

    Remove the meat from the grill and let rest for at least 5 minutes. Serve with the BBQ sauce alongside.


    NOTE:   The chicken can be baked in the oven. Preheat the oven to 375 degrees F. Place the chicken skin side up in a baking dish and bake for 25 minutes. Remove the baking dish from the oven and spoon the BBQ sauce all over the top of the chicken. Return the baking dish to the oven and bake for another 15 minutes.

    Wednesday, July 7, 2010

    Wild Wednesday - Sort of...


    This week is Bo's birthday week.  Translation: He gets to choose what we eat, so most of our meals are repeats. 

    So for our Farmers Market meal, we homemade buffalo burgers with this gazpacho using tomatoes from the market.


    I also made this fabulous bean recipe.  If you haven't tried either of these, don't hesitate!  Jump right in!


    And no worries, I didn't forget this:

    Reason #5 to buy local

    Local food supports local farm families. With fewer than 1 million Americans now listing farming as their primary occupation, farmers are a vanishing breed. Local farmers who sell direct to consumers cut out the middle man and get full retail price for their crops – which means farm families can afford to stay on the farm, doing what they love.

    Monday, July 5, 2010

    Rum Grilled Pineapple


    Have you ever had grilled pineapple?  Seriously?  Well you MUST try now!

    When grilled, the normally eye-catching yellow takes on a deeper more gentle golden hue and the crisp bite turns a bit softer.  Add to that the slight smoke aroma and char flavor and you have got a fabulous dessert.

    Don't worry.  You can also use it as a side dish.  Just take my advice and grill your fruit prior to your meat or you will get an interesting flavor combo.  But since it is even better at room temperature, letting it sit while the rest of your meal cooks only intensifies the excitement.


    Now for the best part.  The I-wanted-to-get-you-hooked-then-reward-you, part. 

    Rum.  Yes, you get to marinate these little blond fruits in rum.  And brown sugar. 

    NOW it's time to run around your kitchen whooping for joy!  If you add fresh berries, a touch of plain yogurt and some leftover sauce to the final presentation, you will weep with such a joy your neighbors will come around to see what the noise is about.

    Maybe you should eat these in doors.

    Grilled Pineapple with Rum Sauce

    4-6 slices fresh pineapple
    1 cup dark rum (I'm thinking tequilla will also shine here!)
    1/2 cup brown sugar

    Place the pineapple slices in a large baking dish, not stacked if possible.  Whisk the rum and brown sugar in a small bowl until the sugar is mostly mixed in.  Pour over the fruit, turning each slice to assure complete saturation.  Marinate on the counter for 30 minutes, or longer in the refrigerator.

    Heat the grill to medium.  Oil the grates and place on the pineapple slices.  Check after 3 minutes and every two after that until light grill marks appear.  Flip and do the same for the other side.  Remove to a platter to rest.  Chop, leave whole, serve with fruit, serve with yogurt or ice cream - but don't forget to use the leftover rum sauce. 

    NOTE:  If serving to children, the sauce can be heated on the stove to a gentle boil then simmered for a few minutes to cook out the alcohol.

    Friday, July 2, 2010

    It's a Kid Production!


    Boys were waving signs and directing me into the parking lot with the call of  "Buy fruits and vegetables"  as I approached the Coleman Community Center.

    As I stepped from the car into the furnace of heat, I was immediately greeted by a young man eager to sell his wares.  Other children scurried around, serious intent on their faces.

    Such was my first experience with one of the Veggie Markets markets sponsored by Monroe Carrol Children's Hospital at Vanderbilt.   The markets are staffed by neighborhood children with guidance from the Vanderbilt Children's Health Improvement and Prevention initiative.   

    Sergio, 8 yrs old, was working advertising and described the job as "makes posters and chants of the market".  Before being hired, he filled out a job application, just like an adult!  With a smile on his face and pride in his voice he announced that on his application he "didn't talk of money but said he wanted to learn to get healthy."  He loves salad and fruits. 


    Angi (8) and Javion (11), working customer service, announced the availability and prices for the day. On his application, Javion wanted to "help the world".  He told me the produce at the grocery store doesn't look as pretty or taste as good as what you can buy at their market.

    Angi's father came by and asked Angi help him decide what to buy for dinner and she danced off, excited at this new task.  Helping a parent pick healthy foods!  What a great lesson!


    Six different markets are run in low-income areas of Nashville where fresh produce is sometimes scarce.  And with a 40% childhood obesity rate in Tennessee, this service has never been more important.  I purchased gorgeous blueberries, ripe red tomatoes, corn that smelled like heaven and green peppers all for $5.00.  Try doing that at the grocery store!

    And Nashville is getting involved.  With underwriting grants from First Tennessee Bank and locations donated by Metro Parks, its no wonder that they entering their third successful year.


    The produce is purchased wholesale from farmers.  Only produce grown within 150 miles of Nashville is used.  The market prices are set based on weight and and base cost with enough added in to keep the market open.


    Besides a small salary, the diligent workers are learning great lessons in marketing and advertising, math (they write up receipts, take money and make change), organization, and customer service.  

    But most important, they are learning how good local, in season fruits and veggies can taste. An example was shared with me:  "The other day the ice cream truck went by.  One of the boys said 'Why would you want ice cream when you could have a peach?'"

    'Nuff said!