
A margarita during a snowstorm. What could be better?
As Tennessee digs out from 5 inches of snow and 2 inches of ice, I feel the need to share a tatsy cocktail. A simple cocktail. A sweet and sour cocktail.
If you love a "margarita" from most restaurants, chances are you aren't getting a true margarita. You are getting tequilla mixed with an artificial syrupy-sweet lime concoction.
Let me introduce you to Margarita. She is a very simple drink. She is made with only a few ingredients. There are variations on this theme, some who dont use orange liquor, some that include a simple syrup, but I guarantee that none include artificial lime flavoring or artificial sweetener.
Now that the lesson is out of the way, lets drink!
Pure and Simple Margarita (Rick Bayless)
1 cup tequila, preferably a young silver or reposado 100% agave tequila
1/2 cup Cointreau or other orange liqueur
1/3 cup fresh lime juice, plus a little extra for moistening the rim of the glasses
A little sugar if necessary (NOTE: unless you are used to the strong and tart flavor of tequilla with lime, you will want to add sugar to taste)
About 1/3 cup coarse (Kosher) salt for crusting the rim of the glasses
About 3 cups medium ice cubes
In a small pitcher, combine the tequila, orange liqueur and lime. Taste and decide if you think the mixture needs to be a little sweeter or a little tangier (keep in mind that it will taste a little tangier once it’s been shaken). Add a bit more lime or a touch of sugar, if necessary.
Spread out the salt onto a small plate. Moisten the rim of four 6-ounce martini glasses with a little lime juice (if you have a cut lime, even an already-squeezed one, moisten the rims by running it around them). One by one, turn the glasses over and dip them lightly in the salt, creating a thin, even crust all around the rim.
Pour half of the margarita mixture into a cocktail shaker, add half of the ice cubes. Shake vigorously for about 15 seconds (this is important to achieve the perfect strength–some of the ice needs to melt into the margarita–and the right degree of frostiness). Strain into the prepared glasses, then repeat with the remaining margarita mixture.
Sunday, January 31, 2010
Pure and Simple Shaken Margarita
Thursday, January 28, 2010
Mahi Mahi with Chipotle Mayonnaise
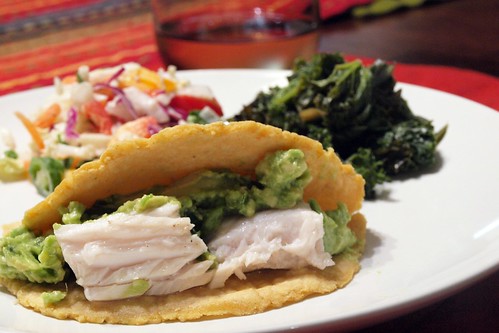
UMmmmmmm, fish tacos! Sacrilege as it is, I prefer my fish tacos to be grilled to a moist perfection instead of fried. I know. Call me a heretic!
From Latin Flavors on the Grill, these filets are simply grilled with oil, salt and pepper. A thin layer of chipotle mayonnaise is spread on after removing them from the grill, melting into the meat and blending with perfection.
The taco idea? It was mine. Homemade corn tortillas and a hit of creamy guacamole round complement the warmth that builds from the mayonnaise.
I am ready for the weather to warm up enough to start grilling outside. In the meantime instead of skipping these recipes, I use my cast iron skillet. Not a bad substitute!
Mahi Mahi with Chipotle Mayonnaise (Latin Flavors on the Grill)
1/2 cup mayonnaise
2 T finely chopped chipoltes in adobo sauce
Salt and Pepper
6 (6oz) Mahi Mahi Filets
2 T oil
Salt and Pepper
Combine the mayonnaise and chipotles and mix thoroughly. Add salt and pepper to taste.
Prepare the grill for medium (or the grill pan, cast iron skillet over medium heat). Oil the grates and a grilling basket or pan.
Brush the fillets with oil and season with salt and pepper. Place the fish fillets on the hot rack and grill for 4-5 minutes until the fish is lightly browned on the outside and firm and white on the inside. Using tongs or a spatula, carefully turn the fish over and grill for 3-4 minutes.
Transfer to a plate and brush with mayonnaise, using the remainder to serve alongside if desired.
TIP: Puree the remaining chipotle peppers and freeze on parchment paper in 1T increments, moving it to a freezer bag when firm.
Tuesday, January 26, 2010
Calamari with Blackened Tomato

I am sure you are not surprised to see calamari on my menu. Bo wasn't either. I think he is quite please with this new obsession of mine!
To continue with my craving for all flavors Mexican, I opened Tacos by Mark Miller. So far, everything from that book has been a winner and the calamari recipe looked no different.
One of the things I am enjoying about this book is the bold flavors made with small amounts of ingredients. Simplicity inducing mouth-watering reactions. My favorite.
I made one tiny adjustment in that I served the seafood over brown basmati rice instead of in a taco. I can assure you this was a great way to do this, but please try the taco an let me know how it was!
It may be a few days before my next post - my sick computer is going into the hospital and I haven't tried loading pictures into Bo's laptop, so we will see. No worries, though. Many more recipes on the horizon, lots to tell you when I return!
Calamari with Blackened Tomato (Adapted from Tacos by Mark Miller)
1/4 olive oil (preferably Spanish)
1/2 small white onion, cut into 1/4 inch dice
1 1/2 lbs calamari, cleaned and washed, body sliced into 1/4 inch rings and tentacles left whole if small
1 large tomato, blackened and cut into 1/4 inch dice
1 jalapeno chie, dry roasted and chopped
2 cloves garlic, dry roasted and chopped
3/4 t salt
3 t chipotle chile powder (you can substitute regular chile powder if you cant find chipotle)
1 1/2 T chopped fresh cilantro
12 (5 1/2 inch) soft corn tortillas
Blackened Tomatoes
Remove the stem, but keep the tomato whole. Blacken, turning frequently, in a single layer in a cast-iron or heavy bottomed skillet over medium-high heat, or on a baking sheet under a broiler until charred and blistered on all sides, about 20 minutes in a skillet or 5 minutes under the broiler.
Dry Roasted Chiles and Garlic
Place unpeeled cloves in a dry cast-iron or heavy bottomed skillet and roast over low heat until the garlic softens, 30-40 minutes. Shake the pan occasionally. Or roast in an oven at 350 until soft, 20-30 minutes. When done the garlic should be creamy and sweet, soft enough to slip out of the skin when you squeeze the clove.
Place the chiles in a hot cast-iron or heavy bottom skillet and cook, turning every 5 minutes until all sides are evenly blistered.
Taco Filling
In a skillet, heat the oil over medium high heat and saute the diced onion until it begins to caramelize, about 5 minutes. Transfer the onion to a small saucepan and add the calamari, tomato, jalapeno, garlic, salt, chile powder and cilantro. Let the mixture come to a simmer over medium-low heat and cook until barely done, about 7 minutes (don't overcook or the calamari will be rubbery). Remove from heat and serve immediately, folding in warmed tortillas or over rice.
Sunday, January 24, 2010
Salsa
I dont often blog about prepared products – after all, my purpose here is to share what I make. But once in awhile something comes along that is so great I want to tell everyone. I mean why should I be the only one eating good stuff?
I know it has been mentioned a few times, but I love Mexican food. Not the kind you may be thinking of – the combo of greasy enchilada, crispy taco with beans and rice, all smothered with cheese – but the kind make with fresh ingredients. The kind I miss from my days in Houston. The kind I can cook at home with the help of Chef Rick Bayless and his fabulous cookbooks.
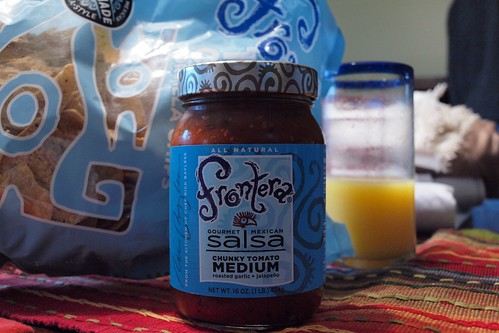
To me salsa is an art form. It is so incredibly simple to make at home and the taste is so amazing, I rarely buy it. But when I got a chance to try a jarred salsa from Frontera, the company owned by Rick Bayless, I jumped at the chance.
Today I opened it to share with Bo and a friend while watching the COLTS WIN (have I mentioned I grew up in Indiana?). I knew the quality would be good, after all Rick Bayless put his name on it. But I was still expecting “jarred salsa”.

I was wrong.
The first thing I noticed was it was thick. Most salsas from a jar are watery. Next thing was the perfectly chopped/minced/pureed ingredients. Now I was intrigued. I took a nice big whiff. Aromatic! Tomatoes, peppers, onions – I could smell the vegetables as individuals, yet they were mixing together somewhere mid air.
Then it came time for the big test. Would it live up to my very-high-foodie-snob standards? I tasted the crisp flavor from fresh vegetables. My tongue felt the smoke from the roasting. There was a nice subtle burn from the peppers and while not quite homemade, it is the closest I have come to from jar. It would be a great addition to your Superbowl Party.

Oh, and did I mention THE COLTS ARE IN THE SUPERBOWL!!!!!!!!
Friday, January 22, 2010
Tuna with Tomatillo Avocado Salsa

One of my New Year goals is to start serving fish or seafood two times a week. It would be easy to fall back on shrimp all the time, but that wouldn't provide all the health benefits I'm looking for.
I am working on trying to find ways to cook salmon that will be pleasing to me and cause me to say "tonight I want salmon". In the meantime I am falling back on the fish types I know I love - and one of these is fresh tuna steaks.
This week I pulled out another book I have neglected, Douglas Rodriguez's Latin Flavors on the Grill. This book is a gem - great recipes with fresh ingredients, lots of pictures, and grilling is the recommended cooking method. Right now it is hard to cook outdoors - our gas grill just doesn't hold the heat when it is cold - but this is when a cast iron pan or stove top grill comes in handy.
 For as "exotic" as the ingredients might sound, the salsa comes together very quickly. I made it earlier in the day, adding the avocado right before serving to help keep its vibrant green color. Tomatillos have such a fresh flavor, almost like you can taste the "green". If you haven't ever tried it, I highly recommend it. After making the salsa, the rest of the recipe is a snap.
Tuna with Tomatillo-Avocado Salsa (Latin Flavors on the Grill)
Salsa
16 tomatillos, husked and washed
1/4 cup freshly squeezed lemon juice
1 ripe, firm Hass avocado, cut into 1/4-inch dice
1 poblano chile, seeded and minced
1 jalapeno chile, seeded and minced
1 small white onion, finely diced
2 cloves garlic, minced
2 T chopped cilantro
2 T olive oil, or garlic oil if you have it (NOTE: I left this ingredient out all together.)
Salt and freshly ground black pepper
6 (6oz) tuna steaks, cut one-inch thick
2T oil
Salt and pepper
To make the salsa, place 8 of the tomatillos in a blender with the lemon juice and 2 T of water. Puree well and pour into a bowl. Dice the 8 remaining tomatillos into small dice. Add to the pureed tomatillos, along with the avocado, poblano, jalapeno, onion, garlic, cilantro, olive or garlic oil and salt and pepper. Set aside.
Prepare a medium fire for the grill (or preheat a cast iron piece over medium heat).
Oil and season the tuna steaks, arrange on the hot grate, and grill for 2-3 minutes per side for rare, 4-5 minutes for medium-rare, and 6-7 minutes per side for well done.
Transfer to serving plates, spoon salsa over the tuna and serve immediately.
Tuesday, January 19, 2010
Shrimp in Red Escabeche
 Shrimp in Red Escabeche, originally uploaded by Kim De.
Shrimp night is Bo's favorite night of the week - not that we have shrimp every single week, but I'd guess we average two times per month. He always lights up when he hears our dinner is shrimp!
I found this recipe in a book I have sorely neglected, Salsas that Cook by Rick Bayless. I have to confess that I love to collect cookbooks. And if I find an author I particularly admire, then I want to collect all of their cookbooks. So sometimes I end up buying them, placing them on the shelf with their brothers, and forgetting to cook with them.
I am working on a solution to rectify this problem. In the meantime, does anyone know of a good 12-step program for cookbook addicts?
Right now my goal is to cook from my Rick Bayless books more often. And this recipe jumped out at me. It is actually meant to be a starter, but serve it over some rice with sauteed spinach, and you've got yourself a meal!
Smoky and tangy from the vinegar, with a hint of honey to soften to blow, this recipe was a winner! It contained the correct hits from my flavor palette with the smoky salsa and the herby cilantro.
I know I have proclaimed this before, I almost always make my own salsa, but here I am again using a bottled kind. I cheated on my principals because it was a Bayless bottled salsa and recommended for the recipe. And who am I to correct Mr. Bayless? I promise, you won't continue to see this particular theme in my coking!
Shrimp in Red Escabeche (Rick Bayless)
1 bottle (16 ounces) Frontera Guajillo Salsa
2 Tbs olive oil
1 1/2 Tbs cider vinegar
1 Tbs honey or more to taste
Salt, about 1/2 teaspoon
1 lb medium-large (about 24) shrimp, peeled and deveined
1 small red onion, thinly sliced
1/2 cup fresh cilantro leaves
Heat the olive oil in a large skillet over medium. Add the salsa and cook, stirring frequently, until reduced to the consistency of tomato paste 3 or 4 minutes. Remove from the heat and stir in the vinegar. Taste and season with honey and salt - it should taste slightly salty and have a hint of sweetness.
Stir the shrimp into the cooked salsa (there should be just enough to coat everything lightly) and return the pan to the medium heat. Cook, stirring constantly, until the shrimp are just barely cooked through (cut open a shrimp to see that it has turned from translucent to opaque white), about 3 minutes.
Scoop onto a platter and let cool to room temperature. In a small strainer, rinse the sliced onion under cold water and shake until nearly dry. Sprinkle over the shrimp along with the cilantro leaves, and the dish is ready to serve.
Monday, January 18, 2010
Chipotle, Tomato and Roasted Vegetable Salad
I feel like it has been awhile since I talked about a vegetable. We really do eat them!
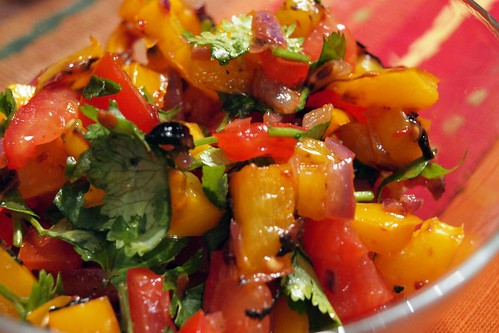
There are very few recipes I make over and over because there are just too many to try. However this one will be a repeater! With a mixture of our favorite flavors, how could we not have it be a repeater!
The nice thing about this salad is its versatility. Make it ahead and chill, bringing it to room temperature. Serve it as a side dish. Add cooked chopped chicken for a one dish meal.
Looking at the picture, you can see the colorful roasted peppers and the brilliant tomatoes covered in the glossy dressing with a hint of heat. Just looking at it, I can almost taste it again! I think it may mysteriously show up on our menu quite soon!
Chipotle, Tomato, and Roasted Vegetable Salad (Adapted from Cooking Light)
Salad
1 1/2 cups coarsely chopped onion
1 1/3 cups coarsely chopped green bell pepper
1 1/3 cups coarsely chopped yellow bell pepper
Cooking spray
1 1/3 cups chopped seeded tomato
1/4 cup minced fresh cilantro
Dressing
1 chipotle chile in adobo sauce, chopped
2 Tbs cider vinegar
2 tsp extra-virgin olive oil
1/2 tsp salt
Preheat broiler. To prepare salad, place first 3 ingredients on a large baking sheet covered in foil and coated in cooking spray. Lightly coat vegetables with oil or cooking spray; broil 8 minutes or until onion and bell peppers begin to blacken, stirring once. Place onion mixture in a bowl to cool. Add tomato and cilantro and gently toss.
To prepare the dressing, remove 1 chile from can, and chop to measure 1 1/2 teaspoons. Reserve the remaining chiles and sauce for another use. Combine the chile, vinegar, oil, and salt, and stir with a whisk. Drizzle over onion mixture; toss gently to coat.
Saturday, January 16, 2010
Grilled Chicken Stuffed with Goat Cheese with Smoky Cilantro Sauce

This recipe was so incredibly easy to prepare and make. The flavor was out of this world - tangy goat cheese with green onions stuffed inside moist chicken. (ironically as amazing as it tasted, it doesn't photograph well - the cheese and chicken blend together)
But trust me, it translates well in your mouth! I served this to company. It is a beautiful elegant dish with simple but amazing flavors, that looks complicated, but it's easy to make!
 Look carefully - you can see the cheese and tiny red pepper
Although I did not grill the chicken, seeing how it is winter, I left those instructions intact. I chose to sear it on all sides in my dutch oven then bake it at 325 for about 30 minutes (using a meat thermometer to judge the cooking time)
Grilled Chicken Breast Stuffed with Goat Cheese with Smoky Cilantro Sauce (Adapted from Bobby Flay)
8 ounces soft goat cheese
1 red pepper, roasted, peeled, seeded and chopped
1/4 cup chopped green onion
1 T chopped cilantro
Salt and freshly ground pepper
4 large boneless chicken breast, pounded thin
2 Tbs olive oil
Smoky Cilantro Sauce
2 poblanos, smoked, peeled and seeded
1/4 cup red onion, coarsely chopped
2 tablespoons fresh lime juice
1/2 cup olive oil
1/4 cup spinach leaves
1/4 cup cilantro leaves
2 teaspoons honey
Salt and freshly ground pepper
Preheat grill. Mix together the goat cheese, green onions, red pepper and cilantro in a small bowl and season with salt and pepper to taste. Lay each breast out and spoon the cheese mixture on one side. Fold over and brush the breasts with the olive oil and season with salt and pepper to taste. Secure with toothpicks if necessary. Grill for 8 to 10 minutes or until golden brown and cooked through.
Smoky Cilantro Sauce
In a blender, combine the poblanos, onion and lime juice and blend until smooth. While the blender is running, add the oil slowly until emulsified. Add the spinach and cilantro and blend until smooth. Add the honey and season to taste with salt and pepper. Serve at room temperature.
Friday, January 15, 2010
Garlic Cilantro Smashed Potatoes

I don't make potatoes very often. I love them too much. I'm afraid it will start a habit that is too hard to break. So on the rare occasion when I do make them, I want to find a great recipe, and I want to enjoy the preparation process.
After doing some research, I decided to make up my own recipe. As long as you remember to roast the head of garlic in advance, it comes together quickly.
Here. I'll demonstrate.
Garlic Cilantro Smashed Potatoes
1 ½ lbs red skin potatoes
¾ c sour cream or plain yogurt
1/4-1/2 c milk, warmed slightly
2 T butter, room temperature
¼ c chopped cilantro (more to your taste)
1 head garlic
salt
pepper
Preheat oven to 425. Cut the top off a head of garlic, sprinkle with olive oil and wrap in foil. Bake 35 minutes or until tender. Let cool then squeeze the soft garlic out of the skins.
Quarter the potatoes. Cover them with cold water, sprinkle with salt and bring them to a boil. Cook for 8-12 minutes or until fork tender. Mash with a fork or potato masher, keeping skins on.
Mix sour cream and butter then add to potatoes along with the cilantro and garlic. Add milk a little at a time until potatoes reach the consistency you desire. Salt and pepper to taste.
Perfection!
Thursday, January 14, 2010
Huevos Rancheros
If you are looking for a meal that is quick and easy, warm and comforting, and will impress, look no further. And if like me you like the occasional breakfast for dinner...
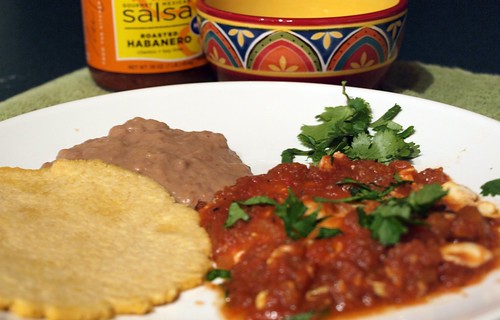
Convincing Bo that it's ok to have eggs for your last meal has been a slow process. But with meals like this one he is warming up to the idea. Eggs, cooked soft with a simmer of salsa, homemade tortillas and soft refritos (re-fried beans) are the perfect Mexican "home cooking" and make a great comfort meal.
This recipe came from MY expert in Mexican food, Rick Bayless. I pulled it from his first book, Authentic Mexican. You can see a jar of store bought salsa in the background - that isnt something you see much in my house. Homemade salsa is so easy to make it is almost a sin to purchase it. If you catch yourself with a busy day, however, please promise me you will buy a high quality salsa. it can make all the difference to your meal!
Enough talking. On to the recipe.
Ranch-Style Eggs with Tomato Chile Sauce (Rick Bayless)
Heuvos Rancheros
About 2 cups Quick-Cooked Tomato-Chile Sauce (recipe to follow) or high quality store bought salsa
4 medium thick corn tortillas, set out to become a bit stale
1/4 cup vegetable oil
8 large eggs
Salt and Pepper
2 T crumbled Mexican queso fresco or cheese like feta or farmer's cheese
Chopped cilantro for garnish
Warm the sauce in a small saucepan over medium low heat, covered. Heat the oil in a large skillet over medium high. When quite hot, quick fry the tortillas one at a time 2-3 seconds per side, just to soften them. Drain on paper towels, wrap in foil and keep warm in a low oven. Reduce the heat in the skillet to medium low ans let it cook f or a few moments.
Break 4 eggs into the skillet and let them cook, slowly, sunnyside up. Sprinkle with salt and pepper then transfer the eggs to a baking sheet and keep them warm with the tortillas. Fry the remaining eggs to the pan and cook in the same fashion.
Set a tortilla on each of 4 warm plates. Top with 2 fried eggs then spoon the sauce over the tortillas and whites of the eggs, leaving the yolks exposed. Last, sprinkle the cheese and chopped cilantro.
Quick Cooked Tomato Sauce
1 1/2 lbs ripe tomatoes, boiled or roasted; OR one 28 oz can good quality canned tomatoes, chopped
Fresh hot green chiles to taste (roughly 3-5 serranos or 2-3 jalapenos), stemmed
1/2 small onion, chopped
1 large clove garlic, peeled and roughly chopped
1 T lard or vegetable oil
Salt
Roughly chop the tomato and place in a blender or food processor.
For a milder sauce, seed the chiles. Chop them to bits and add to the blender with the onion and garlic Process until pureed but retaining a little texture.
Heat the lard or oil in a medium large skillet over medium high. When it is hot enough to make a drop of the puree sizzle, add it all at once and stir consistently for about 5 minutes as the puree sears and cooks into a thicker more orange colored sauce. Season with salt and remove from the fire
Tuesday, January 12, 2010
Black Pepper Crusted Filets Mignon with Ancho-Red Pepper Sauce and Toasted Goat Cheese

I sure love nights when we decide to have a treat, and Filet Mignon nights are certainly out of the ordinary.
I honestly am not sure what I could say about this meal that can't be deducted just from the title. So I'm not going to try. Just close your eyes and whisper the title out loud. Then run to the store for the ingredients, shuffle the kids off to the neighbors, pour the Zinfandel, and light the candles. You will be a big hit!
 Black Pepper Crusted Filets Mignon with Ancho-Red Pepper Sauce and Toasted Goat Cheese (Adapted from Bobby Flay)
4 filet mignon steaks, each 1 1/2-inches thick
1 tablespoon ground cumin
2 tablespoons kosher salt
2 tablespoons coarsely ground black pepper
4 (3/4-inch thick) slices goat cheese
Ancho-Red Pepper Sauce, recipe follows
Chopped cilantro, for garnish
Preheat a cast iron skillet to medium-high. Remove the steaks from the refrigerator and let stand at room temperature for 20 minutes before cooking.
Combine the cumin, salt, and pepper in a small bowl. Liberally season both sides of each filet with the spice mixture. Sear the filets for about 3 to 4 minutes on each side for medium doneness. If necessary, finish in the oven at 350.
Meanwhile, preheat the broiler. Top each filet with a slice of the cheese. Place under the broiler until cheese is golden brown and soft. Ladle the sauce onto each plate, place the steak in the center, and garnish with chopped cilantro.
Ancho-Red Pepper Sauce
2 tablespoons canola oil
1 large red onion, coarsely chopped
3 cloves garlic, coarsely chopped
2 New Mexican red chiles, lightly toasted
2 quajillo chiles, lightly toasted
1 ancho chile, lightly toasted
6 to 8 cups homemade chicken stock
1/4 cup creme fraiche
2 tablespoons maple syrup
Salt and freshly ground pepper
Heat the oil in a medium saucepan over medium-high heat. Add the onions and garlic, and cook until soft. Add the chiles and stock, and bring to a simmer for 20 to 25 minutes, or until the chiles are soft. Transfer the mixture to a food processor and process until smooth.
Strain the mixture into a saute pan that has been set on high heat for a few minutes, and cook the sauce until slightly thick. Remove from the heat and stir in the creme fraiche and maple syrup. Season with salt and pepper, to taste.
Monday, January 11, 2010
Corn Tortillas
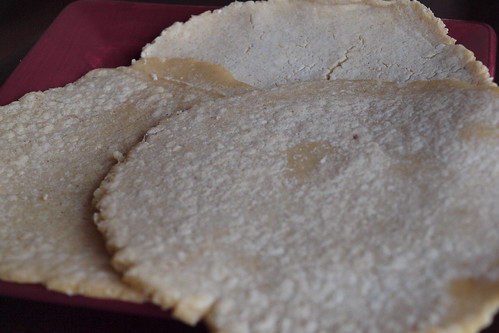
It is time to begin to chronicle my journey attempting to make homemade tortillas. It has been a long time coming. Good homemade tortillas can't be found here because they are all mass produced in a factory "somewhere" and sold at the grocery store.
Trust me. If you haven't had a true homemade tortilla, you do not know what you are missing! If you think your local joint is making them homemade, well you MAY be right, but if you ever truly have a fresh made one, you will know the difference! When I lived in Houston, basically every Mexican eatery in town made fresh homemade tortillas every hour, so buying them was a snap. Now...., well I will have to become a master!
 So I am trying. It really isn't difficult. Pressing them into the correct thickness is the most challenging part. Mine are a bit too thick, but that is ok. I will just make more, and will take pics of the process. If at first you don't succeed....
Tortillas de Maíz (Corn Tortillas)
(by Rick Bayless, in my mind, the MASTER!)
1 3/4 cups masa harina
Measure powdered masa harina, into a bowl and add 1 cup plus 2 tablespoons hot tap water. Knead with your hand until thoroughly combined. Cover and let stand 15 minutes.
Set a large griddle (one that stretches over 2 burners) or 2 skillets on your stovetop. Heat one end of the griddle (or one skillet) to medium, the other end (or other skillet) to medium-high.
Gently squeeze dough. If it is stiff (it probably will be), knead in water 1 or 2 teaspoons at a time until the dough feels like soft cookie dough—not stiff, but not sticky. Divide into 15 pieces, rolling each into a ball. Cover with plastic.
Cut 2 squares of plastic bag 1 inch larger than your tortilla press. Open the press and lay in one piece of plastic. Lay a dough ball in the center, and gently mash it. Top with the second piece of plastic and close press. Using the press's lever, gently flatten the dough into a 1/8-inch-thick disk. Peel off the top piece of plastic.
Flip the tortilla onto your right hand (if right-handed)—the top of the tortilla should line up with the side of your index finger. Now, gently roll it onto the side of the griddle (or skillet) heated to medium: Let the bottom of the tortilla touch the griddle, then lower your hand slightly and move it away from you—the tortilla will stick to the hot surface so you can roll your hand out from under it as it rolls down flat.
After about 30 seconds, the edges of the tortilla will dry slightly and the tortilla will release from the griddle—before this moment, the tortilla will be stuck. With a metal spatula (or calloused fingers), flip the tortilla onto the hotter side of the griddle (or hotter skillet).
After about 30 seconds, the tortilla should be lightly browned underneath. Flip it over. Cook 30 seconds more—the tortilla should puff in places (or all over—a gentle press with metal spatula or fingers encourages puffing). Transfer to a basket lined with a napkin or towel.
Press and bake the remaining tortillas. Stack each newly baked tortilla on the previously baked ones. Keep the tortillas well wrapped to keep warm.
Saturday, January 9, 2010
Checkerboard Cookies
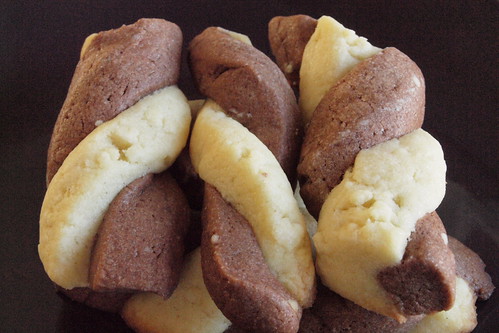
Looking in my files I discovered one last holiday recipe I had yet to blog. I suppose it is fitting that this is the last, as it was the most time consuming to make and probably my lest favorite.
They weren't bad, I just didn't think they had much flavor. Maybe with all the other goodies I made this paled in comparison. Possibly as a stand alone cookie they would have more flavor.
As for time consuming, well it is in the dough shaping where the tediousness comes in.
Tediousness - is that a word?
In the interest of time I did choose to make the swirls instead of the checkerboards. If you want to make holiday cookies with your kids and you don't want to cut and decorate sugar cookies, these could be an alternative. I just don't think it will be a repeater for me.
Checkerboard Cookies (Country Living)
1 lb unsalted butter, room temperature
1 c sugar
2 large eggs
1 egg white
2 t vanilla extract
1/4 t salt
5 cups flour, sifted
3 tablespoons Dutch-process cocoa
Make the dough: Beat the butter using a mixer set on medium-high speed until light and fluffy. Add the sugar gradually and continue to beat until pale and fluffy. Add the whole eggs one at a time and blend in the vanilla. Combine the salt and flour and stir it into the butter mixture.
Remove half of the dough and set aside. Mix the cocoa into the remaining dough on low speed, until fully incorporated. Pat the vanilla and the chocolate doughs each into an 11- by 9-inch rectangle. Wrap each in plastic wrap and chill until firm.
Make the checkerboards: Brush the vanilla dough with egg white and place the chocolate dough on top. Press gently and cut in half lengthwise. Brush one half with egg white and stack the remaining half on top, making certain the vanilla and chocolate doughs alternate. Cut the resulting stack in half lengthwise and set one stack aside. Slice one stack into thirds lengthwise and flip the middle stack over; lightly brush the sides with egg white and gently press together to form a checkerboard-patterned log. Cover with plastic wrap and chill until firm. Repeat with the remaining stack.
Bake the cookies: Heat oven to 350 degrees F. Line baking pans with parchment paper. Slice a checkerboard log crosswise into 1/4-inch cookies. Place the cookies on the baking pans, 1 inch apart, until firm -- 12 to 15 minutes. Rotate pans once while baking. Cool completely on a rack. Cookies can be stored for up to 1 week in an airtight container.
Timesaver: Marbled Cookies Shape vanilla and chocolate dough into ropes. Twist together for a swirled effect. Chill, slice, and bake.
Makes 6 dozen cookies.
Friday, January 8, 2010
Black Bean and Goat Cheese Tamale

Having lived in Houston for several years, I was exposed to flavors, tastes and cuisines I hadn't experienced growing up in the Midwest. For all the things I didn't like about Houston, it was a foodie heaven and I miss that part of it.
Homemade tamales are a part of living in TX. Especially if you are an elementary school teacher (which I was). A holiday gift of tamales was always something to look forward to. I even made tamales one time at a party and it is something I have wanted to try again. If you think tamales are too difficult for you to make, take a look at the steps below.
Being me, I wanted to try something a bit different then the traditional meat-filled masa. So I combined a few recipes to come up with this one. Also against tradition was the way they were cooked - in the oven on top of a water filled broiler pan for a baked/steamed combo. More on that later.
I started out making the dough then letting it rest a bit. I then patted it into the corn husks that had been soaked and drained. Kind of like playing with play-dough!
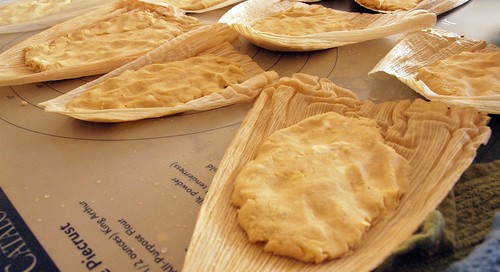 Next step was adding the filling. Trying to make things easier, I had prepared the filling the night before. I added a heaping table spoon down the side as instructed. After all the dough had been filled, I used the additional to add more. More can't be a bad thing!

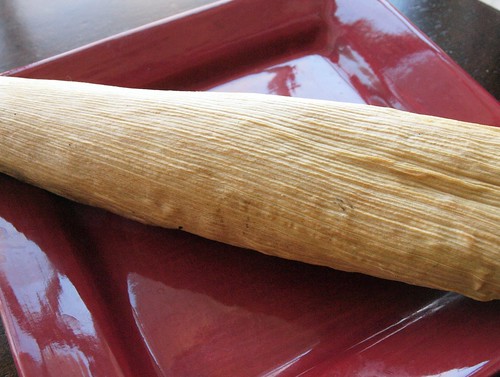
After that, things came together quickly. Using the husk, I folded the dough then tucked the corn envelope closed. They were added to the oven where they steamed/baked for almost an hour. I opened one up to cool and try. Tasty, however there is room for improvement.
 The following are the things I learned about making tamales:
1. The filling should go down the middle. It would make a much prettier presentation
2. One heaping tablespoon of filling isn't quite enough.
3. Baking/Steaming tamales is easy, but it doesn't produce the same moist product.
I will be making tamales again. Bo really wants some with meat. I look forward to opening my Rick Bayless cookbook and using a more traditional recipe.
Basic Masa Dough (Adapted from Cooking Light)
2 cups fat-free, less-sodium chicken broth
1 1/2 cups fresh corn kernels (about 3 ears)
3 3/4 cups masa harina
1 1/2 tsp salt
1 1/2 tsp baking powder
1/4 cup chilled lard or shortening
Combine broth and corn in a blender; process until smooth.
Lightly spoon masa harina into dry measuring cups; level with a knife. Combine masa harina, salt, and baking powder, stirring well with a whisk.
Cut in lard with a pastry blender or two knives until mixture resembles coarse meal. Add broth mixture to masa mixture; stir until a soft dough forms.
Tips: Prepare this dough up to three days ahead, and refrigerate in an airtight container.
Black Bean and Goat Cheese Tamales (Adapted from Cooking Light)
16 dried corn husks
15 can black beans, mashed slightly
1/2 cup sliced green onions
1/4 cup fat-free sour cream
1/4 tsp salt
2 egg whites
1 (3-ounce) log goat cheese
3 oz low fat cream cheese
2 cups Basic Masa Dough (I used most of the dough)
2 cups hot water
Place corn husks in a large bowl; cover with water. Weight husks down with a can; soak 30 minutes. Drain husks.
Preheat oven to 450°.
Combine beans and next 6 ingredients (through cream cheese), stirring well to combine.
Working with one husk at a time, place 3 tablespoons or more of Basic Masa Dough in the center of husk about 1/2 inch from top of husk; press dough into a 4-inch-long by 3-inch-wide rectangle.
Spoon about 1 tablespoon (or more) cheese mixture down one side of dough. (NOTE: Try putting it down the middle) Using the corn husk as your guide, fold husk over tamale, being sure to cover filling with dough; fold over 1 more time. Fold bottom end of husk under. Place tamale, seam side down, on a damp towel covered with another damp towel. Repeat procedure with remaining husks, Basic Masa Dough, and filling. When all tamales are filled, remove them from the towels and place on the tray of a broiler pan.
Pour 2 cups hot water in the bottom of a broiler pan; top with prepared rack.
Steam tamales at 450° for 55 minutes, adding water as necessary to
maintain a depth of about 1/2 inch. Let tamales stand 10 minutes.
Thursday, January 7, 2010
Carne Adovada

In the mood for Mexican food. Not a huge surprise, as the flavors of "real" Mexican food dominate my taste palate.
So I made tacos! Remember from this post that pork is my nemesis, so in my quest to consistently better myself, I decided on pork tacos.
The pork was prepped and put in the oven with the aromatic sauce surrounding it. The timer set appropriately, with the thermometer inserted for extra insurance. Then the waiting began.
After an hour the aroma began to waft into the living room. I checked, the sauce was beginning to dry out, so I added some hot water to the pan. Then the surprise - the thermometer rang after two hours, not three as the recipe stated. So I took it out, covered it, and let it rest for awhile so I could finish the slaw and make the tortillas as accompaniment.
Bo did the heavy lifting and cutting while I waited nervously - how would it taste?
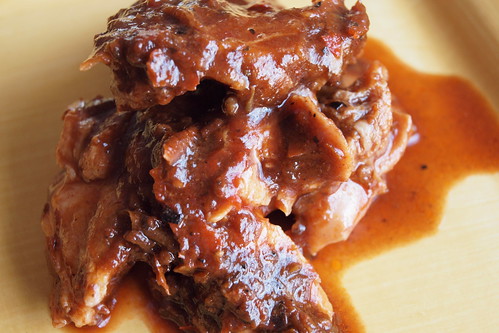 At least it looks nice!
It was hard to find pieces that were mostly meat instead of fat. Possibly the cut called for? The pieces that were meat were a bit dry, but not bad. Add them to a homemade corn tortilla with the spicy sauce drizzled on top folded with the cooling slaw, and I would call it mostly successful.
It was another learning experience. Next time I will try a recipe I have from taco master Mark Miller. I do love a good taco....
Carne Adovada (Cooking Light, DECEMBER 2007)
24 dried red New Mexico chiles, seeded, -- rinsed, and cut into (1-inch) pieces
Cooking spray
1 1/2 cups chopped onion
1 Tbs cider vinegar
2 tsp dried oregano
1 1/2 tsp salt
3 garlic cloves, minced
1 (14-ounce) can fat-free, less-sodium chicken broth
1 (3-pound) boneless pork shoulder (Boston-- butt), trimmed and cut into 1 1/2-inch cubes
Preheat broiler.
Arrange chiles in a single layer on a baking sheet coated with cooking spray; broil 1 minute.
Reduce oven temperature to 300°.
Place chiles, onion, and the next 5 ingredients (through chicken broth) in a blender; process until smooth. Combine pork and chile mixture in a 13 x 9-inch baking dish coated with cooking spray. Cover and bake at 300° for 2 1/2 hours. Uncover and bake an additional 30 minutes or until sauce is thick.
Tuesday, January 5, 2010
Whole Wheat Chile Bread

Ahhh, the time to make bread. I greatly treasure it. The act of making dough, then forming it into a loaf that will bake to perfection is very calming to me. So much so that when life is out of control busy, like December was, I don't make bread. I never want it to become a chore to me.
So now that life is back to normal, it was time for bread. This recipe has been sitting on my computer for awhile, begging for life. The idea of spicy and flavorful chiles in a bread was very intriguing to me. What would the end result be? Spicy and full of the chile taste I love? Or subtle, hiding the spice in the wheat? I couldn't wait to find out!
I began by doing one of my favorite tasks – roasting chiles! The aroma coming from the ever darkening pepper flesh is intoxicating.
 Arent they pretty?
After letting them cool so I could seed and dice, I prepared the rest of the dough ingredients then began the long process of waiting for it to rise, rise again, then bake. Such a frustrating process for the baker who just wants a taste of the finished product!
 Look at that beautiful red color! The small amount of chili powder added to the flour makes that color. And see the tiny green poblano pieces dotting the slice? Pure heaven! I have to admit, I committed the cardinal bread-bakers sin. I cut into my bread while still warm. I just couldn't wait!
If you aren't “into” the spice the way I am, don't make this as written. It isn't unbearably hot, but it does contain the slow burn of peppers. Cut down on the chili powder, cut out the reed pepper flakes, or cut back on the amount of poblano used. But please, make this bread!
Whole-Wheat Chile Bread (Flavored Breads-Mark Miller's Coyote Cafe)
1 1/4 cups lukewarm water
2 tablespoons olive oil
2 teaspoons honey
2 1/2 teaspoons active dry yeast
1 cup stone ground whole-wheat flour
1 cup bread flour
1 cup all-purpose flour
2 teaspoons salt
4 teaspoons chile molido (freshly ground pure chili powder)
4 teaspoons chile caribe (red pepper flakes)
1/2 cup roasted, peeled, stemmed, seeded, and diced New Mexico green chile
Combine the water, oil and honey in a bowl of a heavy-duty electric mixer or in a large mixing bowl.
Sprinkle the yeast over the mixture, stir in, and let sit 2 minutes. Add the dry ingredients. Mix with the dough hook (or knead by hand) for 8-10 minutes, or until dough appears silky and resilient. Mix or knead the green chiles into the dough until thoroughly incorporated. Transfer the dough to a lightly oiled bowl and cover with plastic wrap.
Let rise in a warm place for 1 1/2 hours, or until approximately doubled in volume. Punch dough down; re-cover with plastic wrap and let rise in a warm palce for 30 minutes.
Place a baking stone on the middle rack in the oven and preheat to 400 degrees.
Place the dough on a lightly floured surface and cut into 2 equal pieces. Grease two loaf pans or generously dust baking sheet with whole-wheat flour. Shape the dough into oblong loaves. Alternatively, shape int into 2 round loaves or 14 to 16 rolls.
Place the laoves in the prepared pans or on the baking sheet ( or place the rolls on on the baking sheet), cover with lightly oiled plastic wrap, and let rise again in a warm place for 20 minutes.
Uncover the loaves (or rolls) and, using a spray bottle, spritz them with water and lightly dust with whole-wheat flour. Make 2 or 3 diagonal slashes in the tops of the loaves with a serrated knife to allow the dough to expand in the hot oven.
Using the spray bottle, spritz the oven walls with water. Work quickly so the oven does not loose heat. Set the loaf pans or baking sheet on the hot stone.
Bake for 35 to 40 minutes (20 to 25 minutes for rolls). The bread is done when the crust is dark and firm and the loaves sound hollow when tapped on the bottom. Let the bread cool in the pans or on the baking sheet for 10 minutes. Transfer the loaves (or rolls) to a rack and cool before cutting
Monday, January 4, 2010
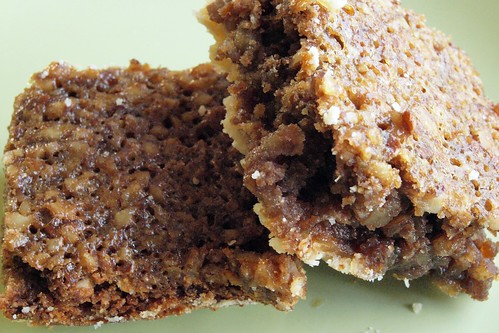
Pecan Pie Bars
As one who is not much of a sweets eater, I have a confession to make - I LOVE pecan pie! Love it! I can't believe that I do, because it is sooooo sweet. But I do. It is one of those things I allow myself to have one time a year. After all, it has an amazing amount of calories!
I don't, however, like pie crust. Not one little bit. I usually eat the gooey filling out of the crust, leaving the bland (IMHO) pastry behind. I have been doing this for years. Until I found a solution.
Enter Pecan Pie Bars. All the sweet goodness without the crust. I am in heaven!
These are easy to make, too. Pecan pie can be tricky and sticky, but this didn't make much of a mess. The taste was sweet without sugar coma, and the "crust" was understated. Oh, and the pecans - well pecans are always perfect!
If you love pecan pie like I do, please try this recipe. It will make your day!
Pecan Pie Bars (Oxmoor House, JANUARY 2000)
2 cups all-purpose flour
1/2 cup sugar
1/8 teaspoon salt
3/4 cup butter or margarine, cut up
1 cup firmly packed brown sugar
1 cup light corn syrup
1/2 cup butter or margarine
4 large eggs, lightly beaten
2 1/2 cups finely chopped pecans
1 teaspoon vanilla extract
Combine flour, sugar, and salt in large bowl; cut in 3/4 cup butter thoroughly with a pastry blender until mixture resembles very fine crumbs. Press mixture evenly into a greased 13" x 9" pan, using a piece of plastic wrap to press crumb mixture firmly in pan. Bake at 350° for 17 to 20 minutes or until lightly browned.
Combine brown sugar, corn syrup, and 1/2 cup butter in a saucepan; bring to a boil over medium heat, stirring gently. Remove from heat. Stir one-fourth of hot mixture into beaten eggs; add to remaining hot mixture. Stir in pecans and vanilla. Pour filling over crust. Bake at 350° for 34 to 35 minutes or until set. Cool completely in pan on a wire rack. Cut into bars.
Sunday, January 3, 2010
Cuban Style Pork Chops

Everyone has a nemesis, right? Well today I'd like to discuss mine. It is pork.
I can't seem to get pork to turn out exactly right. It is either undercooked in the middle and requires some doctoring, or it is too done and turns tough. I dont know what it is. I like pork, so it isnt like I am doing subconscious sabotage. I'd like to think it's simply because I dont have much experience in cooking it, and I need more practice. And so practice I will.
Enter practice dish #1 (lets just pretend, and call it #1). Butterflied Cuban Pork Chops. I looooove a good cuban sandwich - thinly sliced pork, swiss cheese, pickles, crusty bread all grilled....Ummmm. I was excited to try this recipe for all those elements.
I started out slicing the pork almost through, then pounding it before placing it is the marinade for several hours. Close to cooking time I pulled it out of the fridge and set up the assembly. So far so good.
I constructed according to directions then folded the top over. Cast iron skillet heated, I began to cook on one side, then the other, just as instructed. I noticed right away that the meat pocket began to thicken, all my flattening trouble gone to waste. I was concerned this would change the cooking time, but I pushed on.
Carefully I turned the chop over so as not to lose it's precious cargo. Victory! I cooked as directed on the other side, then removed it to investigate.
Was it done it the middle? Of course not! Was I frustrated? Of course I was. I did some quick thinking then popped it in the microwave for one minute. Done
So maybe it was "cheating". I certainly dont consider this a culinary victory with pork. I didnt cook it correctly. However, at the end of the day, it tasted like a moist, juicy, flavorful cuban sandwich. And for that, I'm grateful!
Butterflied Cuban Style Pork Chops (Bobby Flay)
3/4 cup fresh orange juice
1/2 cup fresh lime juice
1/3 cup coarsely chopped fresh oregano leaves
6 cloves garlic, coarsely chopped
1 teaspoon ground cumin
1/4 cup canola oil
4 (8-ounce) pork chops, butterflied -- and thinly pounded
Salt and freshly ground black pepper
8 (1/4-inch) thick slices Swiss cheese
8 (1/4-inch) thick slices boiled ham
2 sour dill pickles, thinly sliced -- (need about 16 slices)
2 tablespoons chopped cilantro leaves
1/4 cup olive oil
Heat the grill to high.
Whisk together 1/2 cup orange juice, 1/4 cup lime juice, 3 tablespoons oregano, the garlic, cumin, and canola oil in a large baking dish. Add the pork and turn to coat. Cover and let marinate for at least 15 minutes and up to 2 hours in the refrigerator.
Remove the pork from the marinade and pat dry. Place the chops on a flat surface, cut-side up and season with salt and pepper. Place 1 slice of cheese, 2 slices of ham, a few slices of pickle and another slice of cheese on 1 half of the chop. Fold over brush the top with oil and season with salt and pepper. Repeat with remaining ingredients.
Place the chops on the grill, oil side down and grill until golden brown, 3 to 4 minutes. Flip the chops over and continue grilling until the bottom is golden brown and the cheese has melted, 2 to 3 minutes longer.
Whisk the remaining orange and lime juices, oregano, and the cilantro with the olive oil and salt and pepper, to taste. Spoon over the chops and serve.
Friday, January 1, 2010
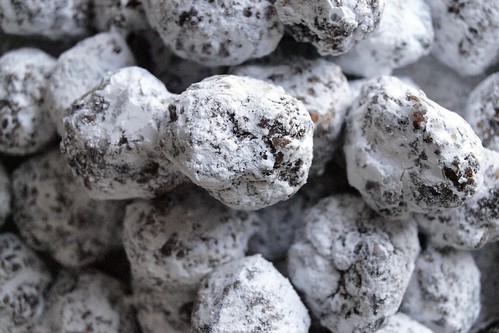
Rum Balls
Welcome to 2010! What better way to ring in the new year then with a recipe for Rum Balls!
This was my first time making these little rounds of perfection. I must confess - I am not very particular when it comes to shaping things. My pizza crusts are always more "free form" then round or rectangular, and instead of perfectly round, these are more "modern art" rum balls.
With me it is all about the flavor! When I first made and then tasted them, I was a bit disappointed. Where was the bite from the rum? Let them sit overnight. It will show up! YUM! Dark and chocolaty with the alcohol zip - these were a hit with all who tried them. I also predict these to be good with bourbon. Hmmmm. I see this experiment in my future!
2000-10; 20-10 or however you choose to say it, I wish you all a Happy New Year!
Rum Balls Recipe (Joy of Baking)
1 1/2 cups (140 grams) toasted pecans or almonds, finely chopped
1 1/4 cups (120 grams) finely crushed shortbread or vanilla wafer cookies
1/2 cup (55 grams) confectioners sugar
2 tablespoons (12 grams) cocoa powder
2 tablespoons light corn syrup
1/4 cup (60 ml) rum
Garnish:
1/2 cup (55 grams) confectioners sugar (powdered or icing), sifted
To toast nuts: Preheat oven to 350 degrees F (177 degrees C) and have rack in center of oven. Place the pecans on a baking sheet and toast for about 8 minutes, or until lightly browned and fragrant. Let cool completely and then either chop up finely with a knife or place in your food processor and pulse until finely chopped. Transfer to a large bowl.
Process the vanilla wafer cookies or shortbread cookies in the food processor until finely ground. Add the crumbs to the finely chopped pecans. To this mixture add the confectioners sugar and cocoa powder and stir until combined. Add the corn syrup and rum and mix well. Chill if necessary and then shape into 1 inch (2.54 cm) balls. Place the sifted confectioners sugar into a small bowl and roll the rum balls in the sugar.
Store in an airtight container in the refrigerator. These are best if made several days in advance of serving to allow the flavors to mingle.
Serve at room temperature.
Makes about 4 dozen (48 rum balls).