Friday, July 31, 2009

Despite best efforts...


Finished slice, originally uploaded by Kim De.

Ah bread baking. Such an exact science. I am new to the art of artisan bread baking. I have been very lucky so far, most efforts have been successful. This effort, while tastes good, did not "shape up" entirely as the author intended.


Three days ago I launched into Pain de Campagne by making the starter. The flour, water and yeast needed to sit over night to begin its work. The next morning, it was bubbly and smelling fermented. Things looked good!


The next step was to add water and flour. Simple enough. It too sat over night, developing its deep flavor. Yesterday morning all was looking well.


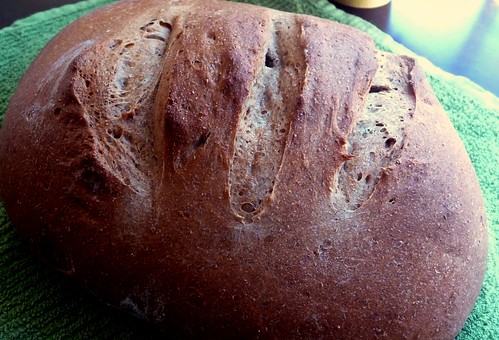
Now, let me say we have had terribly humid weather. I dont know if this wet air contributed to the issues I had next or not... The recipe had me add the remaining flour, along with salt. Then I put the dough in a bowl to rise for an hour or two. Two hours later, I came back and the dough had run over the sides of the bowl. I gathered it up and tried to shape it for its final rise. It was a bit loose and hard to shape. I did my best and left it alone for the final hour, letting the oven preheat while waiting. Just before baking, I tried to shape it into a boule again. It held its shape a bit while also flattening a bit. 45 minutes later, it came out of the oven, a bit flatter than was intended, but certainly no pancake.


Taste, being the true test, came after a time of cooling. While the crust was a bit tough to cut in to, the bread itself was springy and had a nice flavor. I decided it was tasty enough to serve to friends last night, good, since I didnt have three days to make another loaf.

I took notes of my movements, the weather, and the bread's temperament for later. I will be interested to make this again in the fall when cooler/dryer weather provide different baking conditions.

Pain de Campagne by Beth Hensperger

STARTER:
1 Tablespoon (1 package) active dry yeast
1/2 cup whole-wheat flour
1/2 cup lukewarm water (90-100 degrees F)

SPONGE:
2 cups lukewarm water (90-100 degrees F)
1 1/2 cups unbleached all-purpose flour or bread flour
1 1/2 cups whole-wheat flour

DOUGH:
3 1/2 to 4 cups unbleached all-purpose flour or bread flour
4 teaspoons salt

1 large egg, beaten with 2 teaspoons water, for glazing
----

* Day One: To make the starter, place the yeast and whole-wheat flour in a deep bowl or a plastic 4-quart bucket with a lid. Add the water and whisk hard until a smooth batter is formed. Cover and let stand at room temperature until foamy and it begins to ferment, about 24 hours.

* Day Two: To make the sponge, add 2 cups warm water to the starter. Whisk to combine. Add the unbleached and the whole-wheat flours alternately, 1/2 cup at a time, changing to a wooden spoon when necessary, until a smooth batter is formed. The sponge will be very wet. Scrape down the sides of the bowl, cover with plastic wrap, and let rise again at room temperature for about 24 hours.

* Day Three: To make the bread dough, stir down the sponge with a wooden spoon. Add 1 cup of the unbleached flour and the salt. Gradually add most of the remaining flour, 1/2 cup at a time, to make a firm and resilient dough.

* Turn the dough out onto a lightly floured work surface and knead until smooth, slightly tacky, and springy, about 5 to 7 minutes, dusting with flour only 1 tablespoon at a time as needed to prevent sticking. The dough will form little blisters under the surface when ready to rise.

* Place the dough in a greased deep bowl or container. Turn to coat top of the dough once. Cover tightly with plastic wrap. Let rise at room temperature until fully doubled in bulk, 1 1/2 to 2 hours.

* Gently deflate the dough. Turn the dough out onto a lightly floured work surface. Grease or parchment-line a baking sheet. Shape the dough into a tight round (or two tight rounds - use separate pans if making two smaller loaves instead of one large one) and place it on the baking sheet. Cover the dough loosely with plastic wrap and let rise about 1 hour at room temperature.

* Twenty minutes before baking, preheat the oven to 425. Using a serrated knife, slash the loaf decoratively. Brush the entire surface of the loaf with the glaze.

* Place the baking sheet on a rack in the center of the oven and bake for 40 to 45 minutes, or until the loaves are browned, crisp, and sound hollow when tapped with your finger. Transfer the loaves immediately to a cooling rack. Cool completely before slicing.

Thursday, July 30, 2009

Scone Time


Scone dough, originally uploaded by Kim De.

Yesterday I got a yearning for a scone with my afternoon coffee. After an extensive search for a recipe that would fit my needs (I was out of milk), I came across Yogurt Scones from Cooking Light.

These fit the bill perfectly; they would be quick and easy to make, used yogurt in place of the milk, and were easy to adapt to my tastebud's needs. The recipe was written to be a savory scone, perfect to use since I didnt want something very sweet anyway. Hanging out with the usual ingredients was 1/2 cup of wheat flour along with the "saving grace" yogurt (and being the proper wife-of-an-Indian, there is always plain yogurt in the house). Although it called for green onions, I know those were easy to replace with a sprinkling of cinnamon and a handful of dark chocolate chips.

The dough was a bit sticky and not the easiest to work with, but I persevered and won the battle, working it into its 8-inch round disk. I used my pizza cutter to score it into 12 triangles before sliding it into the oven.

After letting it cool on a rack for a bit, I slid it onto a cutting board and finished the slicing process. The scone was only slightly sweet (a plus in our house) with a hint of cinnamon tang and an occasional surprise burst of chocolate. Perfect with an afternoon french roast, and even better later with wine for dessert!


Yogurt Scones (Adapted from Cooking Light)

6.75 ounces all-purpose flour (about 1 1/2 cups)
2.375 ounces whole wheat flour (about 1/2 cup)
1 tablespoon sugar
2 teaspoons baking powder
1/2 teaspoon baking soda
1/2 teaspoon salt
1/4 cup chilled butter, cut into small pieces
1/2 cup thinly sliced green onions (as written - I took out and added cinnamon and chocolate chips0
3/4 cup fat-free plain yogurt
1 large egg white

Preheat oven to 425°.

Weigh or lightly spoon flours into dry measuring cups; level with a knife. Combine flours, sugar, baking powder, baking soda, and salt in a large bowl; cut in butter with a pastry blender or 2 knives until mixture resembles coarse meal. Stir in onions. Combine yogurt and egg white, stirring with a whisk. Add to flour mixture, stirring just until moist (dough will be sticky).

Turn dough out onto a lightly floured surface; knead lightly 4 times with floured hands. Pat dough into an 8-inch circle on a baking sheet lined with parchment paper. Cut dough into 12 wedges, cutting into but not through dough. Bake at 425° for 15 minutes or until golden. Serve warm.

Cooking Light, JANUARY 2009

Wednesday, July 29, 2009

Veggie Night!


Chipotle potato, originally uploaded by Kim De.

Now when I say "veggie" this does NOT mean a meal with only vegetables - it means a meal without meat. I think Bo finally understands that and isnt as afraid of these dinners! (much)

Last night I took a cue from another blogger (thank you Joe) and made Bacon-Chipotle Twice-Baked Potatoes. A nostalgia dish that I hadnt made in years - and had never made with chipotle peppers.

It was time for a meatless meal, so I simply left the bacon off these spuds. They spent an hour baking in a 450 oven before being sliced in half lengthwise. After cooling a bit, the potato pulp was scooped out of the skin, leaving just enough attached to retain a sturdy wall. I had forgotten how tedious this process can be, but the potatoes came out of their surgery with nary a tare.

Homemade buttermilk is one of my secret weapons. I never purchase it, as I would end up throwing most of it away. Instead, anytime a recipe calls for the tangy liquid, I add 1T vinegar to 1cup milk and let sit for 5 minutes - and buttermilk is born. I let this mixture ferment while shredding a sharp white cheddar cheese and chopping up green onions and my lovely chipotle peppers. Be warned, depending on the size of your potatoes and the amount you are able to scoop out, you may or may not need all the milk called for. Add everything else first, then slowly add the milk, stirring to see if you need more.

The potatoes and other ingredients can be mashed with a potato masher, or a mixer. Then it is spooned back into the waiting skins, sprinkled with more cheese and onions and baked for 15 minutes.

This was a big hit with both of us, and we were both glad there were leftovers for lunch! Creamy innards, with a crispy potato shell makes the warmth of the chipotles shine. I have no doubt smoky bacon would add great depth to this dish - maybe next time.


Bacon-Chipotle Twice-Baked Potatoes (Adapted from CL)

2 large baking potatoes (about 1 1/2 pounds)
1/2 cup plus 2 tablespoons buttermilk
3 oz (about 3/4 cup) shredded sharp white cheddar cheese, divided
1/4 cup thinly sliced scallions
1 Tbs finely chopped chipotle chile in adobo sauce
3 slices bacon, cooked and crumbled
salt and fresh ground black pepper

1. Preheat oven to 450 degrees.

2. Using a fork, pierce potatoes in a few places. Place into the oven and bake until tender, about 5o to 60 minutes. Remove and set aside to cool slightly. Slice each potato in half lengthwise - scoop out the fresh, making sure to leave a 1/4" thick shell. In a large bowl, add the potato flesh, buttermilk, 2 ounces (about 1/2 cup) cheese, green onion and chipotle chile - mash with a potato masher. Stir in bacon - season mixture with salt and fresh ground black pepper.

3. Evenly divide the mixture between the 4 potato shells. Place filled shells into an 8" baking dish coated with nonstick spray - scatter remaining ounce (about 1/4 cup) cheese evenly over the potatoes. Place into the oven and bake until heated through, about 15 minutes. Remove and let cool slightly before serving.

Tuesday, July 28, 2009

Another soup in the summer


tortilla soup, originally uploaded by Kim De.

What can I say? I am craving soup! And since I dont see it ending anytime soon, there will be a weekly soup rotation!

Last night, it was Tortilla Soup. It has been years since I have made a tortilla soup, but as I remember, this one is far superior.

I wanted to try it in the crockpot, so the procedure as written was thrown out the window. Instead of precooking the onions in oil, I added all the ingredients to the crockpot. Instead of adding shredded, cooked chicken at the end, I added a bone-in chicken breast at the beginning of the cooking time. I had taken the skin and fat off, figuring there was enough fat left on the chicken to add a touch to the soup.

This recipe turned out great! It may come back, once I have made all the soups on my list!

Tortilla Soup (Adapted from Stop and Smell the Rosemary)

8 white corn tortillas, chopped (I used corn, and next time I think I would only use 4)
6 garlic cloves, minced
1/2 cup chopped fresh cilantro
1 medium onion, chopped
28 oz can fire-roasted diced tomatoes
2 Tbs ground cumin
1 Tbs hot chili powder
3 bay leaves
6 cups chicken stock
1 tsp salt
1/4 tsp cayenne pepper
1 bone-in chicken breast, skinned
1 Tbs fresh lime juice

1. In a large saucepan, heat oil over medium high. Add tortillas, garlic, cilantro and onions. Cook until the onions begin to soften, about 3 to 4 minutes. Stir in tomatoes. Bring mixture to a boil and stir in cumin, chili powder, bay leaves and chicken stock. Bring back up to a boil then reduce heat to a simmer. Stir in salt and cayenne - let simmer for about 30 minutes. When ready to serve, remove bay leaves and add in shredded chicken and lime juice. Let sit for a couple minutes for the chicken to warm through.


Comments: I made it in the crockpot, adding everything at the same time. I left out all oil and let the chicken breast, bone-in, cook with the soup. The chicken had been de-fatted and skinned. I cooked on high for 1 hour, then finished for 5 hours on low. After cooling the soup, I took the chicken out and cut the meat off the bone.

Monday, July 27, 2009

Not much cooking this weekend...


Kim with Dogfish Head, originally uploaded by Kim De.

...but for good causes!

Saturday I spent a few hours at the Music City Brewersfest with a good friend. It was fun, and a bit hot, so a hot dinner wasnt in the cards. I had made bread and set it to rise while I was gone. When I got home, I got it ready to bake and when dinner time came around, we decided bread, cheese and wine sounded like a nice light dinner.

The bread was nice, fit it's purpose perfectly. I made Saltgrass Steakhouse Shiner Bock Bread (nostalgia from when I lived in Texas). It tasted just like you expect a steakhouse bread to taste- light and airy with a spongy texture, good developed flavor, nothing amazing but great with butter or cheese.


Sunday we also had a light dinner, as we had spent some time at a bar with pizza and beer and thought vegetables were definitely in order! Flank steak was marinated in red wine and crushed garlic then grilled. With it I made Broccoli and Three Cheese Casserole from Cooking Light.


Broccoli Casserole is one of my favorite dishes from childhood. This was similar, with healthier spins. Brown rice replaces the white, absent is cream-of-ANY soup, and there is much more broccoli. Instead of everything being mixed, the rice is mixed with egg to form a "crust" with the other ingredients layered on top. It was fabulous! Nutty fontina cheese adds amazing depth and while it was drier than I am used to, I could really taste the broccoli, which stayed tender-crisp, making me feel healthy! This one will be used again!


Saltgrass Steakhouse Shiner Bock Beer Bread

1 1/2 cups Shiner Bock Beer (flat)
2 1/2 cups whole wheat flour
2 tsp dry active yeast
1/4 cup warm water
1/2 tsp salt
1/4 cup honey
1/4 cup vegetable oil
1 1/2 cups all-purpose flour

1. Dissolve yeast in warm water in a large mixing bowl. Add honey and stir. Mix in wheat flour, salt and all- purpose flour in bowl. Stir in oil and slowly add flat beer. Mix all ingredients together. Place dough on a floured surface and knead for at least 10 to 15 minutes. The dough may need a little more flour added to it if becomes too sticky. The finished dough will feel smooth and spongy and will not stick to your hands.

2. Place dough in a lightly oiled bowl and cover with plastic until it
doubles in size. Do not place dough in a draft or in an overheated area. The dough should be left to rise at room temperature.

3. When dough has doubled, punch down in the middle and let rest for 5 minutes.

4. Divide dough into four equal parts and shape into round loaves. Place loaves on a lightly oiled cookie sheet. Score twice on top of each loaf with a knife two inches apart and about 2 1/2 inches long. Cover loosely with plastic wrap until the loaves have doubled in size. Place in a preheated 350 F oven, and bake for about 30 minutes.


Broccoli and Three-Cheese Casserole (Adapted from CL)

2 cups cooked brown basmati rice
2 oz fresh grated Parmesan cheese, divided
3/4 tsp salt, divided
1/4 tsp dried nutmeg
1/4 tsp dried thyme
1/4 cup Dijon mustard
1/8 tsp crushed red pepper
1 large egg
1 egg white
3 oz shredded fontina cheese
4 cups coarsely chopped broccoli florets
1 tsp olive oil
1 cup finely chopped onion
2 oz shredded sharp white cheddar
2 large eggs
2 egg whites
3/4 cup milk
1/4 tsp black pepper
3/4 cup panko breadcrumbs

1. Preheat oven to 400

2. In a medium bowl, thoroughly combine cooked rice, 1 ounce Parmesan cheese, 1/4 teaspoon salt, tarragon, thyme, parsley, crushed red pepper, 2 T mustard, egg and egg white. Scoop mixture into a 7 x 11" baking dish lightly coated with nonstick spray. Use a fork to press the mixture into the bottom to form a crust. Evenly scatter fontina over the rice.

3. Steam broccoli just until crisp tender.

4. In a large skillet, heat oil over medium. Add onion and cook until
tender, about 4 minutes. Stir in the steamed broccoli. Scoop broccoli
mixture evenly over rice mixture. Scatter the top with the shredded cheddar.

5. In a small bowl, whisk together eggs, egg white, 2 T mustard, milk,
remaining 1/2 teaspoon salt and pepper. Pour this mixture over the broccoli mixture.

6. In a small bowl, toss together panko breadcrumbs and remaining 1 ounce of shredded Parmesan. Scatter the top of the casserole with this mixture.

7. Bake until set and the top is golden - about 24-28 minutes. Remove and set on a wire rack - let sit for about 5-10 minutes before cutting to serve.

Thursday, July 23, 2009

Thai Night


Red Curry Shrimp, originally uploaded by Kim De.

I want to make Thai food that is as good as at our favorite restaurant. I have tried, really I have. Most other food from our kitchen is MUCH better than that at a restaurant - Thai food we just cant seem to replicate.

Last night I made Red Curry Marinated Shrimp a Bobby Flay recipe from his Boy Meets Grill tv show. Step one, mix the coconut milk with the red curry paste. Taste. Add the onion, cilantro and lime juice. Taste. Add the oil - decide the sauce isnt hot enough, add 1/2 a chopped serrano pepper. Taste.

So far, everything tastes great. I only added 1/2 pepper, not knowing how much heat it would add. I poured enough sauce over the 1 lb of shrimp (it called for 2) to cover it, then put the shrimp in the fridge to marinate.

To the rest of the sauce I added chopped yellow pepper and carrots. I tasted one more time, decided to add the rest of the serrano, then put it in the fridge untl ready to cook *NOTE this would be good with broccoli, green pepper etc. The recipe didnt call for veggies, this was my own addition and I used what was in the fridge**

Thirty minutes before dinner, I put the veggie mixture on the stove to quickly boil, then simmer until the veggies were slightly cooked, but still crunchy. It was raining, so I pan cooked the shrimp before adding it to the veggie mixture. This was spooned over brown rice and served with a nice dry martini.

We both took bites, nicely said it was good, took more bites, then agreed there was a flavor we didnt care for. I mentioned vinegar, he mentioned sour - so the conclusion we came to was the lime juice. It was too prevalent. The sauce wasnt as rich tasting as at our restaurant (plus we really would have liked to have had fresh thai basil at the end, but none to be found.)

This recipe will go into the archives as a "do not use again" and the Thai search continues.

Red Curry Marinated Shrimp (Adapted from Boy Meets Grill)

* 1 (14-ounce) can unsweetened coconut milk
* 2 tablespoons red curry paste *One of these days I intend to make homemade paste*
* 1/2 red onion, peeled and finely chopped
* 1/4 cup chopped fresh cilantro leaves
* 1 lime, juiced
* 2 to 3 tablespoons canola oil
* Salt and freshly ground pepper
* 2 pounds shrimp, shell and tail left on *I used 1 lb and added veggies*

Heat grill to high. Whisk together coconut milk, curry paste, onion, cilantro, lime juice, and oil in a large bowl. Season, to taste, with salt and pepper. Place shrimp in the bowl and toss to coat. Cover and let marinate at room temperature for 20 minutes.

Tuesday, July 21, 2009

Savory Carrot Tart


Carrot Tart, originally uploaded by Kim De.
There are those times you make something because it sounds interesting, but you are really not sure if you will like it because it it so interesting...this Savory Carrot and Tarragon Tart was one of those dishes.

Carrots - like them raw but not usually a fan cooked. Tarragon - not a fan of licorice flavor. Dijon mustard, love it, but with the other ingredients???

All I can say is WOW! This is one of the best tasting things I have made in awhile. The flavors blend, yet are individual. Are subtle, yet POP in your mouth.

This recipe starts out having you make the crust - a snap with a food processor - then pressing it into a 9-in tart pan. **Note: At this time, I only own an 11-in tart pan, more on this later** The crust is then pre-baked in a 350 oven.


Next a thin layer of dijon mustard is spread on the cooling crust. I used closer to 2T - first of all I love mustard, and second, I had a larger area to work with. I used Sierra Nevada Porter and Spicy Brown mustard.

Next comes a layer of shredded cheese. I had a pre-shredded mexican blend, so I used that. Note to self: Next time make a trip to the store for a sharp cheddar! On top of that the sauteed carrots and onions are added

Lastly is the egg mixture which includes yogurt, milk, dry sherry and more tarragon. The tart pan was placed on a baking sheet, then placed in the oven. With the oven troubles I am having, there was definite concern over whether it would bake evenly!

Luckily eggs are pretty easy to bake and by putting it to the far side of the oven and rotating it mid way through, it set up nicely. I let it cool for a few minutes before pushing the removable bottom of the tart pan up and placing it on a cooling rack. I really would have liked to see beautiful scalloped sides on my lovely crust, but with 2 extra inches of surface space, no such luck. I do see a 9-in pan in my future...

I sliced the tart and served it to Bo and our friend. It was a hit! Add a green salad and a nice beer and you have a meal! Thumbs up! On top of it, this is a good prep-ahead dish, and a good make-ahead dish. I cooked the onions and carrots and mixed the egg mixture ahead of time, waiting to put together until the next day. This tart is also good at room temp and cold, so making it ahead of time is also possible. I also think carrots could be subbed with tomatoes, cheddar with feta, tarragon with basil - really several flavor combinations would work with this particular crust, mustard layer and egg mixture - let your imagination run wild!!


Savory Carrot and Tarragon Tart (Adapted from Eating Well)

For the crust

1 cup all-purpose flour
1/2 cup whole-wheat flour
1 1/2 tsp fresh tarragon leaves
1/2 tsp salt
4 Tbs cold unsalted butter, cut into chunks
1/4 cup extra-virgin olive oil
1/4 cup plain yogurt

For the filling

2 Tbs extra-virgin olive
1 cup thinly sliced red onion
1 1/2 cups grated carrots
2 Tbs dry sherry, divided
1 Tbs Dijon mustard
2 oz (about 1/2 cup) shredded white Cheddar cheese
2 large eggs
1/2 cup milk
1/2 cup plain yogurt
2 tsp finely chopped fresh tarragon leaves
salt and fresh ground black pepper

To prepare the crust:

Preheat oven to 350 degrees.

In a food processor, add flours, tarragon and 1/2 teaspoon salt - pulse to combine. Add butter, one piece at a time, pulsing once after each addition. Pour in oil and yogurt - pulse just until combined (it should be crumbly). Scoop the crumbles into a 9" tart pan lightly coated with nonstick spray - evenly press the dough over the bottom and up the sides to form a crust. Place into the oven and bake until the crust is just set, but has not taken on any color, about 15 minutes. Remove and place pan on a wire rack to cool

To prepare the filling:

In a large skillet, heat oil over medium. Stir in onions - cook until tender, about 5 minutes. Stir in carrots and 1 tablespoon sherry - cook, stirring, for 2 minutes. Remove from the heat.

Add mustard onto the bottom of the crust and spread to form a thin layer. Scatter the top with the Cheddar. Cover the cheese evenly with the carrot and onion mixture.

In a medium bowl, whisk together eggs, milk, yogurt, tarragon and remaining 1 tablespoon sherry - season with salt and fresh ground black pepper. Set tart pan onto a baking sheet - pour the egg mixture over carrots and cheese. Place pan into the oven and bake until the center is set and the edges are golden brown, about 40 to 45 minutes. Remove and place pan on a wire rack to cool for at least 15 minutes before serving.

Monday, July 20, 2009

Soup and Bread Night


Broccoli Soup, originally uploaded by Kim De.

What weather we are having - late September weather in July! High today was 74 with no humidity! The soup making was already planned prior to the weather surprise, but what a night to have it!!

This soup was very good! I used fresh broccoli and carrots, using a bit more of both then called for. After the veggies simmered in the broth, several cups were take out and pureed in the blender. I chose to do it this way to make it a bit thicker. The pureed soup was added back to its chunky counterpart. To it was added sharp cheddar and greek yogurt for tang and creaminess. (I didnt have sour cream, but always have yogurt!)

The taste was amazing! I would have liked for the cheese to melt into a creamy texture, but no such luck. However, despite the fact it didnt look thick and creamy, it tasted thick and creamy! And after all, thats all that matters.

To me, soup doesnt work unless it is served with a crusty bread. I found a recipe from Real Simple magazine that looked, well, real simple and seemed perfect for a Sunday night.

In trying to use mostly whole grains, and the fact that my tastebuds prefer the taste of grainy bread, I did some substituting in the flour department. I used 2 cups of white wheat and 1 1/4 cup of whole wheat in place of the white flour called for. A local IPA was used for the beer, rounded out with basil snipped from my garden. I mixed in my Kitchen Aid, then switched to the dough hook for a quick knead/basil mix. I quickly rounded the dough onto a floured peel and since I wasnt quite ready to bake it, I covered it and set it in a warm spot in case it felt like a rise.

The smell of this bread baking drove me crazy! I didnt wait the full 10 minutes to cool, as I was ready for dinner. It was hearty with deep flavor (which I am sure came from the beer) with the basil adding a nice dimension. I really could not taste the parmesan, possibly because of using whole grains, so next time I think I will leave it out. This bread would also be good with chopped green onions in place of the basil, and I am thinking a bit of grainy mustard would add a great flavor!


All in all, a thumbs up dinner!

Broccoli Chowder (Adapted from Eating Well)

1 Tbs olive oil
1 1/2 cups chopped onion
3/4 - 1 cup diced carrots
2 cloves garlic, minced
1 Tbs all-purpose flour
1/2 tsp dry mustard
1/8 tsp cayenne pepper
4 cups vegetable broth (I ended up added approx 3/4 c water also)
3/4 - 1 lb broccoli crowns, cut into 1-inch pieces,
-- stems and florets separated
4 -5 oz grated sharp white cheddar chees

3/4 cup greek yogurt
salt to taste

1. In a dutch oven, heat oil over medium-high heat. Sauté onion, carrot, stirring often, until onion softens, 5 to 6 minutes. Add garlic and stir for 2 minutes.

2. Stir in flour, dry mustard and cayenne. Cook for 2 minutes, stirring often. Add broth and broccoli stems and bring to a boil. Cover, reduce heat to medium, and simmer for 10 minutes. Stir in florets, cover and cook until until broccoli is tender, about 6-10 minutes more.

3. Transfer 2 cups of the chowder to a food processor and puree. Carefully pour back to
the pan. Stir in cheddar and yogurt and cook over medium heat, stirring, until the cheese is melted and the chowder is heated through. Season with salt.


Basil Beer Bread (Adapted from Real Simple)

2 cups White Wheat Flour

1 1/2 cups Whole Wheat Flour

1 1/4-ounce package instant yeast
1 1/2 tsp kosher salt
1/2 tsp black pepper
3/4 cup(3 ounces) grated Parmesan
1 12-ounce bottle beer, preferably ale
Flour for the work surface

1 cup chopped or torn fresh basil

1. Heat oven to 400° F.

2. In the bowl of a standing mixer on low, or in a large bowl using a spoon, combine the flour, yeast, salt, pepper, and Parmesan. Add the beer and mix just until the dough comes together. Turn the dough onto a lightly floured surface. Sprinkle with the basil (or rosemary if subbing) and knead gently just until incorporated. Shape the dough into a round loaf and transfer to
the prepared sheet. Bake until the loaf is lightly browned and a toothpick inserted in the center comes out clean, 40 to 45 minutes. Turn the loaf onto a wire rack. Let cool for at least 10 minutes before slicing.


Saturday, July 18, 2009

Another "tart" night


Tart, originally uploaded by Kim De.

Notice that "tart" is in " " - the reason being this recipe really turns out like a pizza. I have been wanting to make Rustic Onion Tart with Market Cheese and Walnuts from Deborah Madison ever since I heard the name. A good recipe title can reach out and grab me, and this one did its job!

When I began to plan this meal, I was going to make the crust the recipe called for. However when I discovered I had half a recipe of whole wheat pizza dough in the freezer I decided to use that. After all, I was sure the strong flavors of onions, bleu cheese and walnuts could handle the nutty wheat crust!

When it was time, I shaped the crust with my hands, then rolled it to make sure it was very thin. You may have noticed that I dont make my pizza crust round - I like the look of the free form shapes. To the crust I added the mixture of red and yellow onions I had been caramelizing for the past hour.


The crust and onions were baked for about 7 minutes, then out of the oven it came so the rest of the ingredients could be added. I had sliced and crumbled a soft artisan bleu cheese and chopped a few walnuts. Those were sprinkled around the top of the onions to be baked again for about 6 minutes. The "pizza/tart" was slid back out of the oven and cooled for only a few minutes before I needed to slice and try. The recipe calls for arugula to be added at this time, but since I did not have any, I left it out.

I have always enjoyed the flavors of a strong cheese with walnuts and I wasnt disappointed this time. Add the sweetness of the onions and this was a winner. If you notice, I didnt bake as long as was called for - my crust was much smaller and very thin so I adjusted accordingly.


I felt a special yet simple salad was called for with this main dish. I tore up some greens, added a few slices of granny smith apple and a few red grapes, and to tie things in, a small sprinkle of bleu cheese and walnuts. Homemade ranch dressing was drizzled over top. With this dinner a nice hoppy IPA beer was served.


The verdict? Bo said, "We are never eating pizza out again!"

Rustic Onion Tart with Market Cheese and Walnuts (Adapted from Local Flavors)

Local Flavors Pizza Dough (recipe below)
3 Tbs olive oil
3 lbs onions -- thinly sliced
several thyme sprigs -- leaves plucked and chopped
sea salt and freshly ground black pepper
2 oz local blue cheese or Gorgonzola -- crumbled
4 whole walnuts -- shelled and chopped
1 large handful small arugula leaves

Make the pizza dough. While it's rising, heat the oil in a Dutch oven over medium heat. Add the onions and two thirds of the thyme; toss to coat the onions with the oil. Cover and cook until lightly colored, stirring occasionally so they cook evenly, 30-40 minutes. Season well with salt and pepper.

Twenty minutes before it's time to bake the tart, preheat the oven to 450 degrees. Roll the dough into a thin rectangle just large enough to fill a 12x16" sheet pan or into two 12" rounds. Cover the dough with the onions and bake for 12 minutes. Add the cheese and walnuts, and return the tart to the oven until the crust is crisp and the cheese is melted, about 10 minutes. Remove, add the remaining thyme, and cover with arugula. Cut into squares and serve.


Local Flavors Pizza Dough

1 1/4 cups warm water
1 Tbs active dry yeast
pinch sugar
3 cups all-purpose flour -- (more as needed)
1 tsp sea salt
1 Tbs olive oil

Put the warm water in a mixing bowl and stir in the yeast, sugar, and 1 cup of the flour. Set aside until foamy, 20-30 minutes. Lightly oil a clean bowl from the dough.

Stir in the salt and oil, then start stirring in the flour until the dough is fairly stiff. When too stiff to stir, turn it onto a lightly floured counter and knead until smooth and shiny, about 10 minutes. Add more flour as needed. Put the dough in the oiled bowl, turn once to coat, cover with plastic wrap, and set aside to rise until doubled in bulk, about 1 hour.

Roll out into desired shape, top, and bake.

Friday, July 17, 2009

Everyone needs cookies!


Bevs cookies, originally uploaded by Kim De.

Our freezer had run out of cookies, and although neither of us eat a ton of desserts, we both like knowing these cookies are available in an emergency!

I have been making this base recipe for years. I like it so well and it feels so healthy that I have stopped looking for other recipes.

The basic recipe calls for ground oatmeal, whole wheat flour a small amount of butter and oil and chocolate chips. I never grind the oats as I love the texture of having them whole. I am thinking one of these days I will try subbing yogurt for the oil. I always use dark chocolate chips and always cut the amount in half (I'm more about the cookie) Lately I have been adding dried cranberries, which have been a big hit.

This time I took inspiration from another blogger and added some crushed pretzels. I was hoping for a salty depth, but couldnt really tell the difference.

I make a double batch each time. I use a teaspoon scooper to make very tiny cookies. I only cook them for 11-12 minutes as I like them to be a touch soft, plus they are quite small.

I always joke that with the oats, whole wheat flour, dark chocolate and cranberries, these cookies are like eating broccoli!!!

Bev's Chocolate Chip Cookies (Adapted from Eating Well)

3/4 cup rolled oats
1 cup whole-wheat flour
1/2 tsp baking soda
1/2 tsp salt
1/4 cup butter, softened
1/4 cup canola oil
1/3 cup granulated sugar
1/3 cup brown sugar
1 large egg
1/2 cup chocolate chips
1/2 cup dried cranberries

1. Preheat oven to 350°F. Coat 2 baking sheets with cooking spray.

2. In a medium bowl and stir oats, flour, baking soda and salt. Beat butter in a large bowl with an electric mixer until fluffy. Add oil, granulated sugar, brown sugar, egg and vanilla; beat until smooth and creamy. With the mixer running, add the dry ingredients, beating on low speed until just combined. Stir in chocolate chips and cranberries

3. Drop the dough by heaping teaspoonfuls, at least 1 inch apart, onto the prepared baking sheets. Bake cookies, 1 sheet at a time, until firm around the edges and golden on top, about 11-12 minutes. Cool the cookies for 2 minutes on the baking sheets, then transfer to wire racks to cool completely.

Thursday, July 16, 2009

Mmmmm, Bread!


100% Whole Wheat Bread, originally uploaded by Kim De.

Yesterday it was time for more bread. As much as I love making bread, and am loving the learning process of a slow made bread, some weeks you know it just isnt possible. Enter my favorite "quick" bread book Artisan Bread in 5 Minutes a Day.

This book teaches you how to make "no knead" breads; breads where you make the dough, put it in the fridge, and pull it out to cook when ready. Brilliant!!!

This week I made their 100% Whole Wheat Sandwich Bread. This bread is a great whole grain bread. It is soft and great for sandwiches. It has a tight crumb and a slightly sweet taste. And did I mention it is fast to make?

After I mixed the ingredients, the dough was put in the refrigerator to wait until I was ready for it. Yesterday I pulled off half of the dough, shaped it into a ball, and put in my bread pan. After a rest of 1 hour and 40 minutes, it baked for 50 minutes. Cooling bread is my biggest nemesis, but I was a good girl and waited for it to cool completely before slicing off a piece for lunch.

If you are a new bread baker, would like to try baking bread, or are a master bread baker with a busy week, I highly recommend this book! (and to my great excitement, they have a new book, Healthy Bread in 5 Minutes a Day, being released in October!)

100 Percent Whole-Wheat Sandwich Bread

Whole wheat flour has a nutty, slightly bitter flavor, and it caramelizes easily, yielding a rich, brown loaf. Milk and honey are tenderizers, and their sweetness complements the bitter notes. Although we’ve showcased a loaf-pan method here, this dough also makes lovely free-form loaves on a baking stone.

1 1⁄2 tbsp granulated yeast (1 1⁄2 packets)
1 tbsp plus 1 tsp salt
1/2 cup honey
5 tbsp neutral-flavored oil, plus more for greasing the pan
1 1⁄2 cups lukewarm milk
1 1⁄2 cups lukewarm water
6 2⁄3 cups whole wheat flour

1. Mix the yeast, salt, honey, oil, milk and water in a 5-quart bowl or other container.
2. Mix in the flour using a spoon, high-capacity food processor with dough attachment, or a heavy-duty stand mixer with dough hook.
3. Cover loosely, and allow to rest at room temperature until the dough rises and collapses (or flattens on top); about 2 to 3 hours.
4. The dough can be used immediately after the initial rise, though it is easier to handle when cold. Refrigerate in a lidded (not airtight) container and use over the next several days.
5. On baking day, lightly grease a 9-by-4-by-3-inch loaf pan. Using wet hands, scoop out a 11⁄2 pound (cantaloupe-sized) hunk of dough. Keeping your hands wet (it’ll be sticky!), quickly shape it into a ball following the method in Step 5 of The Master Recipe (above).
6. Drop the loaf into the prepared pan. You’ll want enough dough to fill the pan slightly more than half-full.
7. Allow the dough to rest for 1 hour and 40 minutes. Flour the top of the loaf and slash, using the tip of a serrated bread knife.
8. 5 minutes before baking time, preheat the oven to 350 degrees, with an empty broiler tray on another shelf.
9. Place the loaf in the center of the oven. Pour 1 cup of hot water into the broiler tray and quickly close the door. Bake for 50 to 60 minutes, or until deeply browned and firm.
10. Allow to cool completely before slicing in order to cut reasonable sandwich slices.

Makes 3 1 1⁄2 pound loaves.

Wednesday, July 15, 2009

Chipotle Chicken Soup


Soup in July??? I know, I know - but it has actually been a touch cooler than usual here, and I love fall so much sometimes I like to pretend...besides, soup is good food! Again, I need to thank Joe at Culinary in the Desert for the great review which inspired using this recipe!

Last night we had Chipotle Chicken Soup. Easy?? You bet! This soup came together very quickly. The most time consuming part was pre-cooking then shredding the chicken. After that, it is as simple as opening a can of chicken broth, opening a can of beans, opening a can of tomatoes - you get the point.

The recipe called for kidney beans, which I have no love for. I subbed pintos with great results. I would imagine black beans would also be fabulous as well. I made it in advance, chilled it, then re-heated for dinner. I decided to follow the directions and use my potato masher to chunk up the beans and tomatoes and am glad I did. The immersion blender would have made it too smooth.

I chose to wait until the re-heating to add the already cooked chicken. During the reheating process, I added another cup of broth, noticing that the soup had gotten much thicker with the chicken.

As for serving, the recipe called for adding a teaspoon of olive oil to each bowl. I chose not to, and it wasnt missed. I didnt have any sour cream and had used all my cilantro, so this time, there was no garnish. In the future, I can imagine shredded cheese; crushed tortilla chips; chopped green onions...anything your garnish-minded imagination can come up with.

Dinner was served with a homemade sourdough, some cheese, and wine. The chipotle pepper added a touch of smoky heat, but nothing too intense. Next time I will use fire-roasted tomatoes in place of the regular diced. Major smiles and thumbs up were given to this dinner, and this recipe. It will be a keeper!


Chipotle Chicken and Tomato Soup (Adapted from CL)
1 tsp olive oil
2 garlic cloves, minced
1/2 tsp ground cumin
15 1/2 oz can pinto beans, rinsed and drained
14 1/2 oz can stewed tomatoes (I used diced and will use fire-roasted next time)
1 3/4 cups chicken broth
1 chipotle chile, canned in adobo sauce, --finely chopped
2 cups shredded cooked chicken breast
4 tsp extra-virgin olive oil
1/2 cup sour cream
1/4 cup chopped fresh cilantro

1. In a large saucepan, heat oil over medium heat - add garlic and cook until fragrant, about 30 seconds. Stir in cumin, beans, tomatoes, broth and chile. Bring to a boil, cover, reduce heat and simmer 10 minutes. Partially mash tomatoes and beans with a potato masher. Stir in chicken and cook just until heated through, about 2 minutes.

2. To serve, place roughly 1 1/4 cups soup in each of four bowls. Drizzle each serving with a teaspoon of oil, 2 tablespoons sour cream and 1 tablespoon cilantro.


Tuesday, July 14, 2009

Marinated Tuna


Marinated Tuna, originally uploaded by Kim De.

My goal in feeding us in a healthy manner is to have seafood at least one time a week and veggie meals two times a week. I frequently do the seafood on Mondays so it is not left behind. Last night I chose marinated tuna steaks.

This recipe came together very quickly. I soaked an ancho chile for about an hour, then into the blender it went with orange juice, honey, garlic, and a touch of olive oil. The blender mixture was placed in a bowl was joined by toasted fennel and peppercorns with salt and pepper. The tuna was set in the mixture to soak for about 30 minutes while I pulled together the side dish. (NOTE: the recipe did not call for the blender to be used, this is my addition)

You wont find a recipe for the "corn salad" as it is my own concoction. I pull it out when I want something simple to go with southwest flavors. Corn from the freezer is put in a warm pan with chopped garlic. The trick is to saute the garlic without burning, while nicely browning the corn. I try to start on medium-low to cook through then turn the fire up to medium to caramelize the corn.

While the corn was cooking, I chopped part of a red pepper into a bowl and added some crumbled feta. Once the corn is done into the bowl it goes, slightly softening the pepper and cheese. Salt and pepper are added as well as diced green onions.

This recipe is very forgiving - I frequently add a chopped serrano chile, bleu cheese can be used in place of the feta, a dressing of lime juice, honey and olive oil can be drizzled over the warmed veggies - the options are limitless! My favorite way to serve is cooled slightly so it is closer to room temperature. It is also good cold.

Back to the tuna and its marinade: neither of us cared for it. We could not put into words what we didnt like but both agreed simple salt and pepper would have tasted better. It iwll head into my "do not use again" file.


Tuna Steaks with Ancho Chile Marinade (Adapted from Bobby Flay)

2 ancho chilies, soaked, seeded and pureed
4 cloves chopped garlic
2 teaspoons fennel seeds, toasted
2 teaspoons whole allspice, toasted
2 cups freshly squeezed orange juice
2 tablespoons honey
2 tablespoons olive oil
8 sprigs Mexican oregano
4 tuna steaks, 6 ounces each
Salt and pepper

1. Whisk together ancho puree, garlic, fennel, allspice, orange juice, honey, olive oil, and oregano in a medium-baking dish. Add the tuna and turn to coat. Refrigerate for 20 minutes, covered.

2. Heat grill pan over high heat. Remove tuna from marinade and season with salt and pepper to taste on both sides. Sear on 1 side until golden brown, about 1 1/2 to 2 minutes. Turn over and cook for 1 minute for medium-rare doneness.

Sunday, July 12, 2009

Birthday Week - Last Day

Last night was Bo's birthday "party". We had friends over for dinner. The beauty? Everyone brought Indian food, and all I had to do was make the cake! Its fun to have dinner made for you sometimes!!!

Bo made the main dish and veggie side. The recipes came from one of our favorite books 660 Curries. Bo has dozens of Indian cookbooks, but since I bought this one, it is what he reaches for the most. He made Wok-Seared Chicken with Mustard Greens and Spicy Soy Sauce for the main and Green Beans, Potatoes and Eggplant with a Cilantro-Onion Sauce for the side. Along with that there was a beef kabob, dal (lentils), rice with peas and naan. Our friends are great cooks, my husband is a great cook, so all in all, a FABULOUS dinner with friends, food, drink and music!

Like any recipe made from 660 Curries, these were top notch! We subbed spinach for the mustard greens in the chicken dish. The flavor of this dish is outstanding.

The green beans called for 4 serrano chilies. You can never predict how hot a pepper will be and in this case it made the dish VERY spicy (and we LOVE spicy food!), but a touch of yogurt helps to cool things down.


Dessert was Bourbon Espresso Cake. This cake was very easy to make. It was moist and buttery (I actually think the butter could be cut down a bit) and very full flavor. I used decaf coffee (a rich locally roasted bean) and opted for no frosting. Instead I served it warmed slightly with a scoop of vanilla bean ice cream.


***NOTE when making Indian food, Bo always makes ahead, chills, then re-heats. It helps the flavors develop more. A big plus is it makes it easy to have dinner ready when your guests arrive!


Green Beans, Potatoes and Eggplant with a Cilantro-Onion Sauce (Adapted from 660 Curries by Raghaven Iyer)

6 servings

1 large tomato, cored and coarsely chopped
1 medium-size red onion, coarsely chopped
½ cup firmly packed fresh cilantro leaves and tender stems
4 fresh green Thai, cayenne or serrano chiles, stems removed
1 large white potato, such as russet or Yukon Gold, peeled, cut into 2-inch cubes, and submerged in a bowl of cold water to prevent browning
2 tablespoons canola oil
12 small purple Indian (or 1 large Italian) eggplants (about 1½ pounds total), stems removed, cut into pieces 2 inches long, 1-inch wide, and ½- inch thick
4 ounces fresh green beans, trimmed, cut into 1-inch lengths
2 teaspoons coarse kosher or sea salt

Plop the tomato into a blender jar, and then add the onion, cilantro, and chiles. If the tomato is juicy, it will provide ample liquid for the blender blades to function. If it isn’t, you might need to add ¼ cup water. Puree to form a light purple-red sauce with flecks of green.

Drain the potato and pat it dry with paper towels.

Heat the oil in a large saucepan over medium heat. Carefully add the potato and stir it around. Cover the pan to contain the spattering, and cook, stirring occasionally, until the potato cubes are evenly browned with a slightly crispy skin, 5–10 minutes.

Pour in the sauce, and scrape the bottom of the pan to deglaze it, releasing any browned bits of potato. Stir in the eggplant, green beans and salt. Heat to a boil. Then reduce the heat to medium-low, cover the pan, and simmer, stirring occasionally, until the vegetables are fork-tender, 20–25 minutes. Serve.

Wok-Seared Chicken with Mustard Greens and Spicy Soy Sauce (Adapted from 660 Curries by Raghaven Iyer)

4 servings

1 T tomato paste
1 T soy sauce
1/2 t sea salt
1/4 t Chinese five-spice powder
1 lb boneless, skinless chicken breasts, cut into 1/2-inch cubes
1 T cornstarch
8 T canola oil
8 oz fresh mustard greens, well rinsed, finely chopped and patted dry.
2 large cloves garlic, finely chopped
3-5 fresh green thai, cayene or serrano chilies, to taste, stems removed, cut in half lengthwise (do not remove the seeds)
2 T finely chopped fresh cilantro leaves and tender stems.
3 scallions (green tops and white bulbs), cut into 2-inch lengths

1. Stir the tomato paste, soy sauce, salt and five-spice powder together in a small bowl.

2. Toss the chicken and the cornstarch together in a medium size bowl.

3. Heat a wok or well seasoned cast iron skillet over high heat. Drizzle 2 T of oil down the sides of the pan. When it forms a shimmering pool in the bottom, add the chicken and fry, stirring constantly until the chicken turns reddish brown and is no longer pink inside, 5-8 minutes. Transfer the chicken to a plate.

4. Trickle 2 more T oil down the sides of the wok. Add half the mustard greens. Stirfry until they are wilted, 2-4 minutes. Add this to the chicken. Repeat with the remaining greens.

5. Now drizzle the remaining 2 T oil into the wok and quickly stir-fry the garlic and chilies. The garlic will brown within seconds. Add the tomato paste mixture and stir to warm it, about 30 seconds.

6. Return the chicken and greens to the wok and stir well to combine. Once the chicken feels hot to the touch, 2-4 minutes, stir in the cilantro and scallions.


Bourbon Espresso Cake
NOTE- I made only half of this recipe. It was perfect size for 8 people.

7 (1 oz) squares unsweetened cooking chocolate
3/4 cup butter
1 1/2 cup strong coffee
1/4 cup bourbon
2 eggs
1 tsp vanilla
2 cup cake flour
1 1/2 cup sugar
1 tsp baking soda
1/4 tsp salt

1. Grease 2 8 ½ X 4 ½ in loaf pans

2. Put the chocolate, butter and coffee in a heavy saucepan. Place over low
heat, stirring constantly, til chocolate is melted then stir until blended.
Set aside to cool for 10 minutes. Beat in bourbon, eggs and vanilla. Sift
dry ingredients together and beat into chocolate mixture until well blended.
Divide batter between prepared pans and bake 275 for 45-55 minutes. Cool
for 15 minutes then turn out to cool completely.


Never fear if you dont have cake flour. I used the technique from King Arthur below to make my own!

Cooking Tip: A second way to lighten a cake made with King Arthur Flour is to approximate the characteristics of “cake flour” more closely. To do this, spoon 2 to 4 tablespoons of cornstarch into a one cup “dry” measure. Sprinkle in your King Arthur Flour until it is full and scrape off the
excess with the back side of a knife. Blend this thoroughly and you’ll have pure, golden, never bleached, never bromated King Arthur “Cake” Flour. While this technique will produce lighter cakes, many King Arthur fans use our flour straight because they prefer “King Arthur Cakes.” And many of us who prefer robust cakes use some whole wheat flour in place of unbleached
all-purpose


Saturday, July 11, 2009

Friday Night Pizza

Good Saturday Morning!


Last night we had plans to go out in the world where people are - both being somewhat homebodies (me more than him) we dont always do that - so a quick, light dinner was called for. With this being "meat week" I had to do a non-veg pizza, so I settled on a Cheeseburger Pizza I saw on Culinary in the Desert. Bo isnt nearly as enamored with pizza as I am, so I try to make those that he will like (read: have meat).


I made a whole wheat crust. I usually make the 16 oz version, then use half, freezing the other half for next week. We like it thin and crisp, so I roll it out as thin as I can. I spread my favorite marinara on top (Thanks Alysha!) then sprinkled on the browned ground beef. A thin layer of shredded cheese followed (did I mention Bo isnt a huge cheese fan!!!!). I mixed a smoked mozarella with a sharp cheddar. The pizza was slid into a 500 degree oven onto our stone for a 9 minute bake.

I am having oven issues right now: the temp isnt calibrated correctly and I have to preheat down 5-10 degrees each time. I have three (yes, THREE) oven thermometers inside right now trying to discover the correct temp adjustment but at this time they are NEVER in sync with each other, so frustration runs rampant when I am baking. Why am I telling you all of this? Because I forgot to adjust the temp the obligatory 5-10 degrees and the pizza got a touch crispier then I would like, but it is probably nothing anyone else would notice. In fact tonight's comment was "we should never eat pizza out again!" Pretty good for a guy who "doesnt like pizza!"

A slice with a small salad and we were out the door to a Blues Club for the evening!

Just for fun, I added a pic of this morning's breakfast. Sometimes I get inspired by leftovers - they scream to me: "ADD ME TO EGGS!!!" This morning I obeyed. One half of a crab cake and a few stalks of asparagus from Thursday nights dinner were chopped up and tossed into a frying pan. A sprinkling of pancetta crumbs was added along with some Black and Red Spice mix from Penzeys. The eggs were beaten with a touch of crumbled feta, then added to the hot pan until just cooked and soft. I served breakfast with muffins from the freezer.


Cheeseburger Pizza (Adapted from Canadian Living and Culinary in the Desert)

***NOTE: Since I made a smaller pizza, I used only half the porportions of all ingredients!***

8 ounces ground sirloin
1/2 cup chopped onion
3 garlic cloves, minced
1/2 teaspoon dried oregano
1/4 teaspoon fresh ground black pepper
1/4 teaspoon salt
16 ounces prepared whole-wheat pizza dough
1/4 cup marinara sauce
3 ounces shredded mozzarella cheese
3 ounces shredded white Cheddar cheese

Preheat oven to 500 degrees with a pizza stone placed on the lowest rack.

In a medium skillet, add beef, onion, garlic, oregano, salt and pepper - cook over medium-high heat, stirring often to crumble the meat, until beef is no longer pink, about 5 to 6 minutes. Remove from the heat, drain off fat, if necessary, and set aside.

Stretch and roll out pizza dough to a rough 12" circle on a lightly floured surface. Sprinkle enough cornmeal to lightly cover a pizza peel and transfer the dough on top.

Spread sauce over dough - scatter the top evenly with the cooked beef mixture. Sprinkle the cheeses evenly over the top. Slide the pizza onto the stone and bake until the cheese has melted and the crust is golden, about 10 minutes. Remove and transfer pizza to a wire rack to cool slightly before serving.

Makes about 4 servings.


Friday, July 10, 2009

More from Bo's Birthday Week

Bo loves seafood, so to continue his birthday week, I made scallops from my friend at The Global Kitchen. Tonight's dinner was officially Grilled Scallops with Pancetta and Basil Aioli.

I started Wednesday by making the marinade, prepping the scallops and making the aioli. Dinner was served with roasted asparagus and crab cake - dont be too impressed - the crab cakes were an "impulse buy" at the meat counter of the store!

I followed this recipe exact, except I pan cooked the scallops (having grill troubles). I found the aioli to be too "heavy" on the tongue. I think the olive oil may have been too much for the rest of the delicate ingredients. Next time I would try a canola oil. The asparagus were roasted with a "rub" of olive oil, lemon juice, spicy mustard, salt and pepper. The crab cake was pan seared then baked to finish it off.


Bo was impressed. He called it a "fancy" dinner. Thumbs up!

Grilled Scallops with Pancetta and Basil Aioli (Adapted from Fish and Shellfish Grilled and Smoked by Kearen Adler and Judith Ferto)
serves 4

1/2 cup extra virgin olive oil
2 cloves of garlic, minced
1 tbs cracked black peppercorns
1 tbs lemon juice
1 1/2 lb sea scallops
1 cup basil aioli
4 thin slices of pancetta

A day in advance combine the olive oil, garlic, peppercorns and lemon juice in a resealable plastic bag and marinate the scallops overnight.

Make the aioli a day in advance.

Prepare a hot fire

Meanwhile cook the pancetta in a skillet over med-high heat until crisp. Drain on a paper towel.

When ready to grill remove the scallops from the grill and place on the grill for about 3 minutes before turning. If the scallops stick, cook them a little longer until they turn easily.

After turning cook a little longer until they are heated through, 1-2 minutes.

Spoon 1/4 cup of the aioli onto 4 serving plates and spread around. Arrange scallops on top and sprinkle with the crumbled pancetta.

Basil Aioli

The original recipe calls for nuking the yolks for 15 seconds. I tried this and ended up with cooked yolks. I make mayo and aioli's all the time with raw yolks and have lived. But if it bothers you or if you are elderly, pregnant, an infant or have a weakened immune system use pasturized egg yolks.

2 large organic egg yolks
1 tbs fresh lemon juice
2 anchovy fillets, minced
2 garlic cloves, minced
2 tbs chopped basil leaves
1/2 tsp Worcestershire sauce
1/2 tsp red wine vinegar
1 cup extra virgin olive oil
sea salt and Tabasco to taste.

Whisk egg yolks together and whisk in add lemon juice through vinegar.

Slowly drizzle in olive oil whisking all the while. When mixture has thickened, season with salt and Tabasco to taste.

If the mixture gets too thick, thin with a little warm water.

Keep tightly covered in the refrigerator for up to 3 days.

Wednesday, July 8, 2009

Chili Night


After a break in the action, I was back in the kitchen again yesterday. Our new tv arrived yesterday and some friends came over to help Bo unbox and lift it. We invited them to stay for dinner (in my book, any excuse to have company!) I felt like making soup and since this is BIRTHDAY WEEK for Bo, he got to decide what he wanted.

He settled on a Chicken White Bean Chili. There is always a difference in opinions/cultures in our house when chili is made: I feel cornbread is called for, he thinks it should be eaten with rice. The plan was to have both, but at the last minute he decided he could do without rice this one time.

The chili was a hit for most. I was only slightly enamored with it, but then again I'm not a huge fan of chicken chili. I followed the recipe exactly except for using fresh serranos in place of the canned chilies. My changes will be in ().


Next comes the cornbread. Not difficult, right? I have made cornbread hundreds of times... when I went to the storage fridge to get my cornmeal, I discovered it was a coarse grind. Since that is what I had, I figured I would try it. I made a cornbread from the book Cornbread Gospels which has received rave reviews on the CLBB. What it looked/tasted like was something eggy with some cornmeal added. I wanted to try again, so I tried to grind the cornmeal in the blender and use a different recipe (just in case). This time I tried one from Cooking Light. Same outcome. Cornbread #2 also in the trash. At this point I am becoming frustrated - I DIDNT want rice with my cornbread! :) I opened a book I have called Breads of the Southwest. I found a recipe for Blue Corn Bread and since I knew I had a fine grind blue cornmeal, I decided this must be the one "meant to be". Luckily this one turned out right (since I was now out of eggs). It browned nicely and had the right texture. My only change was to sub yogurt for the sour cream.


Ive had cornbread with more depth of flavor before, but with a touch of honey added to the slice, it was a good side for the chili.

My last recipe of the day was pulled from Culinary in the Desert, which was adapted from Cooking Light. I am a huge fan of broccoli slaw and am always looking for a new one to try and this one did not disappoint! I figured we were having "fall foods" so I would round out the menu with this fall inspired dish.


Broccoli slaw is tossed with dried cranberries then dressed with a vinegar based sauce. After sitting for a few hours, I decided to drain some of the liquid off and add a touch of mayonnaise - not enough to taste, just to help bind. Just prior to eating, sliced tart apples and toasted pecans were added. This got 5 thumbs up and will be made again!

With this being BIRTHDAY WEEK, dinners at home aren't as prevalent, and with today being the BIG DAY, we will be having dinner out tonight. The party with friends will be Saturday complete with yummy Indian food and a cake. In the meantime:

HAPPY BIRTHDAY BO


White Bean and Chicken Chili (Adapted from All of You)


2 (15 oz.) cans white beans, rinsed and drained
4 cups low-sodium chicken broth
1 tablespoon vegetable oil
2 whole bone-in chicken breasts (3 lb.)
Salt and pepper
2 onions, chopped
4 cloves garlic, chopped
2 (4 oz.) cans roasted green chilies, drained (I used 2 fresh chopped serranos)
1 tablespoon ground cumin

Place beans and broth in a slow cooker. Cover and cook on high until beans are tender, 2 hours.

Warm oil in skillet over medium-high heat. Sprinkle chicken with salt and pepper. Place chicken skin side down in skillet; cook until brown, about 4 minutes. Turn and cook for 2 minutes more. Transfer to a plate; remove and discard skin. Drain all but 2 Tbsp. fat from skillet. Add onions and garlic; cook until softened, 5 minutes. Add onion mixture, chilies, 1 cup water and cumin to slow cooker. Stir; add chicken.

Cook on low for 6 hours, stirring twice. Remove 1 cup beans plus 1/2 cup liquid from slow cooker. Puree in a blender; return to slow cooker. Remove chicken, shred it and return to slow cooker. Spoon into individual bowls and serve

Yield: 6 Servings


Blue Corn Bread (Adapted from Breads of the Southwest)

1 cup unbleached all-purpose flour
1 cup fine grind blue cornmeal
2 t baking powder
1/2 t baking soda
1/2 t salt
1 1/4 cups sour cream (I used yogurt)
1/4 c corn oil (I used canola)
2 large eggs

Preheat oven to 375. Grease a 9-in springform pan or pie plate.

In a medium bowl, combine the flour, cornmeal, baking powder and soda and salt. In another bowl whisk together the sour cream, oil and eggs. Add to the dry ingredients and stir until just blended. The batter will be very thick. Take care not to overmix. Spoon the batter into the pan.

Bake 25-35 minutes or until golden around the edges and the top is dry and springy to the touch. a cake tester will come out clean. Let stand in the pan 15 minutes before cutting into wedges to serve.


Broccoli, Cranberry, and Apple Slaw (Adapted from CL)

5 cups broccoli slaw
1/2 cup dried cranberries
1/3 cup rice vinegar
1/3 cup sugar
2 Tbs white wine vinegar
2 tsp olive oil
3/4 tsp salt
1/2 tsp coarse cracked black pepper
2 1/4 cups thinly sliced tart apples
1/4 cup chopped pecans, toasted

1. In a large bowl, toss together broccoli slaw and cranberries.

2. In a small bowl, whisk together rice vinegar, sugar, white wine vinegar,
olive oil, salt and pepper. Drizzle over broccoli mixture and toss gently to
coat. Cover and chill 2 hours. Mix in apple slices. Scatter the top with the
toasted pecans.


Posted by Picasa

Monday, July 6, 2009

Back in the kitchen

We spent the weekend in IN with the family. Here are a few photos:

My little great-niece - notice the William-Sonoma catalog - she is a foodie in training!


Bo with my nephew Skyler


Our dog, Foxy, is not happy about the small creatures (children) walking around the house!


When we came home, I wanted something quick and easy for dinner. I had a small sourdough pizza dough in the freezer as well as some smoked pulled pork. I made a quick BBQ sauce, did a saute on the chopped green peppers and onions and shredded a smoked gouda.

I had trouble rolling out the dough - it was almost "watery" - it wanted to pull apart so I had to work very carefully with it. After baking it for 5 minutes, I turned it over, spread the bbq sauce on and sprinkled the pulled pork. I added the sauteed veggies and shredded cheese and baked it for 10 more minutes. Turned out pretty good, altho Im not sure I like sourdough with the toppings. I think the wheat crust I use would have been better.


This morning I started on dinner for tomorrow night. I will be out tonight, so no food review. However tomorrow we are having company so will be having a larger dinner than usual.

Sneak "peak" into tomorrow night: I am making a Chicken White Bean Chili, Ozark Cornbread and Broccoli Slaw. Dessert will be a simple Banana Chocolate Chip Muffin, seen below.


Reviews, pics and recipes to be posted Wednesday morning. Hope everyone had a great 4th!!!